

Stop Tossing Old Rubber Floor Mats — Use Them To Give Your Front Door An Upscale Look

We may receive a commission on purchases made from links.
If you're stuck wondering whether your front door stands out enough, maybe it needs a little more design and detail. Making this happen doesn't need to break the bank, though. If you have a couple of patterned outdoor rubber floor mats, like these DII Natural Wrought Iron Rubber Doormats, you can make good use of the Victorian-era design by transforming the mats into ornamental accents for the panels on your front door. You simply cut the mats to fit the panels, glue them in place, and paint them. In no time at all, they will resemble the decorative wrought iron detailing you often see on antique wooden doors.
Aside from some rubber mats, what you'll need to make this design project happen is a cutting tool, adhesive, paint, and optional surface texture products. If you're working with thick rubber mats, a cordless power cutter can make swift work of dismantling them, but a sharp box cutter should suffice in most cases. You should also get a metal ruler or anything with a solid, straight edge you can use to make sure you cut the mats nice and straight. Ideally, use contact cement to adhere the rubber to your door, especially if the door is made of wood — something like Bondtech Contact Cement Adhesive would work well. Lastly, if you want to paint the rubber mats a specific color, get yourself some acrylic or tire paint, both of which are less likely to peel off over time.
How to repurpose an old rubber mat into ornate door panel decor
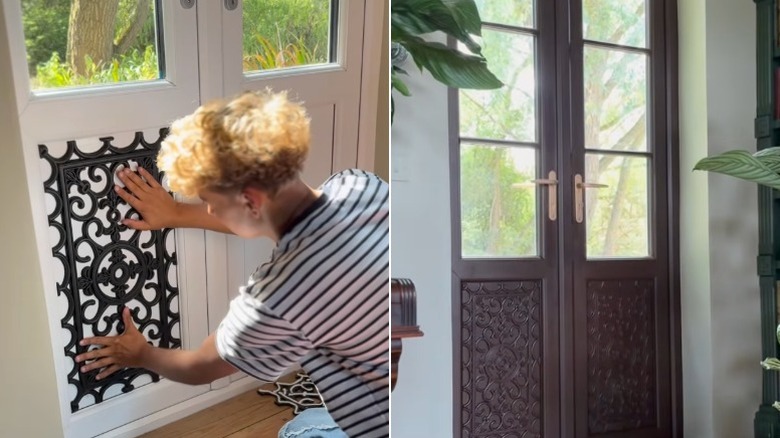
Wash the dirt from your rubber mats with a garden hose on high pressure, focusing the jet of water on hard-to-reach areas. Next, scrub the mats with dish soap and water and rinse them thoroughly. Be sure to avoid the mistake everyone makes when cleaning rubber mats — using polishing products on them. After the mats are clean, measure the panels on your front door, then use those dimensions to cut the rubber mats to fit with a power cutter or a sharp box cutter guided by a metal ruler.
Before applying adhesive to the back of the mat pieces, hold them up to the door panels to make sure they fit neatly. If everything looks right, apply contact cement liberally to the back of the mat pieces, including the grooves and edges, to make sure they stay stuck. Contact cement works best when you apply the product to both surfaces and let it dry for a bit until it feels tacky. Then you can stick the mat pieces to the door panels. Now, you can take this project up a notch and paint both the mat pieces and the door a uniform color.
This simple swap will give your front door a stylish upgrade as is, but there's no reason you can't modify the design to suit your door's style. You could, for example, paint the mat pieces in a new vibrant color or add some texture to them, like gold leaf or a distressed wood look, before sticking them onto the door panels. Finally, if you want to add some defining touches to your front door, you could switch out the modern doorknobs for vintage-style fixtures or hang a wreath front and center for a seasonal vibe.