

You Don't Need A Paint Tray: A Clever Alternative That Holds More Paint

We may receive a commission on purchases made from links.
Do you really need a bunch of new tools to paint a wall? Sure, you need a paintbrush or roller and paint, but do you actually need the tape, tarps, paint tray, and scraper? In many cases, you do, but you don't always have to buy them new. You might be able to DIY them using items you already have at home. After all, painting your room is supposed to be a cheap makeover, so budget-friendly hacks are always welcome. For example, there's a simple, clever way to DIY a paint tray: line a plastic drawer with a plastic bag.
A paint tray kit typically costs less than $20, but if you don't paint often, it's kind of a waste of money. If you get a single-use paint tray, you're pretty much throwing your money away. If you get a reusable paint tray before your next big DIY project, you might be spending more than you need to. Plus, when you're finished painting, you have to find somewhere to store the tray. On top of being more economical, this DIY paint tray made from a drawer also holds more paint than a standard paint tray because the walls are higher, making it especially helpful for large rooms and big paint jobs.
To make this paint tray, you need a few materials. First, a plastic drawer from a desk organizer. It needs to be flat, rectangular, and big enough for the roller to fit into it. More importantly, the drawer should have four walls, like these from the Iris USA Three-Drawer Medium Plastic Stacking Desktop Organizer. You'll also need a plastic shopping bag or trash bag as big as the drawer, as well as some painter's tape or double-sided tape.
How to DIY a paint tray out of a plastic drawer
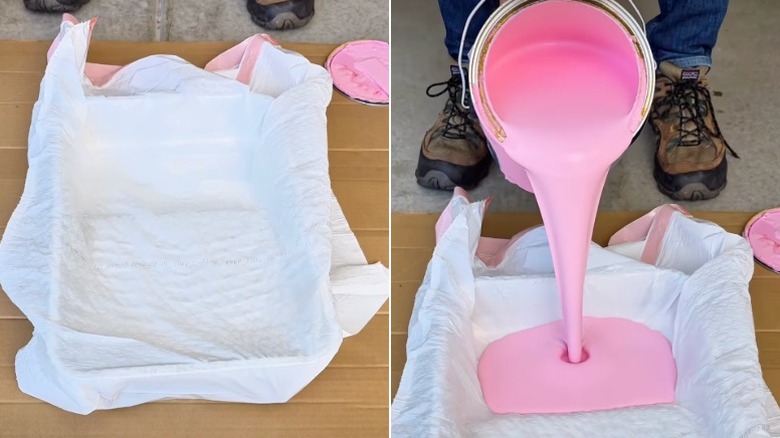
In order to paint your home like a professional, just pull one of the drawers out of the unit and empty the contents into a separate bin for the time being. Add some double-sided tape to the bottom of the drawer, or roll up some painter's tape to act as double-sided tape. Apply the tape to all corners and edges as well, so that the plastic bag won't budge as you use the roller on it.
Finally, attach the plastic bag to the bottom of the drawer. The best way to do this is to place your hands into the bag, creating a rectangle along the bottom, then press the plastic onto the double-sided tape. Fold the sides of the bag over the walls of the drawer. Press on everything to ensure it's firmly in place, then fill the plastic bag-lined drawer with paint. When the job's done, you'll be able to let the paint on the plastic bag dry, remove the bag from the drawer, and toss it in the trash. Then, you can put the plastic drawer back into your organizer as if nothing happened.
If you struggle with the plastic bag technique, you could cut the plastic bag into a sheet and use it that way instead. You won't have to deal with any awkward angles or weird flaps of plastic. Or try swapping the bag for something else entirely. For example, you could cover the drawer with several layers of plastic wrap, making sure there are no gaps for the paint to leak through. Another option is to use aluminum foil sheets larger than the drawer — again, ruling out any gaps.