

Couple Uses Colorful Cellophane Wrap To Make A Basic Privacy Screen Look Like Stained Glass
We may receive a commission on purchases made from links.
Stained glass window panes evoke the beauty and grandeur of sunlight flowing through ancient churches and whimsical castles. The comfort and inspiration those colorful panes inspire in the heart is real. So are their price tags, unfortunately. A custom or vintage stained glass panel can cost hundreds, let alone a large wall or room divider. Saving up for such an iconic piece is, of course, an option. DIYers, however, might not have to wait quite as long to get a divider screen, provided they make one like the couple Amy and Matthew Dunk shared on TikTok. These talented crafters transformed a standing room divider screen by removing the old fabric and gluing colorful cellophane into each of the screen's rectangular panels. The project was originally made as a backdrop for the couple's wedding ceremony, but it's stunning enough to bring joy to any home year-round. It was even noticed by The New York Times.
Amy and Matthew's paneled room divider came from Facebook Marketplace. Other options for finding a decorative room divider include thrift stores, online auctions, and Craigslist, or you can pick up one like this Roundhill Furniture Shoji Four Panel Room Divider. To create the stained glass look, you'll need colored cellophane, like these Ahardaim 12-Inch by 12-Inch Colored Cellophane Sheets, which should be easy to hold onto as you're trimming each cellophane square to size. Lastly, you'll need Mod Podge or another strong but workable, clear-drying glue. Like any good DIY, this one also calls for a few tools. You'll need a utility knife, plus a craft cutting board. The DIYSELF 12-Inch by 18-Inch Cutting Mat is a good example. Grab a craft paint brush, a disposable container or bowl, some paper, a set of colored markers, and a ruler or measuring tape, too.
Creating your stained glass privacy screen
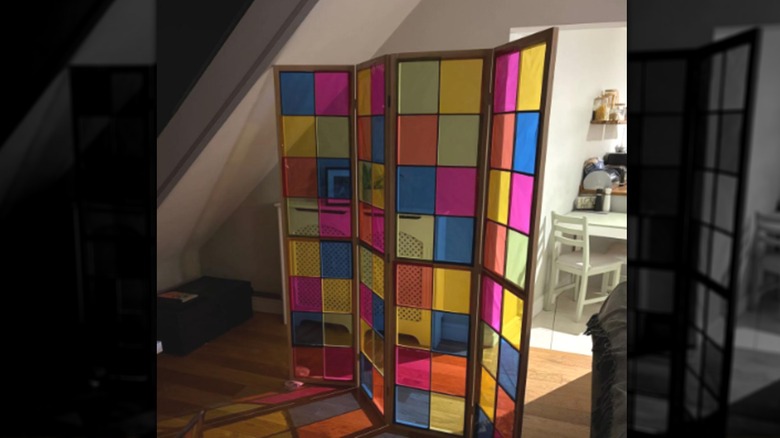
Although Amy and Matthew Dunk started their DIY by removing the fabric panes from the screen, you may want to begin with one of their other steps: drawing a map on paper of where you'd like each color of cellophane to go in the frame. This will help you plan how many squares you'll need to make of each color and ensure that no two adjacent panes are the same. Once that's done, take the old material off of the divider frame. Use the blade of your utility knife and some needle-nosed pliers to remove the staples, if present.
Next, measure and cut the squares of cellophane, making them slightly larger than each panel space. The edges will need to overlap the wood frame enough to glue, but not so much that they hang into the next square over. Use a craft brush to apply Mod Podge to the wood frame. Then, attach a square of cellophane to each pane, pressing the edges into the glue and pulling on the plastic so that each pane dries taut. Repeat for every panel space. Once the screen is done, use it against a window to make a small space shine or to divide a larger space without blocking light.
In the couple's version of the craft, Amy and Matthew used simple colored cellophane. However, you have some other options. For example, if you'd like to make a decorative screen backdrop for a holiday party photo booth, place holiday-specific colors in the windows, like orange, yellow, and brown for your fall holiday party decor or red and green come Christmas time. There are other alternatives, too, like cellophane rolls with patterns, words, or holiday characters on them.