Creative Ways You Can Repurpose Your Old Furniture
There it sits in your garage: Grandma's old dresser, that table with the broken leg, the cute vintage chair that's lost its stuffing. You can't part with these furniture pieces because you love them, but using them as-is isn't an option either. So what can you do?
While there are many quick and easy options to update old furniture, whether it's a fresh coat of paint or decoupaging it with decorative paper, some pieces just can't be salvaged to be used again for their original purpose. The trick is to look beyond that purpose and discover the item's potential to become something else. If your old piece of furniture has good bones, you can give it a new lease on life with a little creativity and turn it into something entirely new — and spectacular.
There many furniture repurposing projects that you can accomplish with limited carpentry skills, but some more complicated conversions might require the help of a professional, so make sure to honestly assess your own abilities before starting and ask for assistance when necessary. Here are 10 creative ways you can repurpose your old furniture.
Turn an old dresser into a charming bathroom vanity
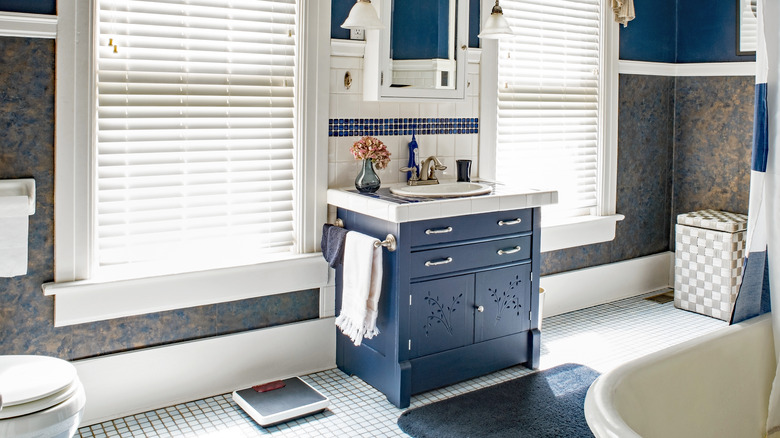
If your bathroom vanity is looking tired and you have a dresser or buffet that's no longer being used, solve two problems at once: Turn the unused furniture into your bathroom cabinet. It'll give your bathroom character and save money.
Note that the vanity has to be the correct height to be functional, per My Old Country House. The standard bathroom vanity height is between 30 and 32 inches (via Cabinet Now), but modern homes can have vanities as high as 36 inches. So, when choosing a piece to use, make sure it's either within that range or is adjustable by adding (or removing) feet.
Another consideration is whether to use a drop-in sink, which needs a hole cut out, or a vessel sink, which sits on top of the vanity, notes My Old Country House. Vessel sinks require less adjustment to the inside of the cabinet, but, with both sink types, the piece will need to be adjusted to allow for plumbing. Postcards From The Ridge notes that you'll want to hire a carpenter to do this if you're not handy with a saw. With vessel sinks, keep in mind that the overall height of the vanity should take into account the sink height, too.
You can paint the piece or leave it as-is, but, either way, the wood top will need to be sealed with several layers of polyurethane or water-resistant varnish (after painting). You might want to hire a plumber to install the sink and faucet and connect the plumbing just to make sure that everything is done correctly and won't leak.
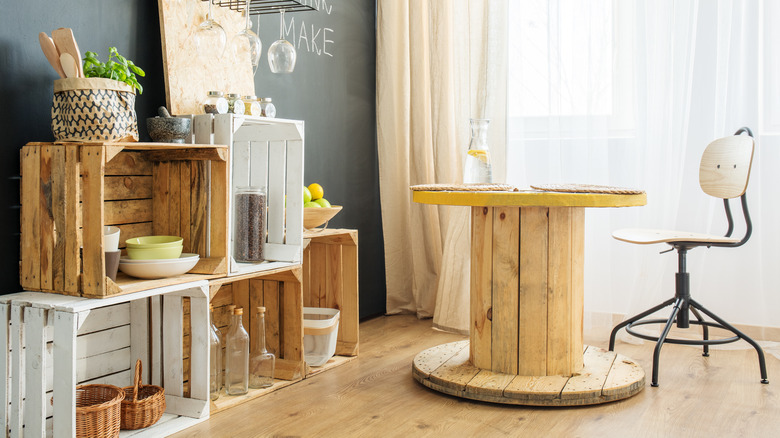
Create a vintage pet bed for your best buddy
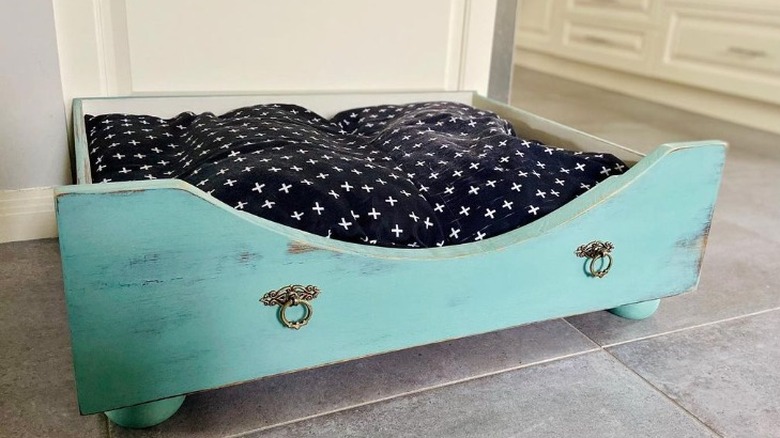
If your dresser has seen better days but the drawers are still usable, pull one out, and make a pet bed for Fido. You'll want a drawer that is solid and secure, including strong joints. You can choose to remove the hardware or leave it on if you like the look. Depending on the size of the drawer — or the dog — you might want to screw in supportive bracing across the bottom to reinforce it, either with slats or a solid piece of plywood. If you don't need a plywood base, glue small squares of wood to the inside corners, notes DIY, to make sure you have something solid to screw the feet into.
The process is simpler if you buy feet with pre-installed screws that you can then insert into pre-drilled holes. But, if you want to use a different type, use long screws, and screw the feet on from inside the box at a downward angle. You'll want to sand the box to make sure there aren't any sharp edges and then paint and decorate it. Insert a pillow or cushion for the finishing touch.
You can also repurpose an old wooden soda crate in this same fashion if you have a small furry friend.
Craft a little speakeasy from your old music maker
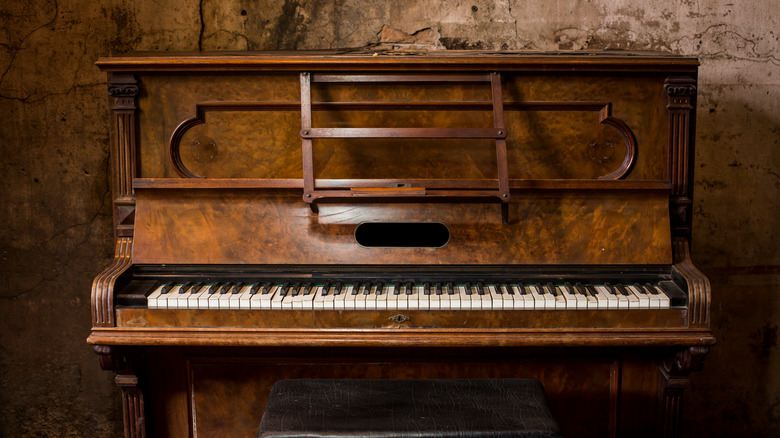
That pretty old piano that's unplayable can turn into a stylish bar with a little bit of DIY. Upright pianos and those with a deeper case are best so there's more space to store your bar supplies, per Life on Beacon. Ideally, you'll want to repurpose a piano with panels or a pull-out sheet-music rest to reuse as cabinet doors.
The first step is to remove the hammer mechanisms. An Amazing Machine provides a great how-to tutorial, but you might need help to remove some of the heavier pieces. Leaving the string mechanisms on the back adds a fun detail that doesn't take away any space, but they can be removed as well, if desired. Once it's disassembled, clean the piano thoroughly, and paint it if you want.
Then it's about being creative and customizing your bar setup. While you probably want to insert a shelf above the keys, you also can screw a wine glass rack to the top lid. Some people also remove the keys and use that area to store various bar tools like stir sticks or corkscrews, Home Jelly writes, and others cut the bottom panel by the foot pedals to create extra storage. You can leave the front panels off or attach them with hinges so you can hide everything when it's not in use, opening it for a fun surprise for guests.
Take a seat in your old chest of drawers
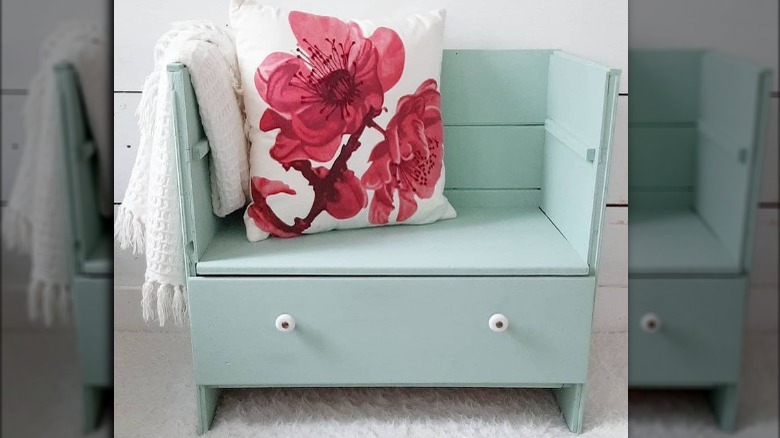
We can be pretty hard on dressers. The surface sees plenty of wear and tear, and, after years of being pulled in and out, the drawers can lose their shape. If you have a dresser that's worse for wear, you can repurpose it into a cute seat with storage underneath — great for putting on your shoes and storing small items like scarves, hats, and umbrellas. While smaller dressers require less carpentry, it's possible to do this project with larger pieces as well.
Take out the top drawer or as many drawers as needed to make the seat a reasonable height; also remove any dividers and drawer guides, Hometalk notes. Then, cut off the top, but leave the sides for armrests. Furniture Flipping notes you can even cut the entire cabinet in half and rebuild the arms, but that will require a little more woodworking. You'll need to reinforce the seat bottom with wood — if it's solid, you can use the top of the dresser as the seat — and add armrests, either with wood or upholstery. You can choose to line the drawers in fabric or leave them as-is. Some people also have taken the fronts from the discarded drawers and attached them on the back as a decorative detail.
Add a lick of paint, a pretty cushion, and you're done!
Convert a bookshelf into a dollhouse
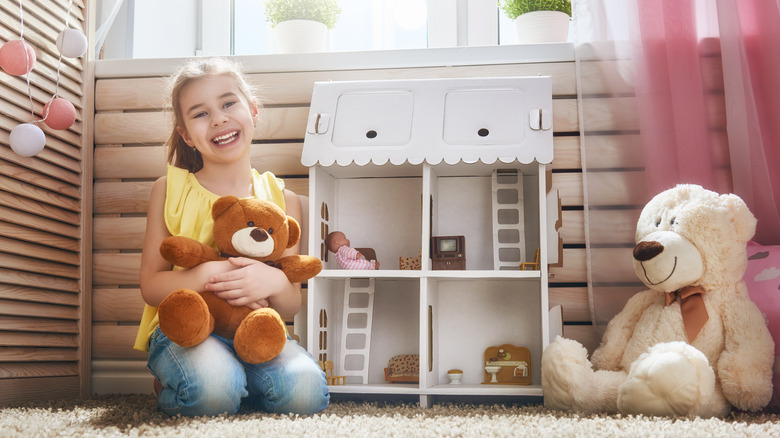
Delight the children in your life by turning an unused bookshelf into a dollhouse. This can be done in an afternoon with just a little elbow grease and very little — and optional — carpentry. If you don't have an extra bookshelf lying around, they're often found at thrift stores, BobVila.com notes, or you can get a cheap one from stores like IKEA or Target. A more modern, cubic-style bookshelf lends itself well to this project as the boxy compartments act as rooms. Add a coat of paint for a uniform feel, and then decorate the rooms by gluing wallpaper or scrapbook sheets to the walls and floors.
Of course, if you want to take the dollhouse to the next level, there are lots of extra features you can add. Create dividers in the shelves to make separate rooms, and add a pitched "roof" with some scrap wood. You can also add trim to the edges for a fancier look. If you want to be really ambitious, miniatures company Houseworks makes prefabricated doors, windows, and all sorts of other building components that you can add to make it feel more like a real house.
Upcycle leftover materials to create a cute play kitchen
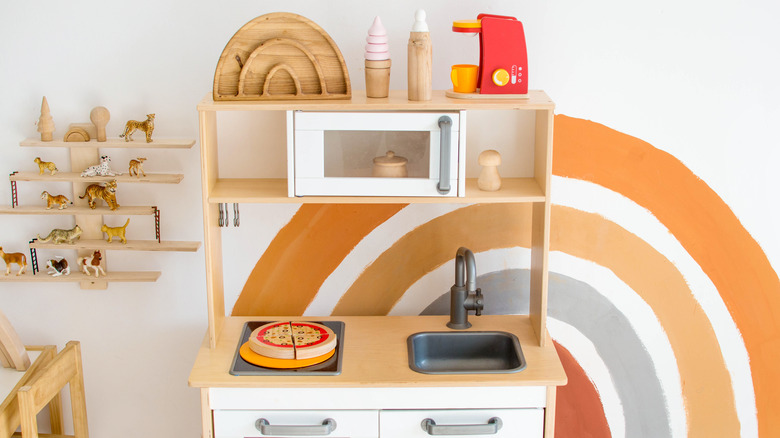
For another easy — and affordable — transformation that your kiddos will appreciate, turn an old dresser, end table, or TV stand into a play kitchen.
When you think of the basic components of a toy kitchen — an oven, a sink, burners, and shelves — it's easy to reuse materials you have on hand to make miniature facsimiles. Plastic basins can work well for sinks, Restyle Relove writes, which can you also spray paint silver, notes Remodelaholic, but a stainless steel bowl will also do the trick. A small cabinet door turned on end becomes an oven door. Circular silicone trivets with ridges work great as "burners," or you can cut out wood circles, glue them to the top, and paint burners on the wood. Or replicate the look of an induction cooktop by spray-painting a sheet of thin plastic black and drawing on burners with a metallic pen, Remodelaholic notes. Cheap plastic baskets can serve as drawers as well.
While you can get cabinet handles, oven knobs, and other hardware at your local home improvement store, you can usually find used pieces for cheap at Habitat for Humanity Restore, Facebook Marketplace, and Craigslist.
The key is to make the play kitchen feel as real as possible, so having interactive components like doors that open and knobs that turn really enhances the play experience.
Retire that old suitcase to make a coffee table

Modern suitcases are all about technology and ease of use, but vintage suitcases and trunks were built to survive the rigors of old-timey travel. If you have one on hand, it can easily find a new lease on life as a coffee table, nightstand, or end table — and it has built-in storage!
The most important factor, DIY Network notes, is to choose the right trunk or suitcase. Make sure it's solidly constructed, has flat sides, and is of uniform width. It doesn't matter if the locks and latches work, but you have to get it open for construction. If you want to use it as storage, make sure the inside is mold-free and the hinges are in working condition. Reinforce the bottom of the suitcase with a piece of plywood, to which you can also attach the legs. If you have a rounded suitcase, you'll need to trim the corners to ensure a snug fit, according to HomeTalk.
There's a wide variety of legs you can use, from metal pin legs to turned wooden ones. It's really a matter of taste. You can also choose just how tall you want the table to be. For a coffee table, you'll want lower legs, whereas a nightstand would need taller ones so it's accessible from bed. Predrill the holes, and screw the table legs into the plywood for stability.
Give your kitchen a custom look with a repurposed island
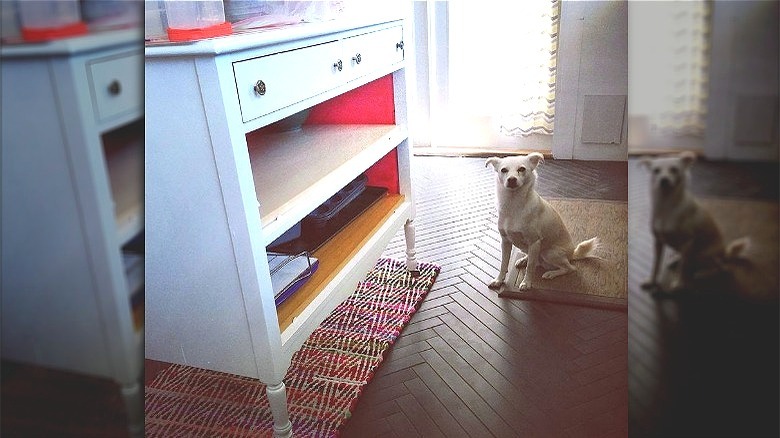
Most affordable prefabricated kitchen islands look pretty similar. But you can create a totally customized piece by repurposing an old desk or dresser into an island.
The first consideration is the size of your kitchen and what space you want to allocate for the island. You need to be able to walk around it comfortably. You'll also want a piece with solid enough construction that can take the weight of a countertop, and you need to consider what you're going to store in the island. With a dresser, you may decide to take out some of the drawers to have open shelving or a larger storage area.
Height is also a factor. With the standard kitchen countertop measuring 36 inches high (via Caesarstone), you'll want a piece that — with the countertop — either is around that height or can be adjusted with added legs or lockable wheels, which are great if you want the flexibility to move the island around, My Old Country House notes.
Extending the countertop with a larger overhang can help expand the footprint of your island, and legs can be added to support the weight of the counter if your original piece is not particularly large. You can choose to use the same counters as the rest of the kitchen to make it feel uniform or purposely pick a different material for a bold contrast.
Turn a vintage bed into an eye-catching bench
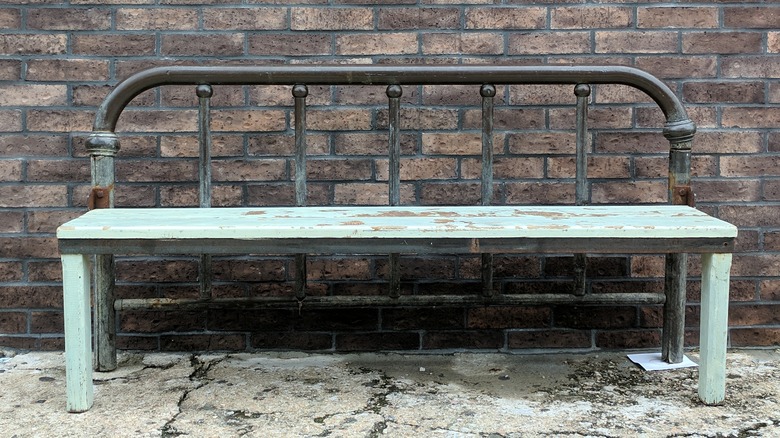
Did you know why it's so common to find the headboards and footboards of vintage beds but not the beds in their entirety? It's because the weakest points on an antique bed are the side rails. They take the brunt of the sleepers' weight and can easily get damaged or lost. Since the side rails are usually too difficult to fix or replace, the headboard and footboard often get stashed away and forgotten or sold for pennies, Hometalk notes. But you can give that bed a new purpose by turning it into a beautiful bench seat.
Because the footboard and headboard were meant to go together, they're already at a matching height, and the decorative details coordinate. By cutting the footboard in half, Grillo Designs points out, you can connect the halves to the headboard to create the bench arms. Then, all that's needed is to add a box frame for the seat. You can finish it with slats of reclaimed wood or use a plywood plank and upholster it with padding and fabric. The entire piece can be painted and even weatherproofed with coats of water-resistant varnish or polyurethane.
Transform an old fireplace surround into a wine rack
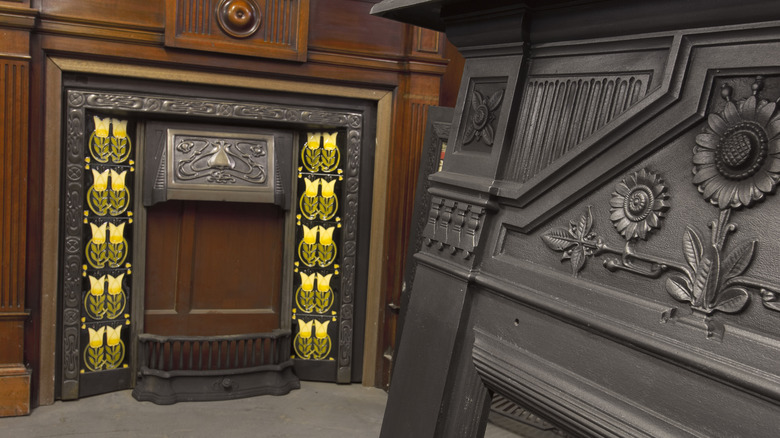
Over the years, many fireplaces have been ripped out in the name of modernization. A quick visit to a salvage store often reveals fireplace surrounds of all different styles and periods. But, while some will hopefully find their way back into homes, a great many languish unused — and that includes old, broken electric fireplaces whose elements have failed.
Girl Upcycled via HomeTalk came up with a great idea to use the surround from an electric fireplace as a wine rack. Paint, added embellishments, and a trio of wooden wine rack slats turn a decorative yet non-functioning surround into a useful piece. The depth of the surround allows it to hold full bottles of wine.
The same thing could be done with a vintage surround by building a box on the back to provide support for the wine racks and adding side panels to close in the sides. Prefabricated wine rack slats can be added and painted to match.