20 Amazing Repurposed Furniture Transformations You Have To See
As many looking to furnish or refurnish rooms in their house will come to realize, furniture is not cheap. New furniture purchased in stores or online is very costly, takes a while to be delivered to your house, and either requires assembly cost or a knowledge of furniture assembly. However, a great way to refresh your home without buying and waiting for expensive new furniture is repurposing, or "flipping" furniture you already have, or cheap second hand furniture found at thrift stores, flea markets, online marketplaces, etc.
Furniture flipping is a good skill to learn for more than personal enjoyment. Repurposing old furniture, from refinishing and staining an old dining table, to totally repurposing an item into something completely new, can turn into a decently profitable source of income — up to $100,000 in your first year, even, according to Fitnancials. If you're interested in learning how to flip and repurpose furniture, but don't know where to start, read on for inspiration.
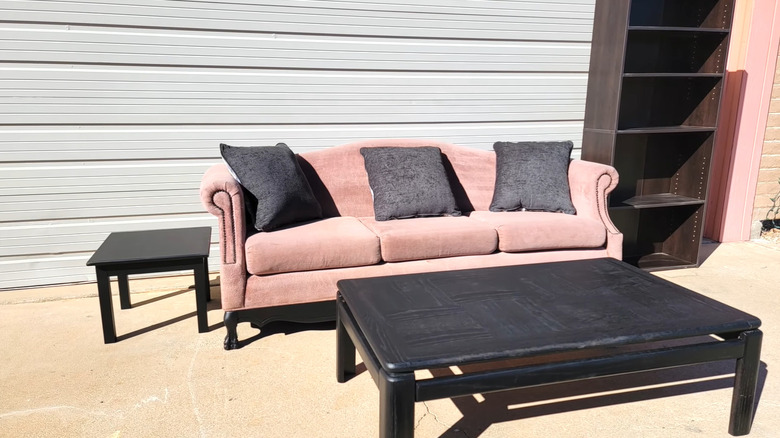
1. Before: dirty and dull pink couch
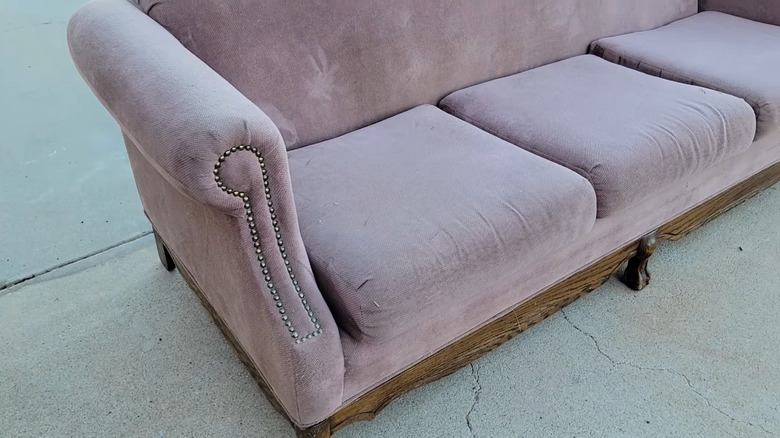
This first flip comes from Desert DIY, who flipped this old, dirty, and scratched up pink couch for a young mother aging out of the foster care system. This couch was found for free on Craigslist.
2. After: glamorous pink and black couch
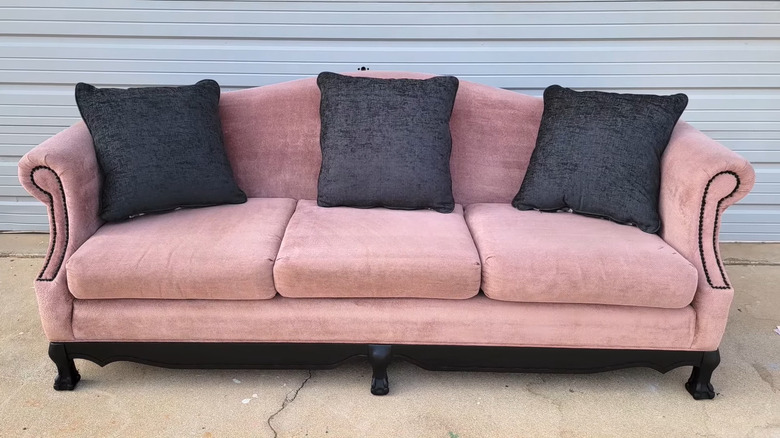
Desert DIY spruced up this couch with a pressure washer and vacuum for the fabric, black spray paint for the base, and black paint for the brass buttons. The final result is something glamorous, updated, and totally renewed from its previous form.
3. Before: dull and scratched up coffee table
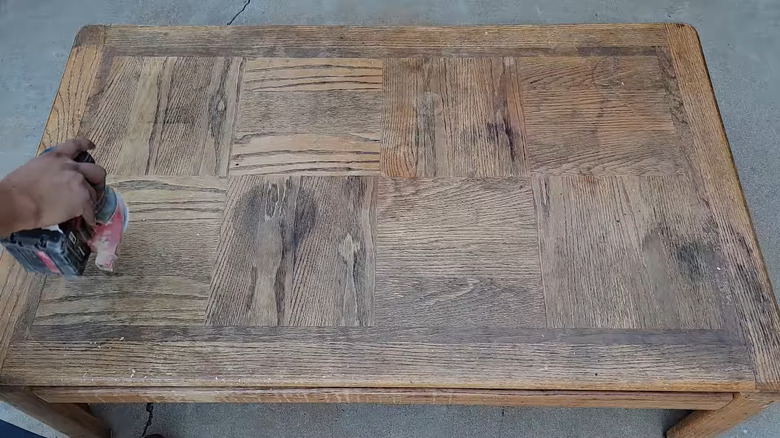
Continuing the living room decorations, Desert DIY flipped this coffee table that was donated to them for the same mother. Before, it was scratched up, dull, and in need of serious TLC.
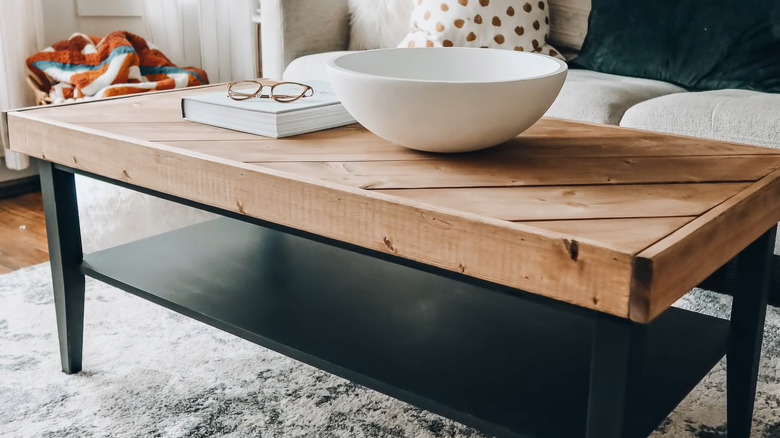
4. After: simple black coffee table
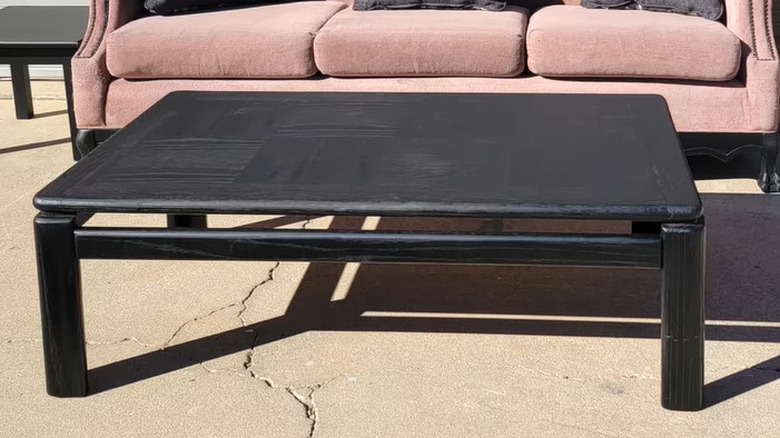
This flip used a sander and the same black spray paint as before. Desert DIY sanded down the table until it was smooth, and then spray painted it with a few coats of black spray paint. The final result is a classy, simple coffee table with much more life than before.
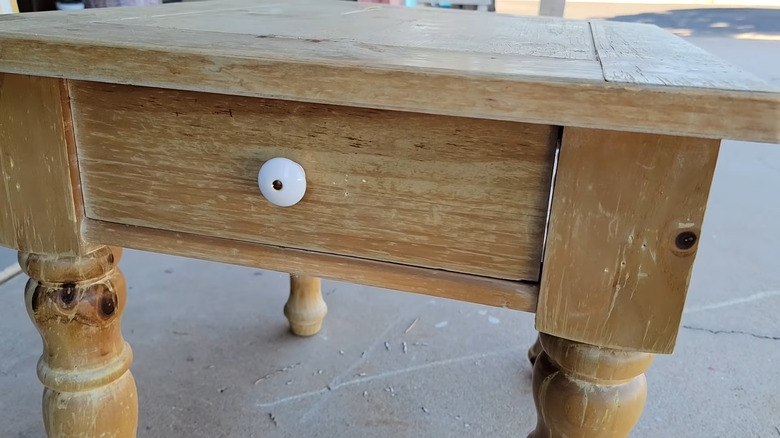
5. Before: plain side table
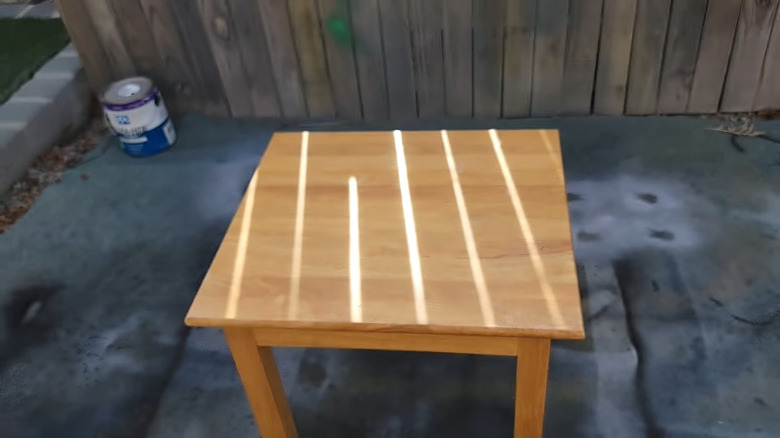
Rounding off the living room set, Desert DIY took this plain side table and turned it into a matching set with the rest of the living room.
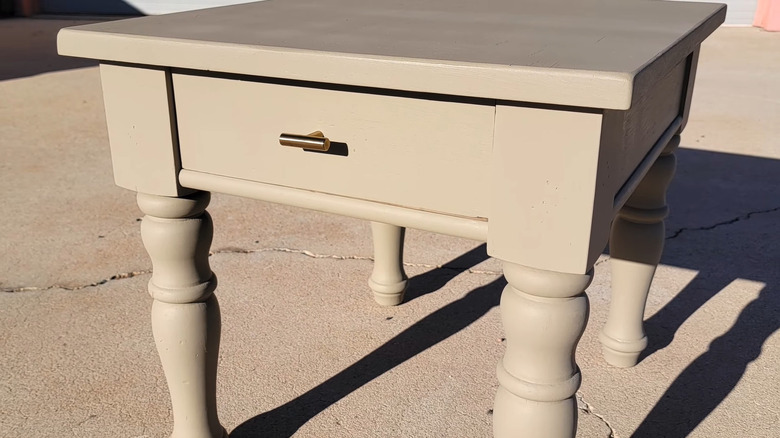
6. After: matching living room set
This flip was the easiest of all, and only involved a few cans of black spray paint, sandpaper, shellac, a power washer, and a vacuum. All together, this living room set from Desert DIY resulted in a fully furnished living room.
7. Before: scratched up shelf
This next flip is a bit more involved, but super worthwhile. Everyday Kait started with a simple wood shelf on wheels, purchased for $5 on Facebook Marketplace. Materials used for this product included white paint, table legs, wood stain, a scrap piece of wood, and mounting adhesive.
8. After: cute and trendy shelf
Everyday Kait removed the top piece, painted it white, removed the wheels, installed and stained new legs, and used mounting glue to attach a spare piece of pine to the top of the shelf. The finished product is a gorgeous corner shelf and table, and costs much less than it would if brand new.
9. Before: scratched up and old hutch
DIY Wife cleaned up this old and scratched up hutch and transformed it into something that looks brand new and fits perfectly with any home. She used caulk, a sander, black paint (and a pressure sprayer, though that's optional), new hardware, a power saw, scrap wood, and wood stain.
10. After: gorgeous black hutch
The final product is almost unrecognizable. To achieve this transformation, DIY Wife removed the hardware, caulked the holes, sanded the hutch, painted it black, installed new hardware, removed the hutch's old base, and used a piece of wood stained to match the new hardware to create a new base.
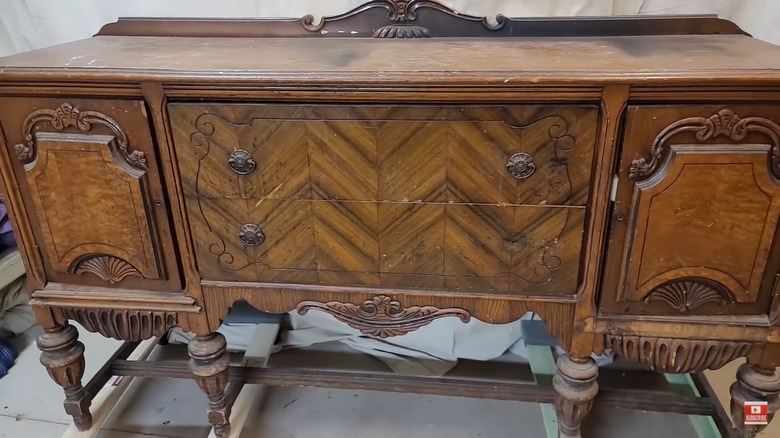
11. Before: cute but worn antique buffet
While many choose to modernize their furniture flips, Glenda Chavez revitalized this antique buffet while still holding onto its history and charm.
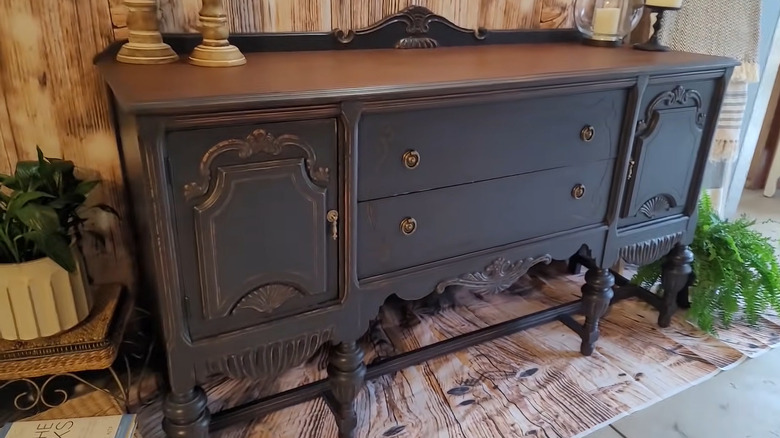
12. After: updated and authentic antique buffet
Glenda Chavez kept true to the buffet's antique appeal. Instead of painting the whole thing, she instead refinished what could be salvaged, only painting the main frame of the buffet where stains couldn't be removed. She also kept and cleaned up the original hardware, making it the perfect blend of old and new.
13. Before: scratched and wrinkled drop leaf dining table

Desert DIY also flipped a dining room set for the mother aging out of foster care. They found a drop leaf dining table for $10 at Goodwill, which has deep scratches and wrinkles, scuffs, and stains.
14. After: beautiful black drop leaf dining table
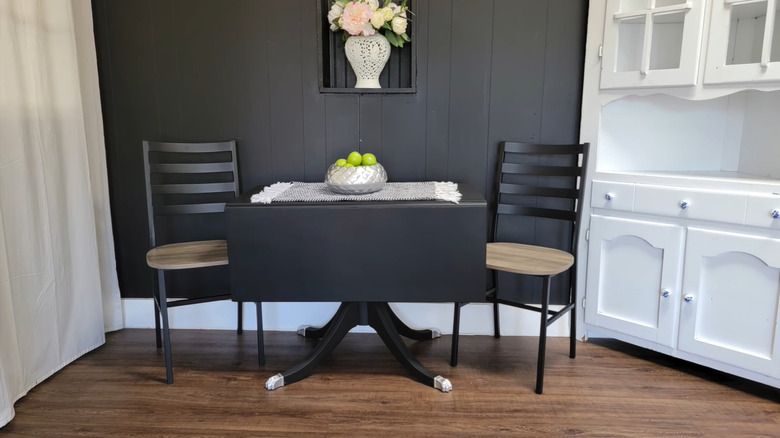
After sanding down all the deep scratches and wrinkles off the surface, Desert DIY spray painted the table black, cleaned the original hardware and spray painted it silver, and reassembled the table. They paired it with inexpensive black chairs to complete the dining set.
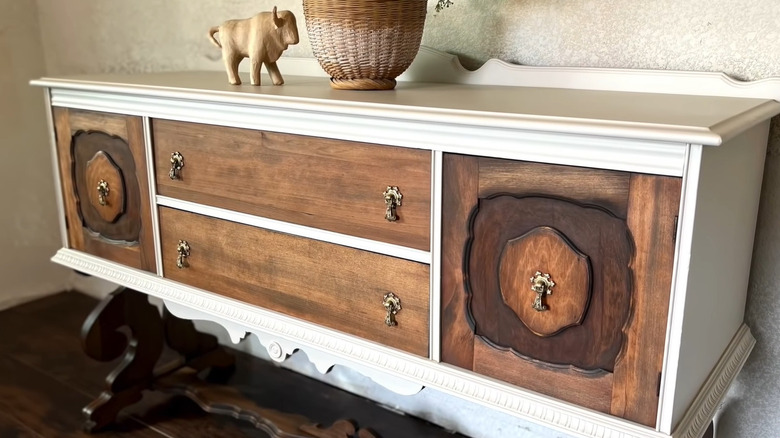
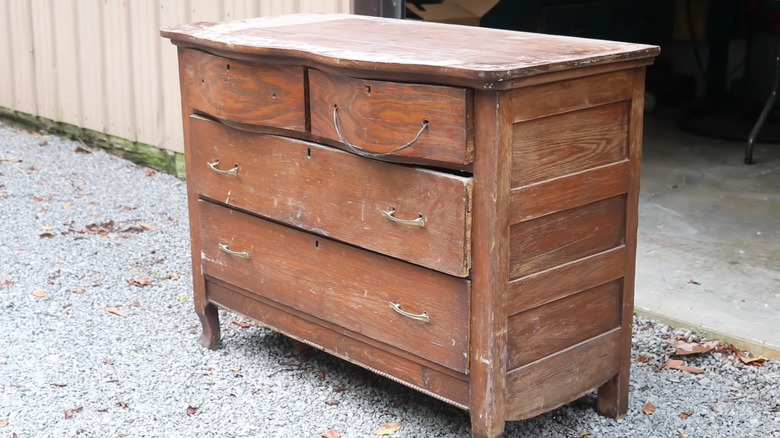
15. Before: old and plain fir dresser
This flip comes from Everyday Kait again, who repurposed this fir dresser she inherited. The dresser itself had plenty of structural integrity, minimal scratching, etc., but needed a visual revamp.
16. After: updated and modern dresser
Everyday Kait began this flip by trying to sand and stain the wood, which proved unsuccessful. Instead, she diluted a fusion mineral paint to stain the top of the dresser and its drawers. She painted the frame white, and installed black legs and matching hardware. The final product is modernized with a whole new vibe.
17. Before: grouted and old plywood side table
Desert DIY took this old plywood table from tragic to gorgeous and girly with very little effort, and again were able to donate it to a mother in need. All it took was a sander, some paint, spray lacquer, and new hardware.
18. After: girly and sleek side table
Desert DIY started this project by filling in grouting on the table, then sanding it down. They painted it with mistake paint from the hardware store (incorrect swatch mixes which are much cheaper), sprayed it with lacquer, and finished it off with gold hardware, creating a femine, girly final product.
19. Before: broken and peeling antique dresser

Some serious magic was needed to revive this dresser, which was flipped by Glenda Chavez. The original dresser was peeling, chipped, and falling apart structurally.
20. After: rejuvenated black and gold dresser
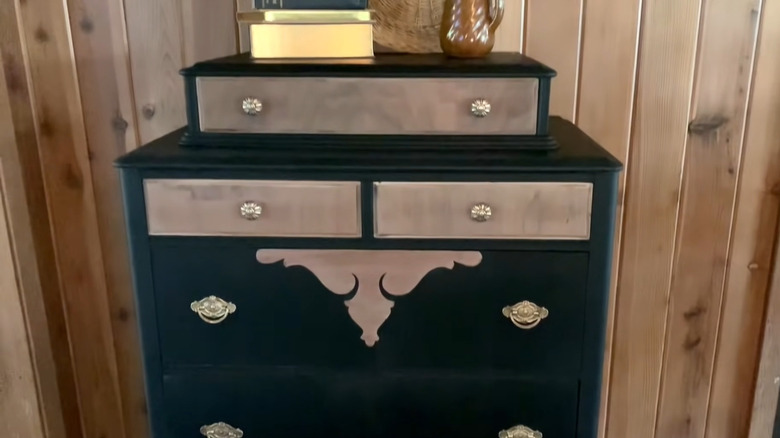
This dresser required lots of effort to restore it into something functional, let alone beautiful. After stripping, caulking, sanding, painting, more sanding, more painting, and cleaning and reinstalling the original hardware, Glenda Chavez produced a show-stopping final product, with a black base, wood accents, and gold hardware.
21. Before: beat up mid-century dresser
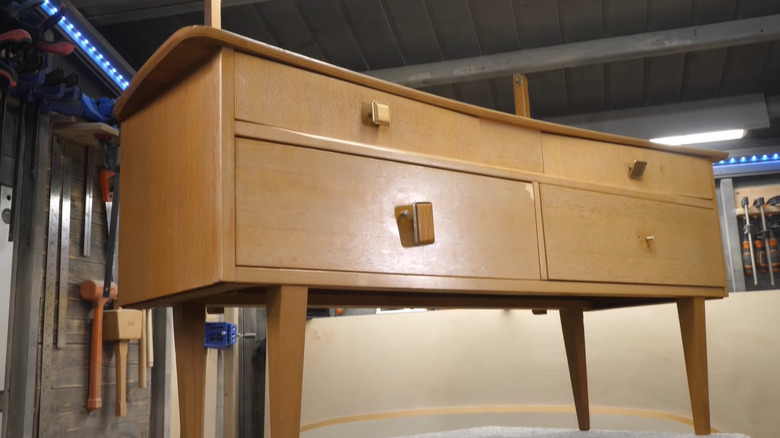
This furniture flip is a lot more hardcore than the others, but the final product is worth the required time and patience. Madebyraphael took this beat up, broken down mid-century dresser, and with a bit of woodworking skills, a sander, and some paint, turned it into something stunning.
22. After: beautiful blue mid-century dresser
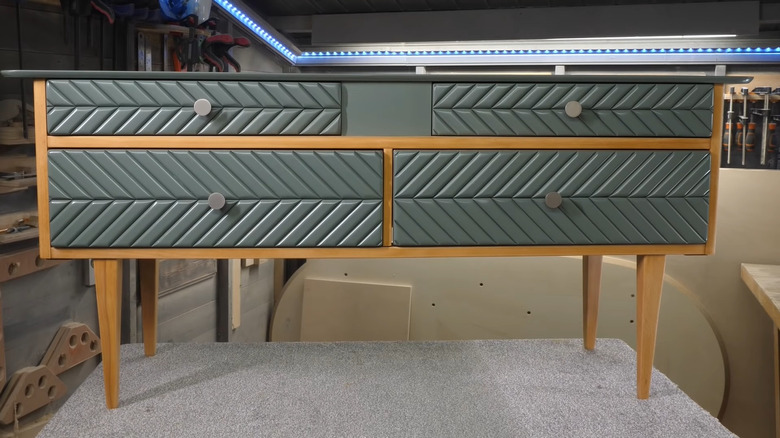
Madebyraphael added angled pieces of wood to the drawer fronts for a texture patterned. Then, after sanding down the main frame and stabilizing any broken pieces, he painted the top and drawers a gray blue, keeping the main frame the same color, and installed new hardware. The final product is trendy, sleek, and functional.
23. Before: warped and damaged dresser
Mad City Modern took this $25 mid-century modern dresser from the 1960s purchased from Facebook Marketplace, and put in a little bit of elbow grease to give it new life. The dresser had warped framing, broken pieces, and was painted to be quite unappealing.
24. After: beautifully restored mid-century dresser
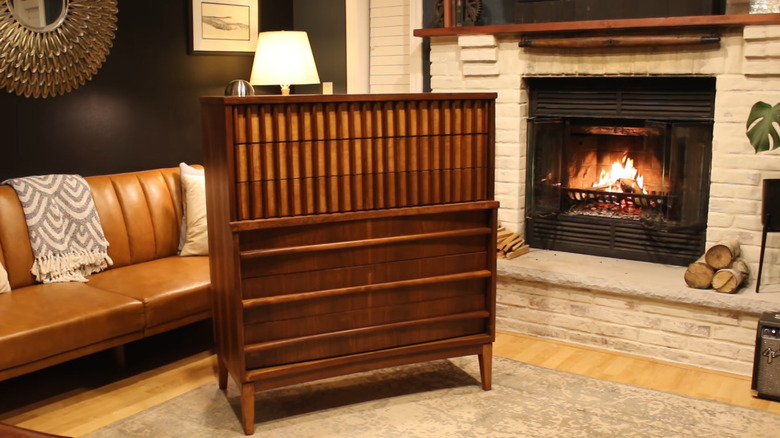
Mad City Modern took this warped, damaged, and thickly-painted dresser and restored it to its full mid-century modern glory. He began by stripping away the old paint, then sanding the furniture down, and finally staining it an appropriate color, as well as repairing the damage to the piece.
25. Before: trashed and scuffed coffee table
Everyday Kait also transformed this old, scuffed, and landfill-bound coffee table into something timeless and classy. The coffee table was missing its glass piece, which Kaity found a clever, but more skilled, workaround for.
26. After: timeless and classic coffee table
Everyday Kait sanded and repainted the table black. The top, though, was more of a carpentry project. Kaity cut diagonal pieces of wood and glued and screwed them on top of the table, added a matching trim, and then stained the top a chestnut brown, resulting in a timeless and classic coffee table.
27. Before: worn out pine ottoman

Another flip from Desert DIY starts with this ottoman which, despite its wear, is actually not antique — just incredibly worn down. It is also made entirely of pine, and has great structural integrity.
28. After: trendy rustic ottoman
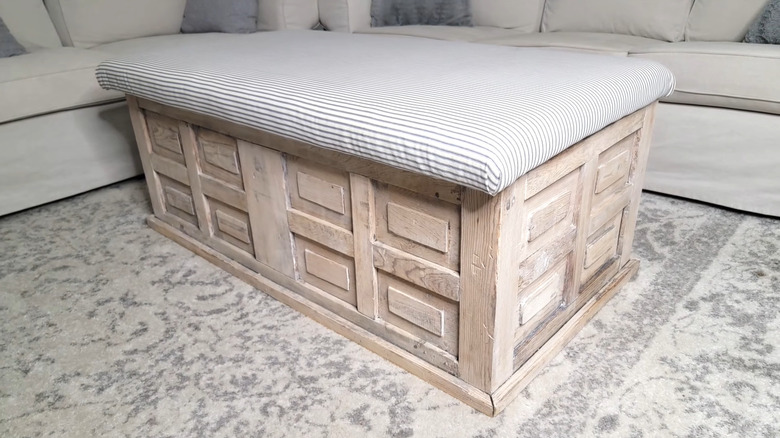
Desert DIY made this one for personal use. They started by washing and brushing the wood to remove dirt and splinters. Then, they white waxed it, creating a rustic finish. Finally, they used a piece of wood covered in foam and fabric and attached it to the top with hinges for a comfortable and lovely footrest.
29. Before: infested and scuffed antique sideboard
This furniture flip comes from Sab's Rehabs, who found this gorgeous antique sideboard buffet on the side of the road. The piece was in decent shape, but was pretty scuffed up, and infested with spiders.
30. After: rustic and polished antique sideboard
Sab's Rehabs got to work flipping this antique buffet by cleaning it up, removing spiders, filling holes, fixing splintered wood, sanding the wood, staining the top, painting the rest a dark blue, adding some gilding, and cleaning and reinstalling the original hardware. The final product is still rustic and antique, but cleaned up significantly.
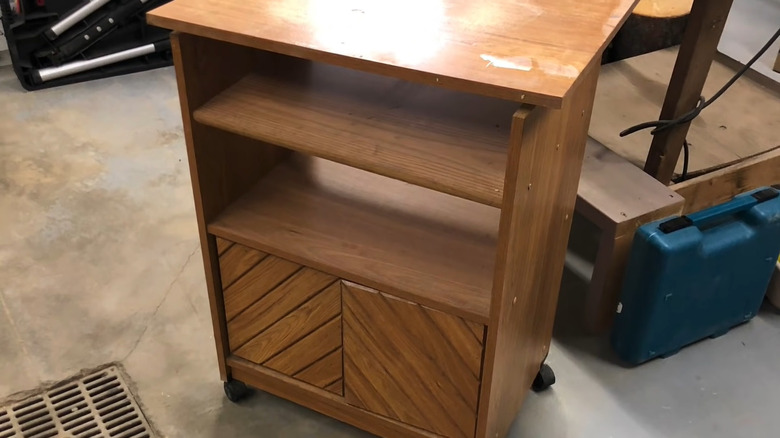
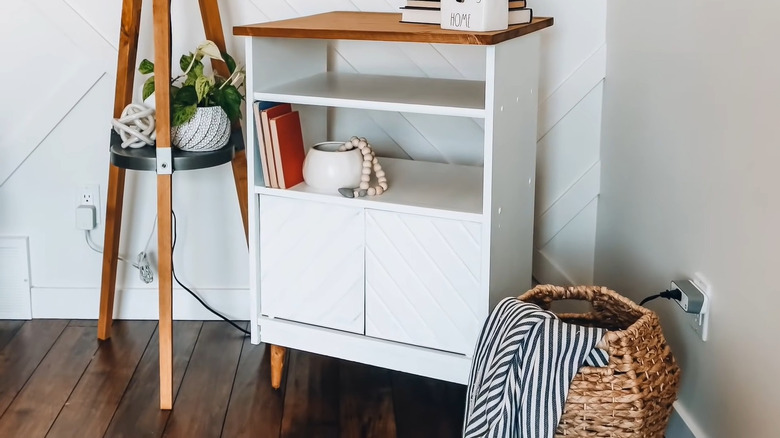
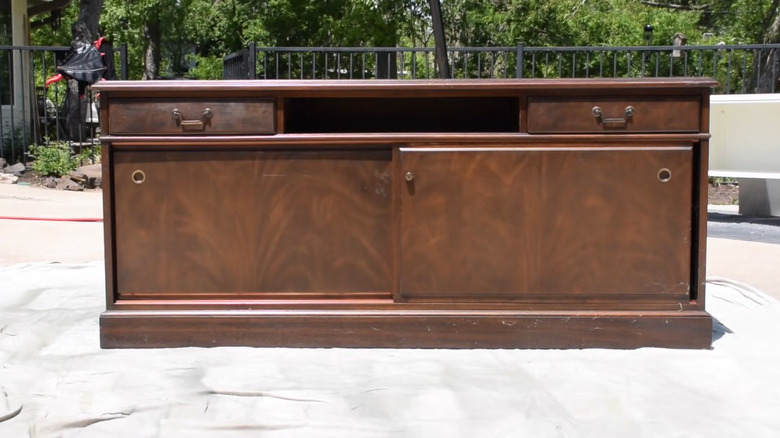
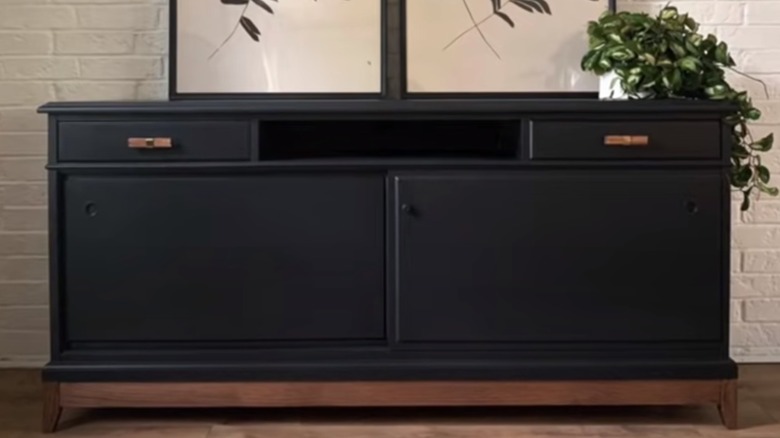
31. Before: dull television stand
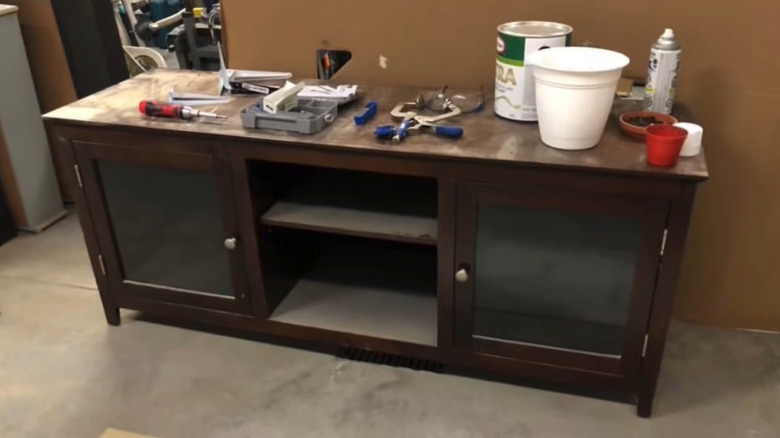
Everyday Kait flipped this old and boring television stand found on Facebook Marketplace into something really unique and refreshed. This flip was a little labor intensive, but the final product wows.
32. After: chic and classic television stand

This flip from Everyday Kait involves replacing the legs with new wooden frames she built herself, sanding and painting the furniture black, cleaning up and reinstalling the original doors, and installing new hardware. The final product is chic and classic.
33. Before: broken and hopeless dresser
White Cottage Company wanted to restore this old dresser to its former glory, but the drawers wouldn't open or close with ease. Instead, they decided to turn it into a kitchen island for a small space.
34. After: rustic and charming kitchen island
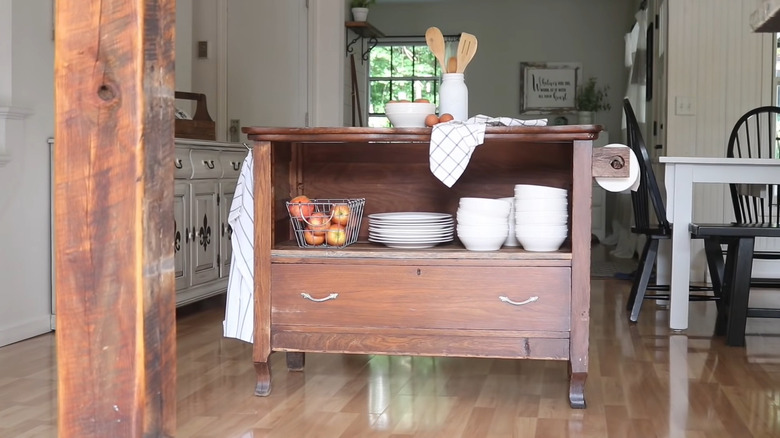
White Cottage Company began by removing and cleaning the drawers. Then, they built a middle shelf out of old pieces of scrap wood, sanded and stained the island, installed a paper towel holder, reinstalled the bottom drawers, and installed some hooks. The final product is rustic and charming, and very practical.
35. Before: beat up dresser
Mailey Elaine found this old and very beat up dresser for $20, and turned it into a trendy, gorgeous coffee bar.
36. After: trendy coffee bar
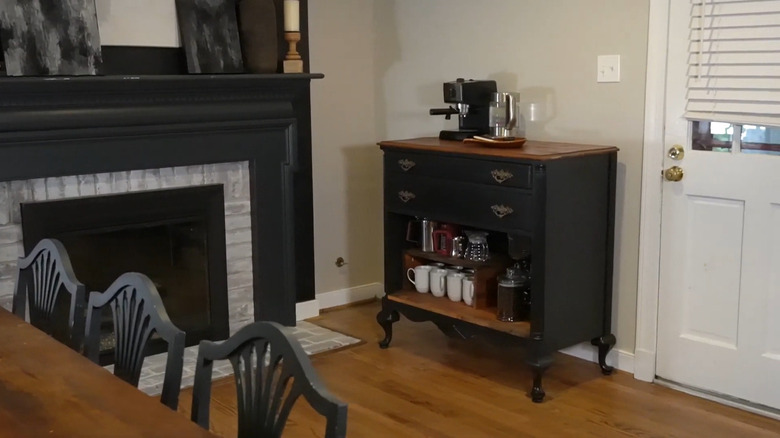
Mailey Elaine removed the bottom drawers and busted out the middle for a large open shelf. Then, she removed the top drawers and filled the missing hardware holes. She sanded, primed, and painted the dresser black, installed a bottom shelf, stained the top, and installed some vintage hardware, resulting in a gorgeous and trendy coffee bar.
37. Before: old farmhouse desk
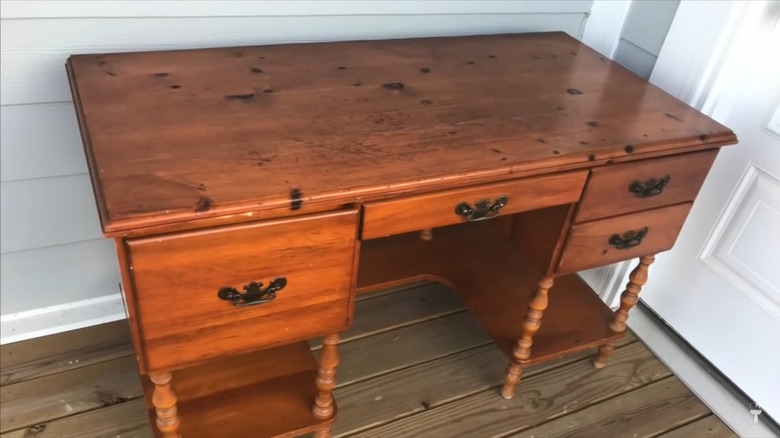
Christina Muscari needed a desk for her daughter's room, and flipped an old, cheap farmhouse desk into something perfect (and low cost) for her.
38. After: trendy teen desk
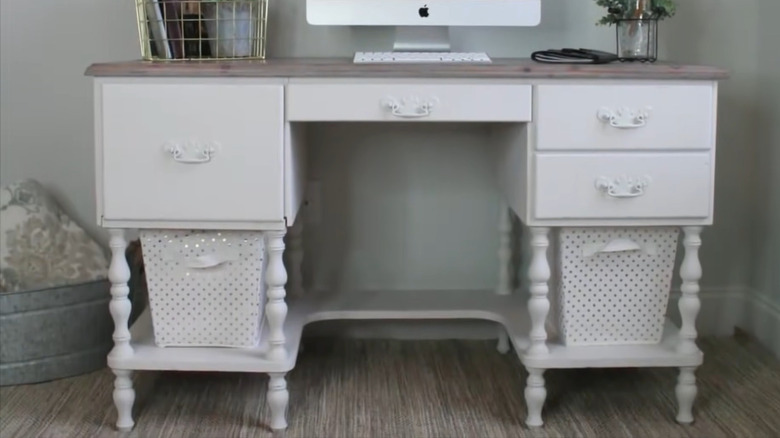
To flip this desk, Christina Muscari sanded the desk, stained the top gray, painted the body white, and installed white hardware, creating the perfect desk for her daughter.
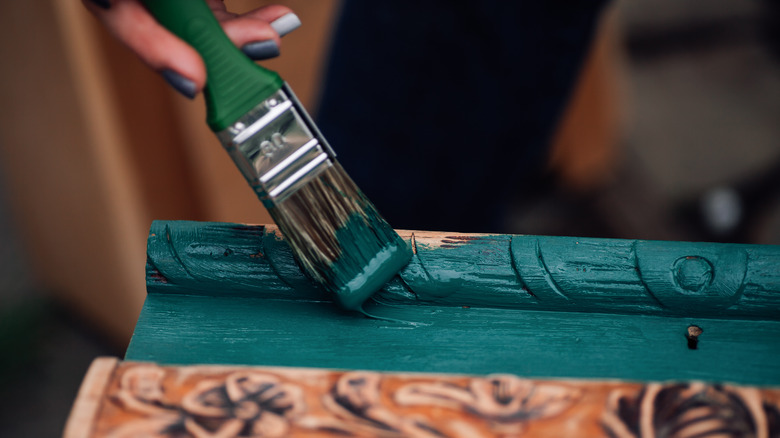
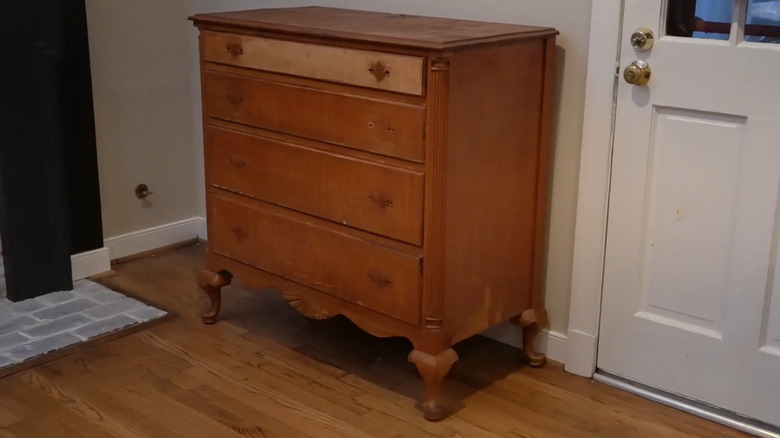
39. Before: stained mission end table

This last repurposing also comes from Christina Muscari, who totally (but simply) transformed this stained mission end table into something beautiful.
40. After: beautiful green end table
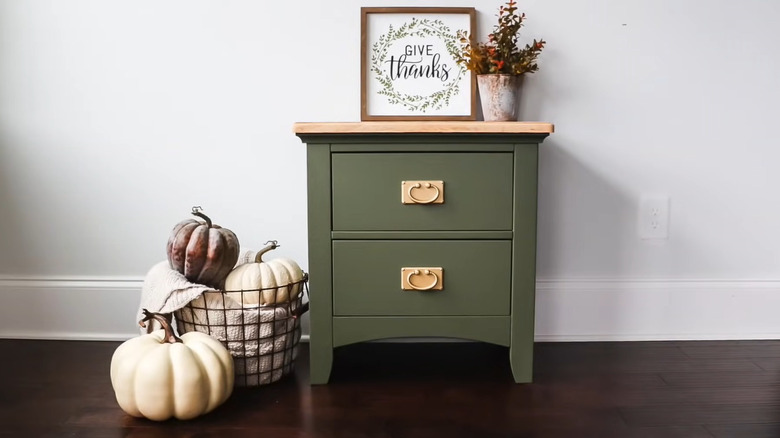
Christina Muscari began by sanding off the paint on the top of the table as well as the rest of the piece. She then painted the body a lovely olive green, and added a light gloss to the wood on the top, as well as painted the hardware gold.