Here's What You Need To Know To Sharpen Your Lawn Mower Blades
If you want a neat environment free from reptiles, mosquitoes, and other harmful pests, mowing your lawn is non-negotiable, according to Lawn Solutions Australia. While many homeowners hire professionals for the job, others simply hit the great outdoors, get it done, and save a couple of bucks. It's pretty easy, really — all you need is a mower, gear boots, and of course, an unscheduled morning. Before getting out to the field, you need to carry out routine checks on your mower to ensure all is well with your equipment. However, sometimes you may experience difficulties while mowing, such as excessive vibration, fuming, difficulty cutting grasses, et cetera, which indicates an internal problem.
For professionals, it's quite easy to detect the issue with the mower, but you may struggle a little as a novice to decipher the actual problem. If your mower seems slow when cutting grass or leaves them almost uncut, it may indicate a blunt blade edge, per Turfco. Working with this is practically impossible, and you need to sharpen the blades immediately to get that clean, well-trimmed lawn. If this is a problem you're experiencing currently, we have the right solutions embedded in this article for you. Read on!
Safety first

Like always, we'll implore you to take safety precautions first. Attempting to service your lawn mower without taking certain safety precautions could lead to unfortunate accidents, via Lawn Love, which we do not want. So we'd advise you to play safe by disconnecting the power button of the lawn mower. Then, grab your safety gear — protective gloves and goggles — before touching any part of the mower.
If your lawn mower uses spark plugs, open up the engine cover to locate the ignition cable. According to Hutson, it can be found at the front of the engine of a walk-behind or riding lawn mower, while a zero-turn mower has its ignition cable at the rear end of the engine. Once you've located it, disconnect it completely to be assured of your safety while using the machine. On the other hand, if your lawn mower uses a battery to run, you'll have to find and disconnect the battery or batteries as the case may be. For a riding mower, check its battery under the seat or hood and disconnect appropriately, per Batteries Plus. If it's a push mower, locate the battery on the deck or close to the back box handle.
Gently tilt your mower to the side

Now that your safety is assured, position your mower in a perfect spot and prepare to tilt gently to the side for easy access to the blades. Just before you tilt, ensure you're in the know. A wrong approach could lead to other complications and compel you to replace the air filter or engine, via HowTL. Locate the sides with the air filter and carburetor and ensure it's facing upwards when you're tilting. Locating the air filter can be slightly tricky for a non-professional.
But not to worry, one of the best cues is searching for a plastic, rectangular air box which is the general housing for most mower's air filters, per Lawnmower Fixed. This will help you guide against oil spilling everywhere, creating some annoying mess on your field or in the garage. Another essential tip we'd like to include before proceeding is giving your mower a good support system after tilting to save it from falling off. According to The Lawn Mower Guru, one way to do this is to place some 2 x 4 wood pieces diagonally against the mower for that extra support.
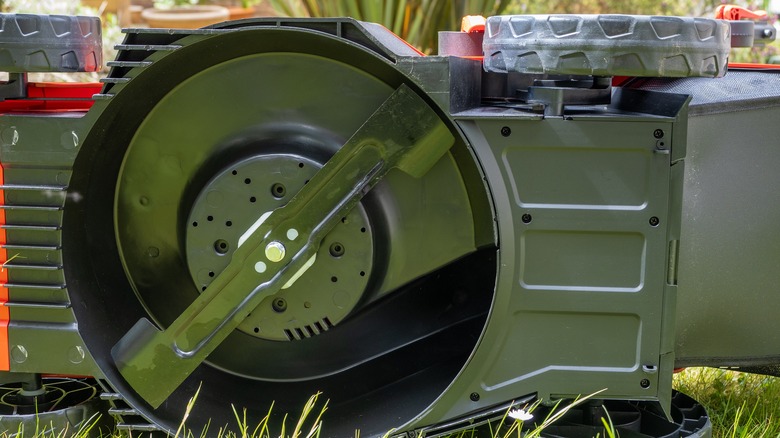
Remove and clean the blades
As we mentioned earlier, tilting the mower will allow you to access the blades easily. Now, it's time to remove and clean them. It is recommended to clean the mower's blades regularly since it gathers lots of debris, causing blunt blades or even spreading some fungal diseases, writes In Harmony Sustainable Landscapes. We bet it's been so long since you did this, so seize this opportunity to clean your blades. But you need to remove them first using a wrench or ratchet. Turn the bolts and nuts holding the blades in their place anticlockwise using the wrench. Place them in a safe spot to avoid losing them, then gently lift the blades out.
Tom's Guide suggests marking the blades with spray paint or marker before lifting them for proper placement after sharpening. Now that they're out follow the next step to clean them. You can get your blades sparkling by brushing the surface using a blunt brush, which should get all the accumulated dried dirt and grasses off. However, if some are still stuck, apply water to soften the dirt before brushing it off, via Cool blue. Garden Guides experts suggest rubbing oil on the blades for future purposes because it helps wade off dirt while mowing.
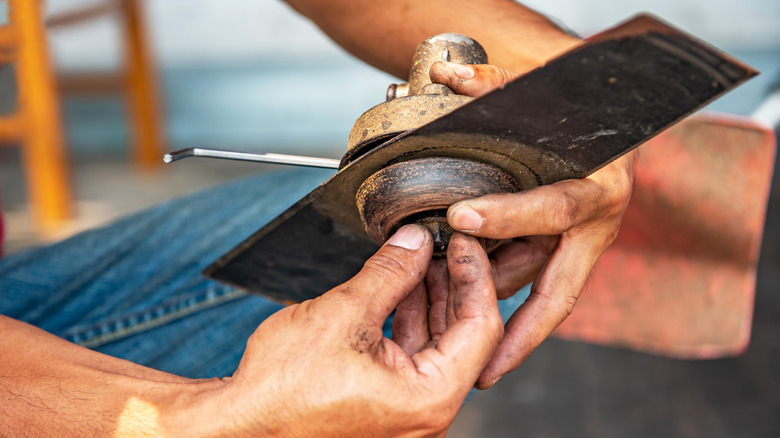
Clamp and grind the blades
Now that you're done with all the preparatory steps, it's time to sharpen your blades. But before that, it's better to fit your blades perfectly on the spot, preferably between edges, preventing movement while sharpening. There are different ways to grind the mower blades, and we'll provide you with the most comfortable options. The first on our list is using a file that is quite affordable and easy as well. With your blades clamped down between the edges and firm pressure applied, gently rub the file surface against the blade edges in a perpendicular direction, per Garden Tool Expert. It's pretty slow but will still give you the desired results.
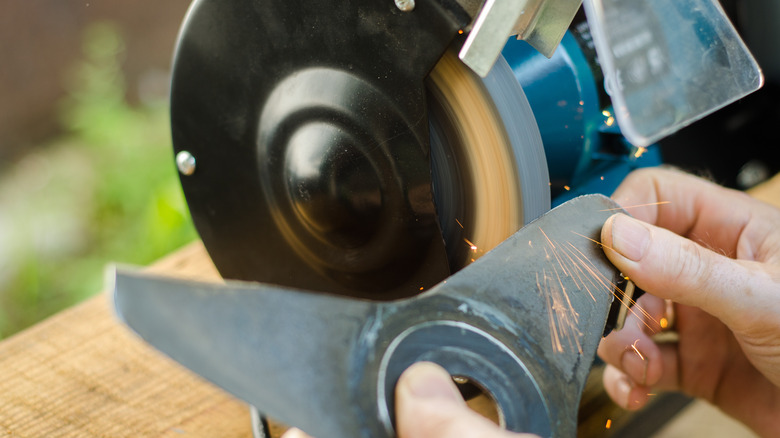
A faster route to sharpening your mower blades is by using a bench grinder. Although it comes with some sparks and loud noise, you'll be done in no time. To do this, rub the blade edge against the spring wheel of the bench grinder till you get a clean edge, via HGTV. The last method we'll share with you is a sharpening drill or stones for the blades. These are quite faster than the hand file but more effective for a smaller blade. All you need is a little effort while rubbing the blades against the drill, and you're good to go in a few minutes.
Balance and reassemble the blades
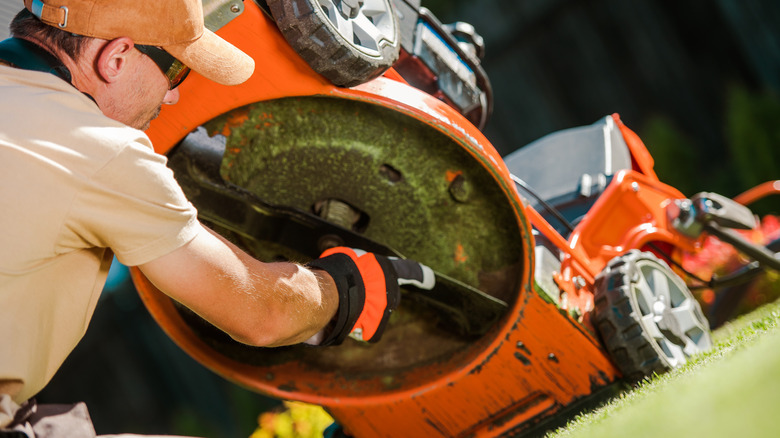
You're all set to fix your blades back to their proper positions. At this stage, you need to be careful when lifting them; remember they are sharp, and the slightest mistakes could cost you a lot. After sharpening, there is the tendency that they've gotten imbalanced in the process. While this can damage your mower, per Vista Turf, be rest assured that it can also be fixed. You can check for imbalance in your blades by placing a nail or screwdriver tip on the surface, writes the experts at Tom's Guide. If any of these sits nicely on the surface, proceed to install the blades. However, if there's a problem, file the area appropriately to even out with others.
Now to reinstall the blades, place them back in their spot using the markings you made earlier as a clue. Then, get your wrench to secure the nuts in perfectly. Check for any other worn-out in the machine before covering up the engine. Lift your mower after that, refuel if needed and proceed to enjoy your mowing adventure. That's it on our effective solutions to sharpen your mower blades. You can select any of these options that are pretty comfortable for you.