Clever Ways To Repurpose Unwanted Door Knobs
Door knobs don't only belong on doors. There are a few ways to repurpose unwanted door knobs whether they're old ones you've switched out for something new or vintage thrift store finds. With their ornate details, many door knobs are just plain pretty, so it would be a shame to toss them. Instead, you can turn them into anything from a coat rack to Christmas decor.
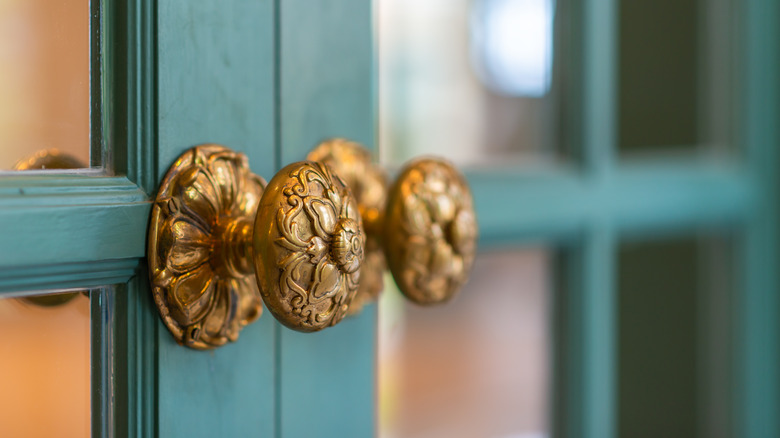
Since many of the projects on this list are decorative, you'll want to use door knobs that are aesthetically pleasing. Antique metal door knobs are a popular pick since they often come with pretty carved or painted details. Plus, you can often score cheap and unique finds at flea markets or thrift shops. Glass door knobs can also give your project a vintage and slightly glamorous look. Otherwise, you can also use more contemporary door knobs for these projects, if they suit your decor style. With the variety of options, door knobs are a great material for your next DIY project.
Curtain tie backs
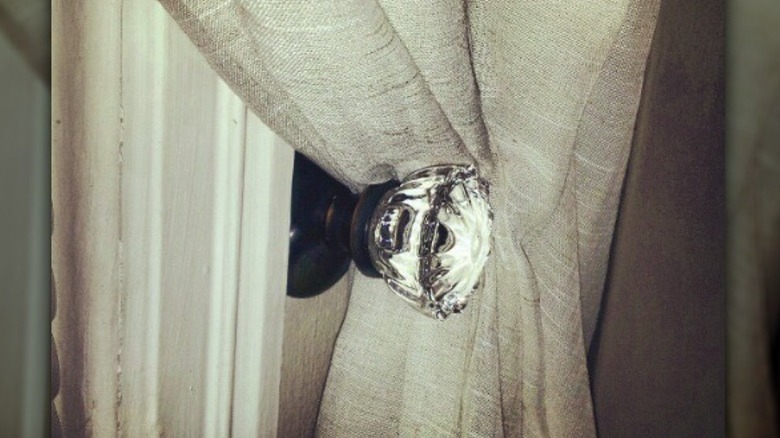
Decorative door knobs can make gorgeous curtain tie-backs — they look pretty and are the right size and shape to hold back most curtains. For this project, you'll need a door knob and trim plate for each curtain. The front side of the knob will be on display, so you'll want to choose door knobs with a nice front face. Vintage door knobs are a gorgeous choice for this project.
If it's still in place, remove the spindle or shaft, the long middle bar that connects the two door knobs. Then, attach the door knob to its trim plate with a strong adhesive that dries clear, such as super glue or general purpose glue like E-6000 Craft Adhesive. Use screws, placed through the screw holes in the trim plate, to attach the doorknob to the wall beside the curtains. Generally, curtain tie-backs should be mounted a third of the way up the wall, right beside the window frame. Once mounted, thinner curtains should fit nicely tucked behind the door knob. If your curtains are too thick, you can loop a string curtain tie around the curtain and then hook it onto the door knob.
Bottle brush Christmas trees
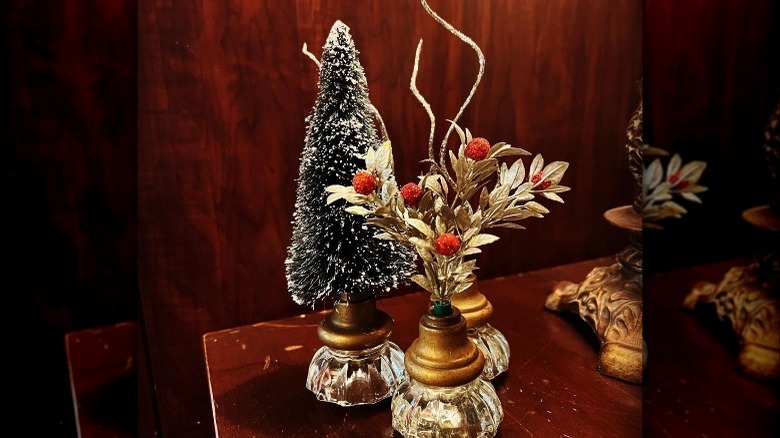
Give your Christmas decorations a vintage spin by using old door knobs. This seasonal DIY is charming and easy to do, plus it can bring new life to your old Christmas decorations. The door knob will be the decoration base, so you'll need one with a flat front face. The flatter, the better, since rounded knobs will be wobbly. Next, you just need to find Christmas decorations that have a small enough base to fit into the hole in the back of the door knob. You'll also want to choose decor pieces that aren't too tall so the door knob is able to balance on its own once the decoration is inserted.
As Junk Is My Life points out, bottle brush Christmas tree decoration is excellent for this project. These small and light trees are the perfect size to mount in a door knob. Twist off or cut off the base of the tree, making sure to keep the length of the bottom post, then insert it into the hole of your door knob. Trim more of the post to get a good fit, if needed. If the post isn't long enough, you can use a hot glue gun to fill some of the hole. You can also use other seasonal decorations for this project like sprigs of holly or pine tree stems.
Photo holder
Looking for a more unique way to display your favorite snapshots? If photo frames just aren't cutting it, make your own photo holder using an old door knob and wire. Again, since the door knob will be the base for this project, you'll need one with a flat front face. You'll also need pliers and wire cutters for this project. Use sturdy but malleable wire (you can use hobby wire or deconstruct a wire clothes hanger).
Cut a 12-inch piece of wire, and wrap it around the base post of the door knob three times to shape it into a circular coil of wire. Remove the wire from the door knob base and turn it over — the uncoiled side of the wire will be inserted into the door knob hole and you can also use a dot of hot glue to make sure it sticks. Then, the circular coil of wire should hold your photo at the top. For a more detailed tutorial, follow the steps in this video from Tarnished Treasures.
Coat rack
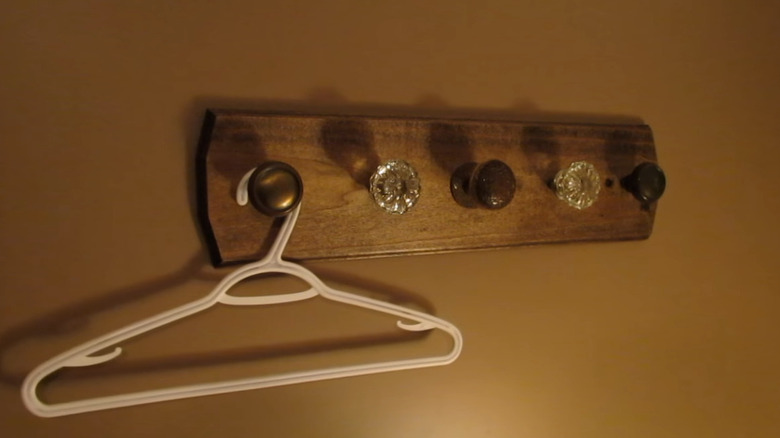
There's something oh-so-charming about a vintage door knob coat rack. With a little DIY prowess and a few tools, you can create your own custom one. Start with a piece of plywood that is cut to your desired size for the base of the coat rack. Stain or paint your wood to your desired color. Measure and mark where you want the door knobs; around six inches apart is suitable. Use a drill to drill holes through the plywood board. Then, on the back side, use a Forstner drill bit to create a centered hole around each drill hole.
To attach the door knob to the board, you will need to use a tap and insert a threaded rod into the door knob. Screw in sections of threaded rod, which should be trimmed to the appropriate length to attach the door knobs tightly to the board. Then, insert them through the pre-drilled holes in the board. Flip the board over and twist the nuts tightly onto the threaded rod. Now, the coat rack is ready to mount in your front entryway! This video from PatonHaus shares a more detailed step-by-step description of this project.
Mini flower vase
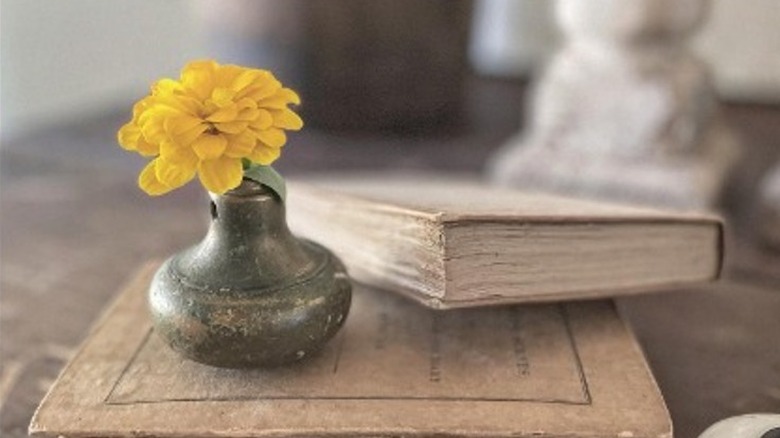
So simple and so quaint, it takes very little effort to turn an old door knob into a mini flower vase, according to the Wedding Chicks. This is another project where you'll want a door knob with a flat face and another where vintage or glass door knobs are a beautiful choice. If the door knob still has the spindle attached, remove this piece. Clean the door knob — if you want to keep the old-fashioned patina on the door knob, just use a soft cloth. If you want to restore the door knob back to its original condition, use vinegar and ketchup to clean off any rusty residue.
Collect your flowers. Due to the small size, you'll only be able to fit a bloom or two per door knob. You can add thin branches and leaves to create a little arrangement. Drop a little bit of water into the door knob hole and place the stalk of your flowers and plants inside. You can scatter a few door knob flower vases to decorate a shelf or group a few together as a vintage table centerpiece. This vase project is so pretty and unique for both decorating your home and using for events!
Legs for a tray
Door knobs can make stellar decorative feet for a raised tray or table trivet. Start with a plank of wood, cut to the size you want your final tray to measure. Apply your chosen finish to the wood. If you plan on using the tray in the kitchen, finish it with a wood sealer, which will help it hold up better to spills and messes. If food might come in direct contact with the tray, use a food-safe finish like mineral oil or shellac.
Use four identical door knobs to ensure the tray is level. If it's possible to drill through the door knobs (like for thinner metal knobs), pre-drill a hole through the face of each door knob. Then, use a long screw to attach them to the bottom of the tray as Brick House Vintage & DIY explains. However, that won't be possible for some door knobs. In this case, use a tap to create threads inside the door knob hole and insert a dowel screw with the pointed end facing out of the door knob. Once securely attached to the door knob, you can use the pointed end to screw it into the bottom of the wood tray.
Basket vignette decor
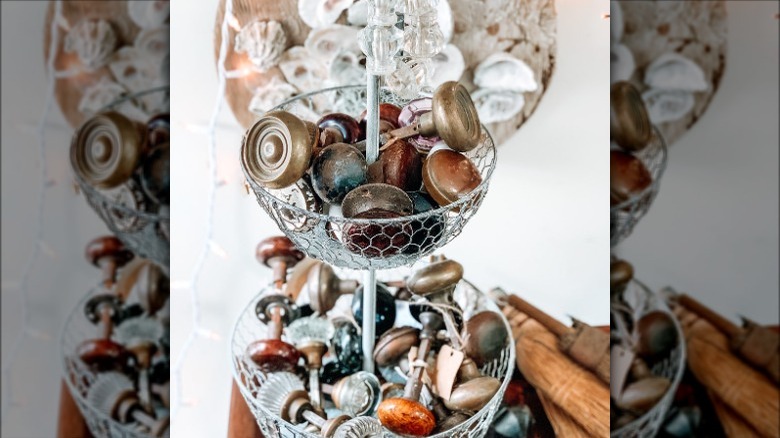
If you have a big collection of vintage door knobs — more that you can use for the other projects on this list — then display them instead of keeping them in storage. One easy way to do so is in a basket. While any basket will do, to show off more of your door knob collection, choose one that you can see peeks of the door knobs through. This wire basket is an excellent example since it shows off the door knobs around all sides. The two tiers make it a good pick for a large collection, plus keep more door knobs in view.
You can place this basket vignette decor in a range of places around your home. It looks great on a front hallway table, living room side table, or large bookshelf — anywhere that you want to add a little vintage touch! Best of all, it makes it easy to take from or add to your collection.
Decorate a birdhouse
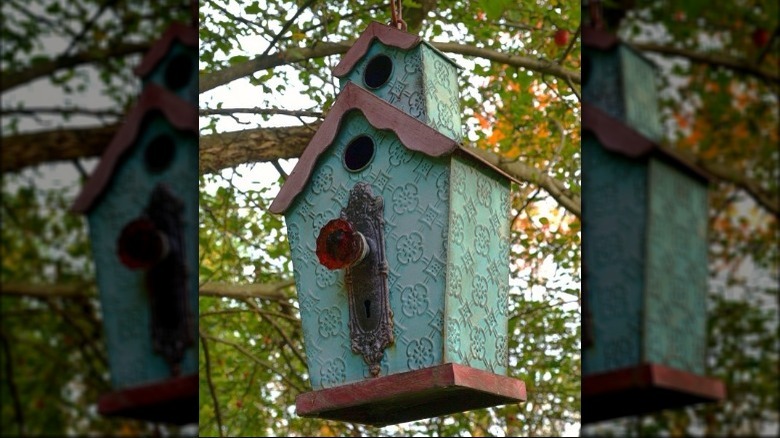
Make a birdhouse feel all the more homey by decorating it with a door knob. Just like a nice door knob can beautify your doors, it can make a birdhouse look more quaint too. Since it will be front and center, choose a pretty ornate door knob. Consider the material and ideally choose an exterior door knob, which will hold up better outdoors.
Nature Niche recommends a few tips for making a birdhouse more attractive to birds, which can help you choose a door knob. Choose a natural door knob color, which can help the birdhouse blend in more with its surroundings and helps camouflage the bird's home from predators. Of course, if the birdhouse is more decorative rather than functional, choose any door knob style and color you wish. Once you've chosen a door knob, attach it to the front of the birdhouse using glue or screws, depending on the birdhouse materials. If you use glue, make sure it's a waterproof option so it won't wash away when it rains.
Vintage-inspired grand millennial display
If you're not much of a crafter (or just don't have the time to take on another project), there are ways to use old door knobs as-is. Incorporate loose antique door knobs into your vintage decorations. Decorative door knobs can add character and charm to your shelf display, especially if you have a trendy grand millennial-style display. This style incorporates "outdated" traditional elements like floral patterns, ruffles, embroidered decor, and wicker and rattan furniture. But it's presented in a more modern way by mixing it with on-trend decor pieces.
This decor style exudes coziness, so an antique door knob would fit right in on a grand millennial shelf. Liz Marie blog shares some shelf styling tips that you can use to create your vintage-inspired display. Generally, it's best to put large and heavy items on the bottom shelves (including visually bulky items that look "heavy" even if they're not). Smaller and lighter pieces like door knobs should be placed towards the top shelves. This type of placement makes the shelf feel more grounded and balanced overall.
Christmas tree base
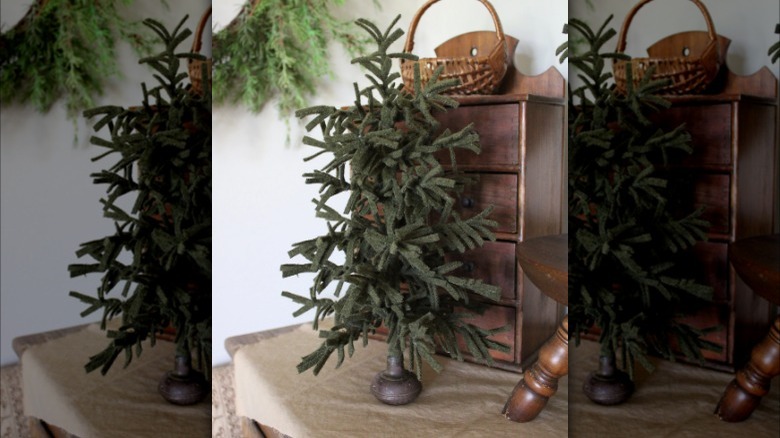
A mini Christmas tree is the perfect solution for small spaces, tight budgets, and decorative holiday scenes — whatever the reason you might not want a full-sized tree. Their smaller size means their base is more visible, so you'll want an option that looks nice. Like an antique door knob! This is another project where you'll want to choose a flat-faced door knob. Since this tree project is larger, a wide and flat door knob will help it balance. However, if your finished tree has trouble balancing or is a bit wobbly, an easy solution is to use museum putty to secure the base to the table or floor.
For this project, use a faux mini Christmas tree. To get a similar look as this inspiration photo, choose a tree around 10 inches wide by 15.5 inches tall. You don't want to go too large with your tree here since the bigger the tree, the more likely the base will be unbalanced. Try to find a tree with a base post that is similar in diameter to the door knob post for a more seamless look. Attach the tree post to the door knob with a strong adhesive, like super glue or hobby glue. Once the glue is dry, your tree is ready to display!
Canister lid
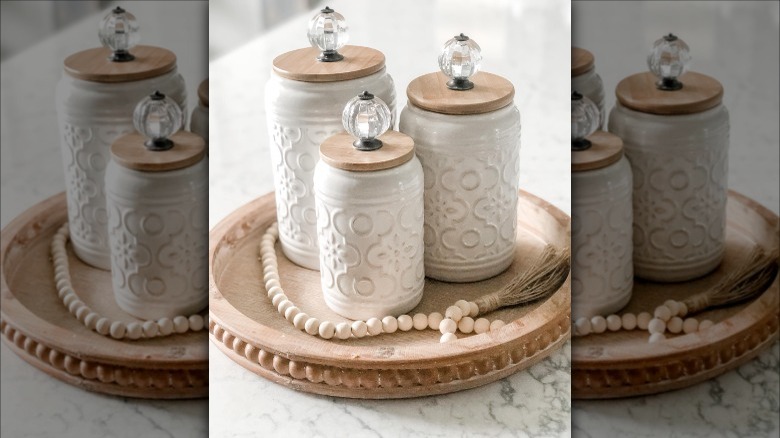
Large canisters can get a major style upgrade with the addition of an old door knob. For this project, choose decorative door knobs since they'll be one of the first things you notice on the canister. Try to match the door knob to the canister size so it looks balanced. For example, you don't want to use a full-sized door knob on a small mason jar — though you could try this DIY with small drawer knobs! For most standard-sized door knobs, this means you'll want to use large canisters.
Depending on the door knob design, this project can suit a few decor styles. You can give canisters a glam touch with glass knobs, use vintage door knobs for a farmhouse chic look, and more pared-down modern door knobs for a contemporary kitchen. First, mark the center of the lid. Then, add a dab of strong, clear-drying glue like super glue to attach the door knob to the canister lid. Keep in mind that these lids should now be hand-washed (even if they're dishwasher-safe) to make sure the door knob and glue stay in good condition.