Giving Your Shower A Makeover? Here's How To DIY Tile Your Shower

Ditching the fiberglass shower for a tiled version could add a bit of glamor and character to your bathroom, but for that to happen, you have to consider the process and whether doing it yourself is an option. Installing bathroom shower tile can be a bit tricky if this is the first time you've tiled anything, but with a few steps and a bit of practice, you could be a pro in no time.
To DIY tile your shower, start with getting the right tools for the job, which typically include a notched trowel, a tile cutter, tile spacers, the tile for the project, along with grout, grout float, and sealant. You may be able to rent some of the tools at your local home improvement store. Don't forget the necessary respirator and safety equipment.
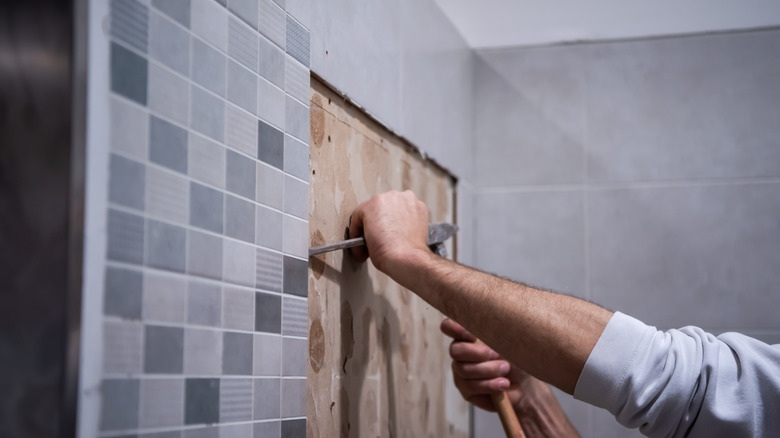
Once you have all of the supplies needed, prepare the shower wall by removing any existing tile from the surface or removing the fiberglass shell. You may be able to use a hammer and chisel to pry off the old tile, but try to avoid as much damage as possible to the surface of the drywall. Then, you'll need to replace the backer board or the surface where the tile will adhere if there's any significant damage to it. With this prep work done, you're well on your way to tiling your shower, as you'll then need to apply grout, cut and lay the tile, and seal it.
Select shower tile and create a pattern
As you work on preparing the bathroom shower stall for the new tile, it's also necessary to consider the tile products you'll use. You'll find a multitude of options available to select from, but it's best to focus on tile that's water-resistant and highly durable for shower walls. Porcelain tile is a good option because it's available in diverse styles and colors but is also able to handle the wet environment with ease. Other options include glass tiles and glazed ceramic, though you should avoid traditional ceramic due to the tiny holes that allow moisture to penetrate them.
Once you have an idea of the material you would like, spend the time creating and laying out a pattern. Do a dry-fit of the tile along a horizontal row in your shower. This will give you a good idea of the layout and how much space you'll want to put between each piece. After the horizontal layout, work on the vertical pattern by starting at the top near the ceiling. Starting at the top ensures that any cut tiles occur towards the base of the shower, which is less noticeable.
After a dry fit, determine if you'll need to cut that bottom row. If so, then start with the second row of tiles. Be sure to use a level so each piece remains level throughout the project. Consider attaching a piece of wood along the dry-fit layout to create a level starting point.
Apply the tile mortar
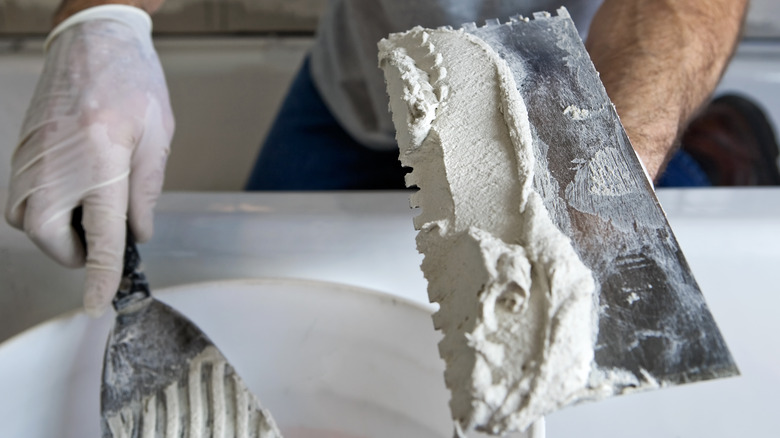
Mortar, sometimes called thinset, is the glue for the tile, but there are various types and numerous manufacturer options. No matter which type you buy, follow the directions on the package for mixing it. The goal is to create a texture that's much like that of peanut butter (and certainly not the chunky version). Next, choose the right notched trowel for the job. While you may not think this matters, most tile manufacturers provide specific recommendations for the size of the trowel notches as that helps to ensure even placement of enough mortar per tile.
Once mixed, use your trowel to apply a thin layer of it to the wall. Less is more here, as too much mortar isn't going to necessarily increase the holding strength but will make leveling your tile much harder to do. Aim for a small section at a time, often just enough for a few tiles to be placed. This helps ensure the mortar doesn't dry out too much as you place each tile.
In the ideal scenario, you're working from the center of the wall from the floor to the ceiling. Apply mortar along that level edge you've created. Don't race through this step since you'll want to ensure you have enough time to level each tile properly.
Cut and set the shower tile into place
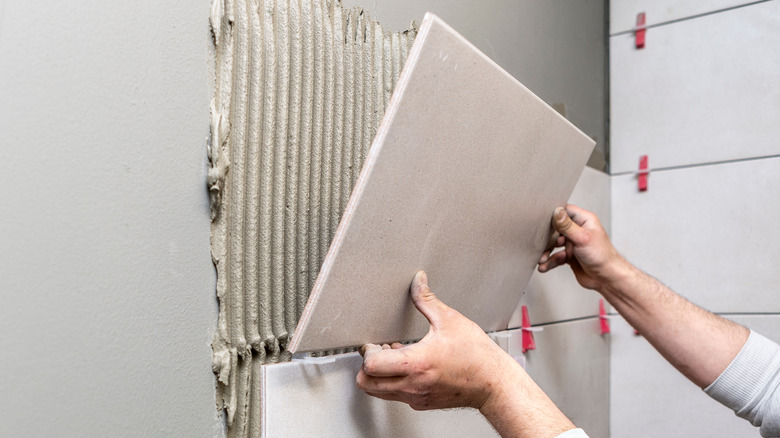
Exact measurements are a must when cutting tile, as is using a tile cuter. Practice using the tile cutter to get a feel for the power and pressure you need to place on the tile. Follow the manufacturer's directions on how to use the tile cutter to minimize the risk of splitting it improperly or creating tiny cracks. If you need to cut curves into the tile, you'll need a tile nipper, which allows you to break small portions off to get the right fit.
With the right size, your next step is to position the tile onto the already-in-place mortar. Place a tile spacer between each one as you go. Spacers help to hold the position of the tile so there's a uniform amount of room between each piece of tile, creating a professional-like look. Once the spacers are in and the tile is placed, use the back end of a mallet to tap the center of the tile. This helps the adhesive to grip the tile.
Finally, before moving on, ensure the tile is level (you should do this every time you place a tile, or you may have to remove several to return to a problem tile later). If it's not level with the tile next to it, remove it and reapply the mortar, ensuring a more uniform level. Continue from top to bottom, one row at a time, until you complete the shower stall.
Apply grout and clean up the tile

At this point, your project is likely looking impressive, but you'll still need to grout the tile. Grout helps fill in the gaps, creating a uniform look, but it also minimizes moisture from penetrating the backboard. Choose a grout color and type that matches well with the tile you've selected. You may be able to purchase pre-mixed grout. If not, you'll need to mix it with the amount of water recommended by the manufacturer. You're again looking for a peanut butter consistency. Once mixed, the grout needs to rest for 10 minutes. This process allows the mixture to come together, strengthening. It will feel a bit harder to mix at this point, though it should still be pliable and easy to spread.
Scoop out some grout onto a grout float (the trowel-like tool for the job) at an angle, getting most of it towards the two few inches of the tool. Then, apply slight pressure as you move the grout over the tile along the spaces, filling them as you go. Ensure enough grout gets into each joint to fill them. Start at the bottom of each tile, and apply upward for the best coverage. Use the grout float to remove as much excess material as possible. Then, go back over it with a large sponge about 20 to 30 minutes after you've placed it.
Seal the grout and tile to prevent water damage
Showers are wet places where bacteria can flourish, making sealing the grout here essential. It will take three or so days of drying before you can seal it (and you shouldn't be using the shower at all yet). The goal is to ensure the grout hardens, which will help keep the tile in place.
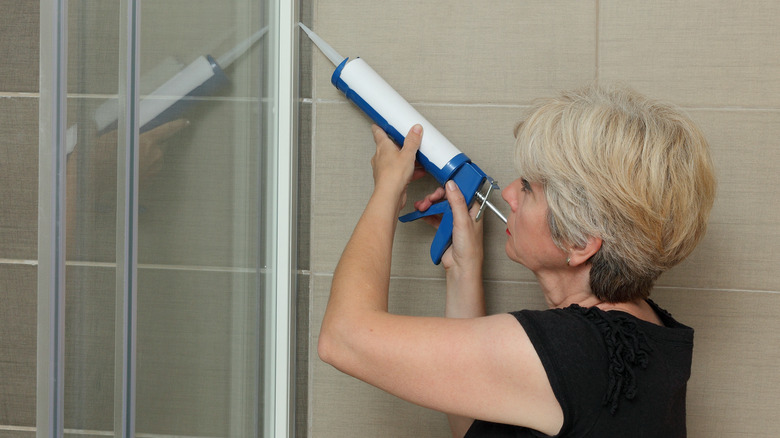
Purchase appropriate grout sealant for the product you have. Follow the manufacturer's directions for application, which generally will simply be spreading it over the grout. Also, use a silicone-based sealant for bathrooms to seal the corners of the tile, the edges along the bathtub, and all joints. Use a caulk gun and a fluid motion to ensure the silicone gets into all areas well. Then, use a caulk edger to remove excess material.
Once again, wait as long as the manufacturer recommends for the sealant to fully dry. Once you do that, your next step is reattaching all fixtures to the space. You may also need to add sealant to these areas to ensure a water-tight finish. Once you've done this, you've completed your impressive shower makeover.