What Purpose Does A Ballcock Serve In Your Toilet And How Can You Replace It When Broken?
Having a properly functioning toilet is essential for the comfort and convenience of any household. However, when an integral component like the ballcock malfunctions, it can lead to issues such as water wastage, constant running, or even a toilet overflow. By understanding the purpose of a ballcock and learning how to replace it, you can take control of your toilet's maintenance and avoid the inconvenience and expenses associated with a malfunctioning system.
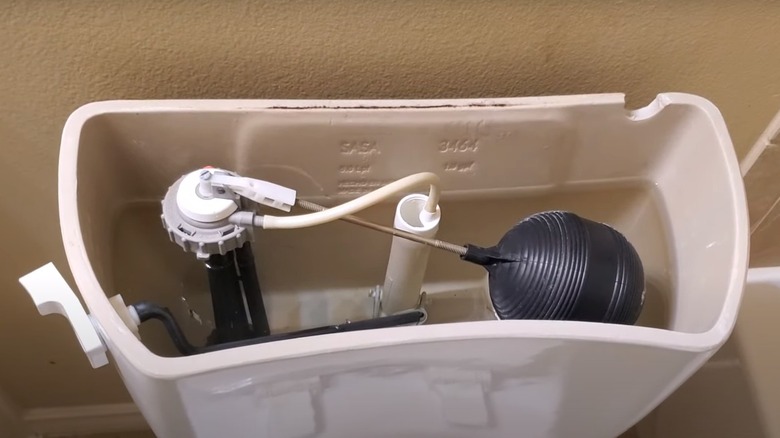
The ballcock, also known as the fill valve, plays an important role in regulating the water level inside the toilet tank. The ballcock is made up of a floating ball attached to a long arm that operates a valve. It is responsible for allowing water to flow into the tank after a flush and shutting off the water supply once the tank is full. By maintaining the correct water level, the ballcock prevents overflow and ensures efficient flushing. Common signs of a broken ballcock include a constantly running or humming toilet, water leaking into the bowl, or insufficient water filling the tank after flushing. These issues not only waste water, but can also lead to increased utility bills and potential water damage.
Steps to replace a broken ballcock
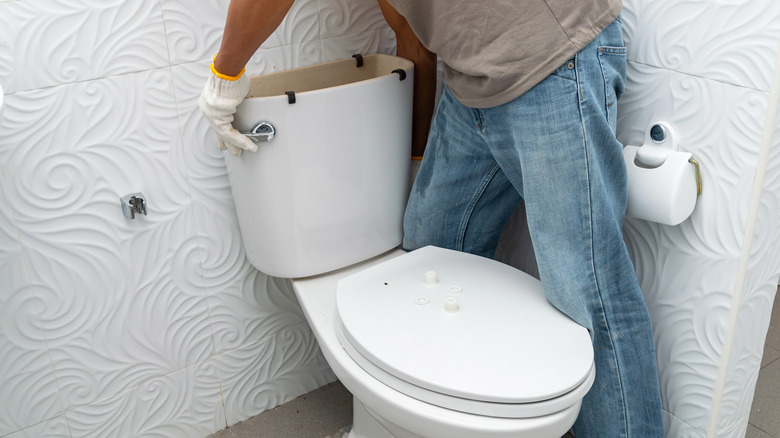
To begin, gather the necessary items: an adjustable wrench or pliers, a bucket and towels, a new ballcock assembly (available at hardware stores), and plumber's tape for sealing. Locate the shut-off valve, typically found on the wall near the toilet, and turn it clockwise until it stops to cut off the water flow. Next, flush the toilet to remove most of the water, and use a bucket and towels to remove any remaining water. To detach the old assembly, find the water supply line connected to the bottom of the ballcock. Loosen the nut and disconnect the supply line.
Position the assembly in the same location as the old one. Attach the supply line to the bottom of the ballcock and tighten the nut securely. Apply plumber's tape to the threaded connections to ensure a watertight seal. After installing the new ballcock, consult the instructions provided with the new assembly to determine the proper adjustment method. This usually involves modifying the float height or adjusting the valve mechanism. Turn on the water supply valve and allow the tank to fill. Check for any leaks around the connections and ensure the ballcock shuts off the water flow once the tank is full. Finally, flush the toilet to confirm that the ballcock refills the tank correctly.
Precautions and adjustments
Following the provided steps is an essential starting point, but it's equally important to exercise caution and follow any specific instructions that come with your new ballcock assembly. Manufacturers may have unique designs or procedures that they recommend, so it's wise to refer to their guidelines first to ensure a successful replacement. It's also important to take certain precautions, such as turning off the water supply and handling tools with care to prevent any damage to your toilet. Keep a bucket or towels nearby to avoid any potential spills during the replacement process.
Observe the water level in the tank once it has filled. It should be around an inch below the top of the overflow tube. If the water level is too low or too high, adjustment may be necessary. To adjust the water level, locate the adjustment screw, clip, rod, or float that allows you to modify the float height. Make one minor adjustment at a time. Then, flush the toilet and observe the refill process. Ensure that the ballcock shuts off the water flow once the tank is full, and that there are no leaks or continuous running water.