Here's How You Can Bring Your Dying Lawn Back To Life

If you've got a lawn to take care of, then we know you've got questions. How do you convince the moles to live anywhere else besides your backyard? What's the best option for fixing dry patches? Should you re-seed or lay down sod? Having a backyard to enjoy with the family can be lovely, but along with that bliss comes a good degree of maintenance. One thing that's for sure is that you should never ignore the health of your grass and the soil that lies beneath it because it's the key to all the enjoyment that comes with a lush, even lawn.
There are tried and true methods for whatever lawn care issue you're facing. Just bear in mind that a yard is a very large and somewhat delicate ecosystem; it will take time for a dying lawn to return to balance and grow back healthy. Here are some of the best tips for restoring life to your tired, bald, patchy, mess of a lawn.
Add nutrients by applying Epsom salts
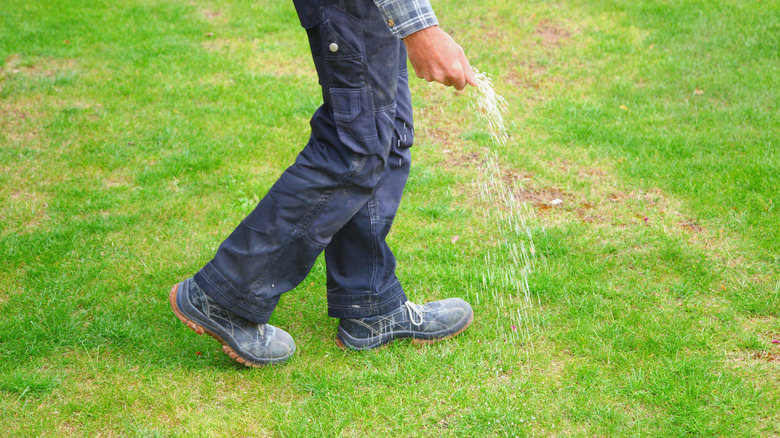
No, it is not time to take an extra long soak in the bathtub, it's time to help your ratty lawn bounce back to life. Also called magnesium sulfate, Epsom salts were first discovered in 1618 in a town called Epsom in England when a farmer noticed that his cows were quickly healing from shallow wounds after wading through salty water that they refused to drink. Can Epsom salts be just as good for your grass as they can be for your sore muscles? Maybe.
If you want to be sure that Epsom salts will help, get your soil tested for magnesium and sulfur deficiencies, as those are the two nutrients the salts will increase. In turn, Epsom salts can improve soil quality and give your grass a nice and even bright green color. They can basically be used as a lawn fertilizer; apply in spring by mixing 2 tablespoons of salt with 1 gallon of water. Or, use a spreader to apply the salt directly to the grass at a rate of three pounds for every 1,250 square feet (via the Epsom Salt Council), and then turn on your sprinkler system and let it do the dissolving.
Control the moles
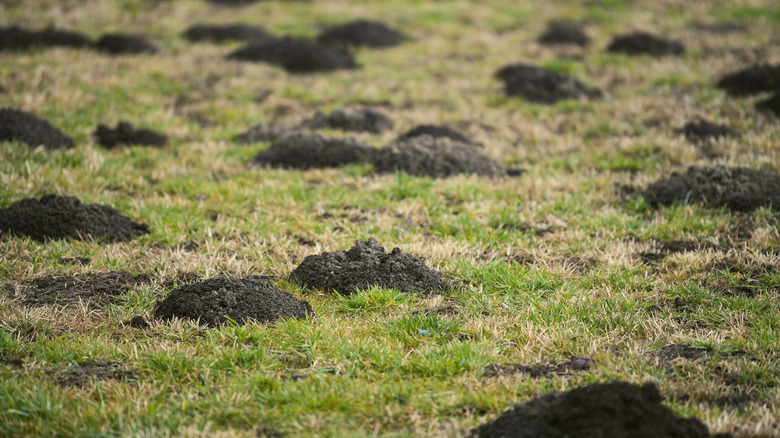
Even if you didn't grow up playing Whack-A-Mole at the country fair, chances are good you know what a nuisance these burrowing creatures can be when it comes to lawn care. On their nonstop daily hunt for insects to keep their bellies full, moles can cover a lawn in endless rows of shallow tunnels that disturb the grass and leave mounds of soil everywhere. Prevention is a key element of mole control, but if you've already got a backyard covered in molehills, don't despair; there's plenty you can do to get your lawn back on track. The first tactic is to make sure they don't have anything to eat, which could mean applying insecticide to kill grubs (more on grub removal below).
Repellent options include ultrasonic devices that irritate moles with noises they don't like, and nontoxic sprays or granules made of castor oil. You might also try keeping them out of specific areas by burying a row of rocks that they can't penetrate or planting a garden full of plants they don't like. Alliums naturally deter many types of pests, and moles specifically are known to turn their nose up at marigolds and daffodils.
Eliminate grubs
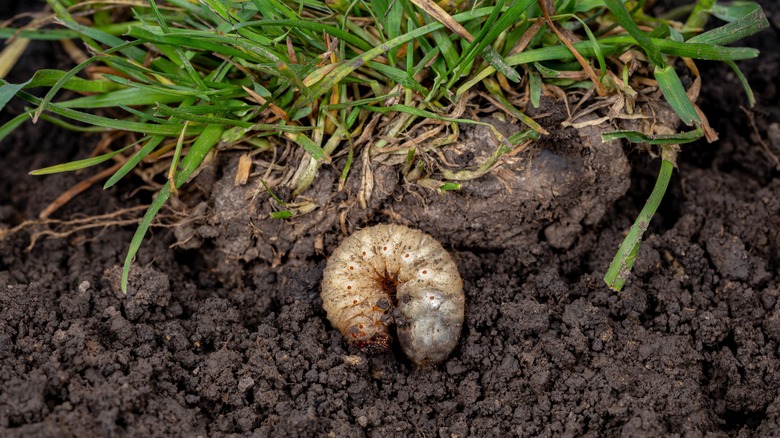
You can figure out if you've got a problem with grubs by digging a few inches below the surface of a dead patch on your lawn and looking for them. Grubs are white and close to an inch long, and you'll find them curled up like little clams. A few grubs here and there should not be a problem, but if you have an infestation then you'll need to take action because they can be responsible for quite a lot of damage. Choosing an effective insecticide is not as simple as heading down to the garden center and grabbing a product off the shelf. The appropriate formula will depend on what time of year it is and what stage of life the grubs are at.
Some insecticides prevent grubs, some combat an ongoing issue, and some don't contain the right chemical formulation to do much of anything in regard to grub control. It's always a good idea to contact your local extension service for expert guidance. Once you're sure you have the right product for the job, pull on some boots and gloves, carefully apply the chemicals to the grass, and then water your lawn so they seep into the soil and really go to work for you.
Feed the lawn with compost
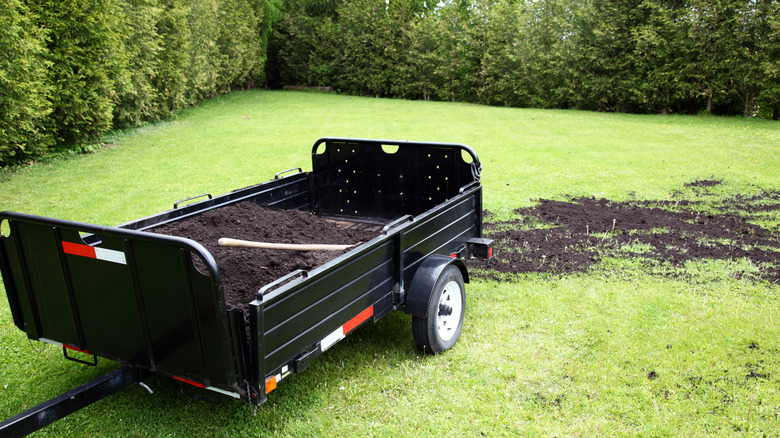
If you think of amending the soil in your garden, you'll envision yourself pulling out all of the weeds and then breaking up the top few inches of soil with a garden tool or rake to really mix it all up. Of course, that's not possible with your lawn because of the destruction it would cause to the grass. That's where topdressing comes in. Topdressing means spreading compost over the top of your grass in the hopes of improving the soil conditions below over time. In essence, you're feeding it from above.
You'll need to use enough organic material to make a difference in the soil's health without going overboard. Too much compost will block out oxygen and sunlight, inadvertently choking out the grass below rather than helping it. Use a shovel and a wheelbarrow to spread compost throughout the yard as evenly as you can. Then very gently rake it out so the compost starts to mix with the soil and any healthy blades of grass you do have can pop up above it and be exposed to the sun. Don't forget to water your lawn when the application is complete.
Irrigate less frequently but with more water each time
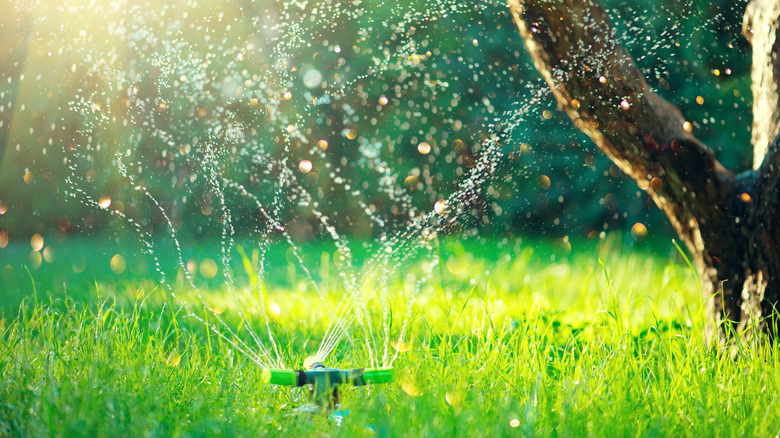
Water, water everywhere. The internet is full of advice on how best and when best to water your lawn. When it gets hot for a long duration throughout the summer months it makes sense to think you should turn on the sprinklers quite often. We're supposed to drink a ton of water ourselves, so what's the difference? It may go against our gut intuition, but when it comes to grass it's actually better to water less frequently but with a higher volume of water each time you do it.
A daily shallow spritz only serves to cover the grass in moisture that can lead to disease, and often a lot of that water evaporates during the heat of the day, meaning it gets wasted before it can be absorbed. Instead, give your grass a long, deep drink to allow enough water to seep down through the soil to the roots. Ideally, you want the soil to be evenly wet 4 to 6 inches below the surface. This will seem like a lot of water the first time you do it, but since you'll turn on the sprinklers less often it will even out.
Keep the mower blade at its highest setting
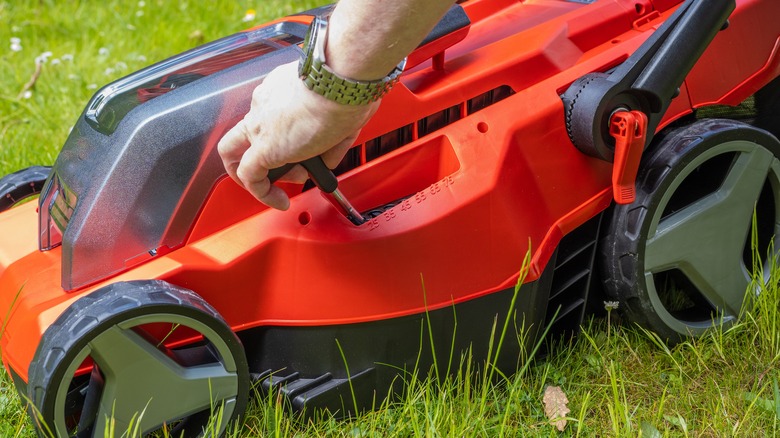
There are plenty of mistakes everyone makes when mowing the lawn, and cutting down too close to the soil is an important one to avoid. Your blade height should always be set at its highest level, so adjust it once and leave it for good. This is going to help each blade of grass establish itself with a deeper and stronger system of roots. As you continue to mow this way, the grass becomes more drought and grub tolerant. And as each blade grows a little longer, they start to shade the soil which inhibits weeds and crabgrass.
Aim for a blade height between 2 to 4 inches, but take a look at your grass after you finish a pass. If it's falling or laying over on its side and looks messy, go ahead and lower the blade a tiny bit. Even just ½ inch can make a big difference in appearance.
Mulch leaves with the lawn mower
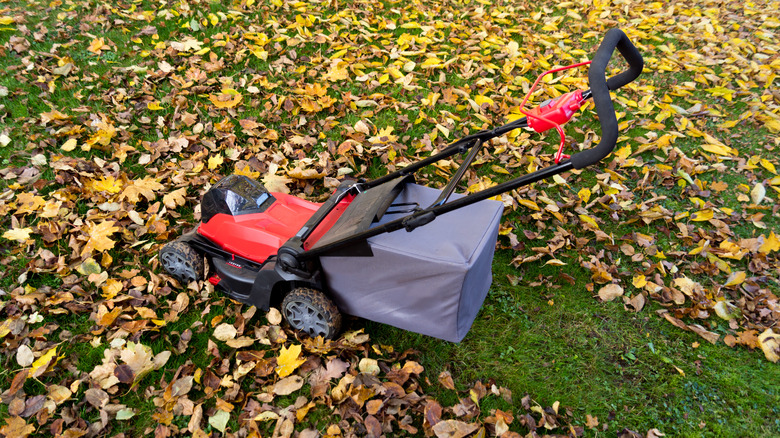
Tired of raking up endless piles of leaves? If you've been waiting for a reason to skip this mundane chore, we've got good news for you: You don't really have to do it. In fact, raking might actually be hurting more than it's helping, so put the rakes and the paper bags and the oversized gardening gloves back in the shed and just pull out the lawn mower. The goal here is to turn the dying leaves and other decaying plant matter into mulch that will re-feed the grass. Any standard mower should be able to get the job done, but there are specifically engineered mulching mowers if you need a more powerful machine.
Clearly, fallen leaves are the key ingredient here, so this is a process you're going to employ come autumn. If your yard contains a lot of deciduous trees, and therefore a lot of falling leaves, double check that your mower blade is at the highest setting (which it should be anyway, right?). Over time the chopped-up leaves will break down and turn into natural fertilizer for the lawn. If you have excessive amounts, you can bag it to spread over other areas of the yard or garden for the same purpose.
Overseed bare patches
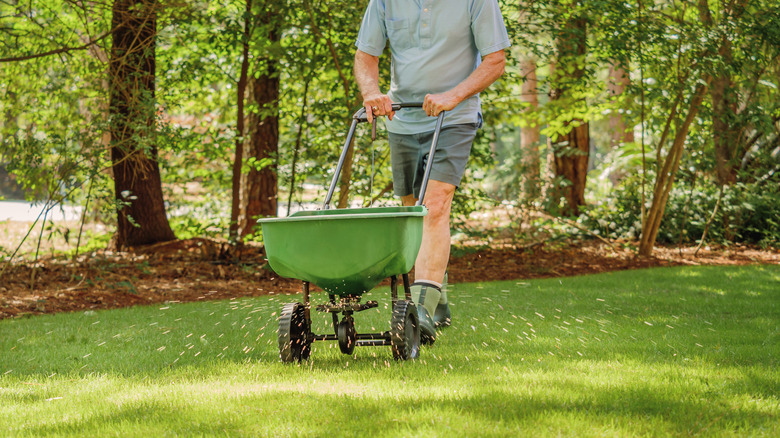
You could have a major issue like a persistent fungal disease or a mole family that refuses to take a hike, but your lawn could also just be tired and old. Maybe you just bought a new house and the previous owners had paid it no mind. Or maybe it didn't occur to you to take care of it until you noticed the bare spots. Either way, overseeding may be all it takes to perk it back up.
Simply put, overseeding means covering your entire lawn with fresh grass seed towards the end of the season and leaving it to germinate over the winter. Depending on your climate zone, you can incorporate different kinds of turfgrass when you do this. Check in at your local garden center about which types of grass grow best in your area and also to learn about improved grasses that have come on the market and will fare better than whatever has been there for the past few decades.
Plan to overseed in the fall and consider aerating the lawn before you begin. We've got more info on how to do that below.
Patch up dead spots by laying new sod
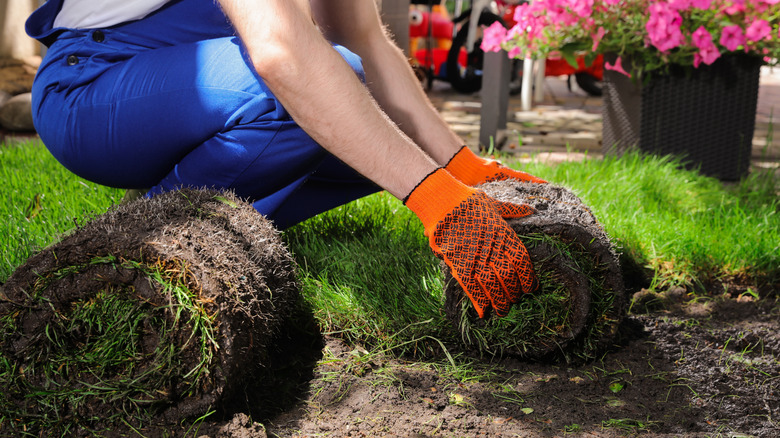
Are you trying to plan a barbecue or graduation celebration and your heart sinks when you look out the kitchen window to the mud hole that has become your backyard? You might be at a point where you've got too many dead spots and you simply don't have time to wait for seeds to flourish or chemicals to do their job. In that case, it's probably time to consider laying down large patches of pre-grown sod. This is a project unto itself, requiring a fair amount of prep to ensure the sod grows well. It's not quite the shortcut many people think, but you'll have it done in a weekend and be thrilled with the gorgeous results.
To ensure you're properly installing sod, start by using a rototiller on the soil to remove rocks and incorporate organic matter. Then use a rake to even out the surface. The process of laying out the rolls will be similar to installing laminate flooring or vinyl planks. Stagger the edges of each piece to avoid gaping seams and push them together so there's no space between them. You'll need a sharp knife to cut edges when you meet a tree trunk, and a lawn roller will come in handy for evenly packing everything tight, which will encourage the young roots of the sod to grow down into the existing soil.
Pour boiling water on weeds

If your budget hovers somewhere close to $0 and weeds are your primary nemesis against maintaining a lush green lawn, you should try boiling water. It's not going to take care of any major problems, but it's a simple and cost-effective option for smaller issues. This method of weed control is best for spot treatments because it's known as a "contact herbicide." All that means is that the boiling water will only kill the unwanted plants (weeds) that it comes into direct contact with; it won't do any harm to nearby desirable plants (healthy grass) and there won't be any chemicals that seep into the soil.
Small, young weeds should be your main target with boiling water, as it won't be much of a match for the serious ones. A tea kettle will allow for better aim. You can hit patches throughout your lawn and apply the hot water to the edges and cracks in sidewalks or pavement. It will most likely take a few applications before it eliminates weeds, but it's free so that may make it worth the added effort.
Rake away thatch
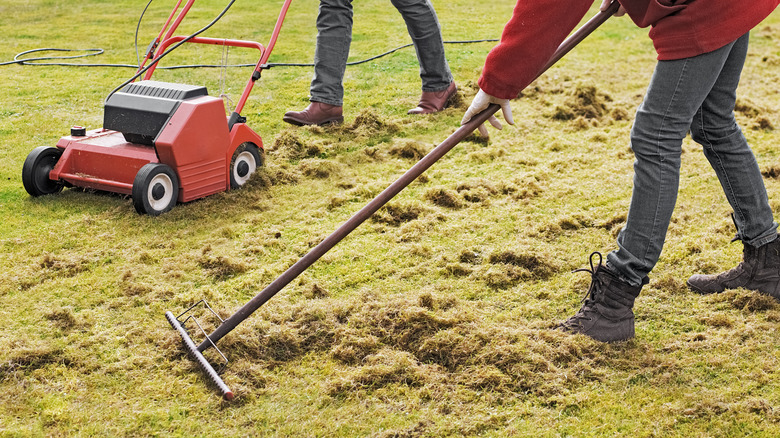
Thatch is a layer of debris that forms between blades of grass and the soil beneath. If it gets too thick it will pool rain water above the surface and turn your lawn into a mushy mess. This leads to shallow roots, grass that cannot handle any degree of drought, and issues with fungal diseases and pests. A thick layer of thatch will also prohibit fertilizer from penetrating down to the roots and potentially suffocate an otherwise healthy lawn. Proper mowing, aeration, and mulching of grass clippings should prevent thatch, but if you've already got too much of it, you'll want to get rid of it.
Dethatching is sometimes called power raking; a power rake looks a lot like a lawn mower except that it has rake tines underneath it instead of rotating mower blades. You can adjust the height of the rake tines depending on how deep into the grass you need to go in order to pull away the built-up thatch. Power raking can be done in either spring or fall. The machine will pull up the debris and then you'll need to hand rake it to collect and remove it.
Reduce compaction by aerating
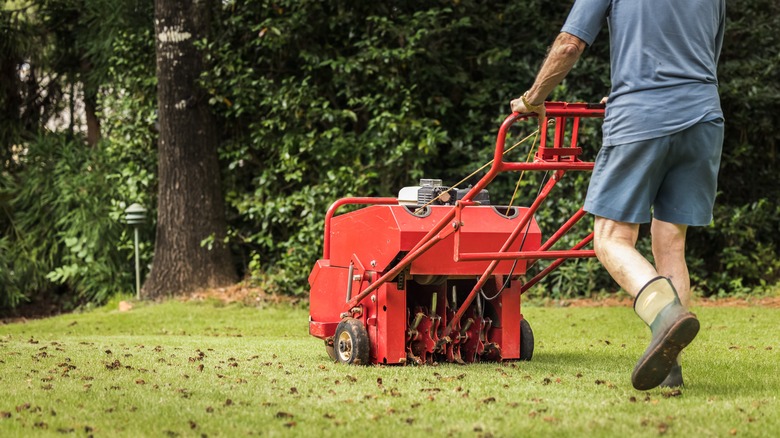
Aerating is sometimes confused with dethatching but it's actually a very different process. Yards that see a high level of activity can become packed down; soil compaction makes it difficult for water, air, and nutrients to flow freely to the root systems of the grass, which is another way they can be suffocated. Dethatching concentrates on build-up above the soil, while aeration targets the compaction of the soil below the surface by pulling up plugs and creating space for it to loosen.
There are plug (or core) aerators and spike aerators. Which you choose will be determined by your budget and the size of your lawn. A spike aerator works fine for a small yard; it will only punch holes into the grass rather than pulling up and removing plugs, but for small areas that should be plenty. For particularly compact soils and larger lawns, go for the real deal with a plug aerator. Water the grass before you begin, and be prepared to apply fertilizer and/or grass seed after you finish.
Summon the pros
Oftentimes a DIY weekend spent tending to common yard issues is plenty to bring a dying lawn back to life, but it helps to recognize that there's also a laundry list of potential diseases that homeowners may not be able to tackle on their own. Have you heard of gray snow mold or necrotic ring spot? How about crown rot anthracnose or microdochium patch? This isn't a pop quiz to see how much you've learned so much as a reminder that, even when we do all the things we're supposed to do, we can still find ourselves dealing with bare patches and unhappy grass.
Figuring out exactly which type of bacteria or fungus is attacking your grass might best be left to the professionals, who will perform an assessment and take samples for testing. They'll know what questions to ask in order to reveal all of the potential symptoms, and they'll be better equipped to choose the right remedy. For example, there are different species of turfgrass, and just like any other plant, some perform better in different climates. It could be possible that your lawn is primarily made up of a cool season grass when you would do better with a warm season grass. But at the end of the day, we can't all be expected to know that!