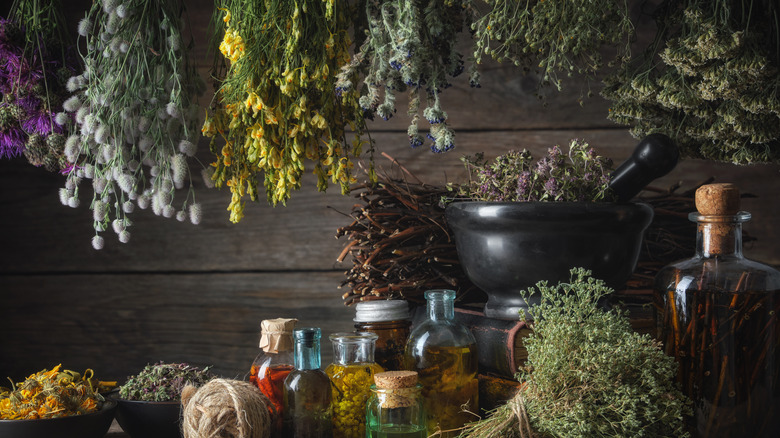
Tips To Harvest And Store Your Fresh Garden Herbs So They Last Longer
Herbs add aroma, flavor, and nutritional value to your culinary creations, and you might enjoy growing your own in either outdoor or indoor herb gardens. But you may be wondering about the best practices for harvesting and preserving these tasty plants. You can cut the fresh sprigs throughout the growing season, and there's nothing better than nipping out to the backyard to harvest a few fresh leaves that you add to a simmering pot on the stove. But, what about saving the herbs for future use? Without the correct preservation methods, they'll wilt and become moldy.
In addition to harvesting your herbs at the right time, with appropriate tools and techniques, you'll want to learn the safe and effective methods for preserving them. Fortunately, there are multiple processes that employ drying, freezing, and culinary techniques to save the flavors and aromas. With a little knowledge, you can maximize the benefits of your harvest and store the herbs so they last longer.
Snipping new growth causes the plants to proliferate

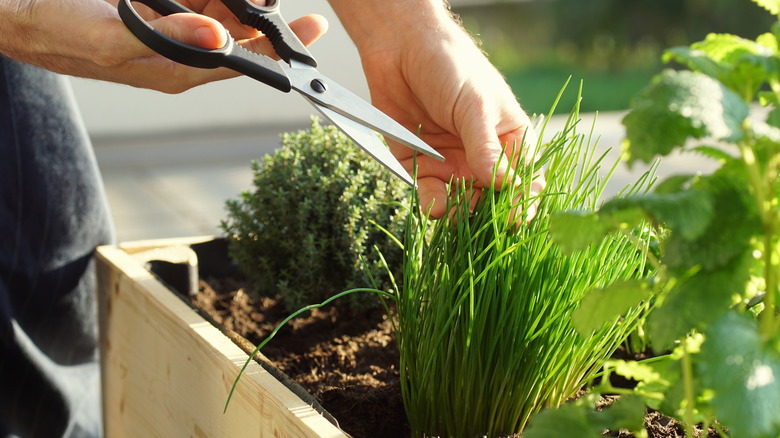
Many herb plants are grown for their leaves. These include basil, oregano, sage, parsley, and more. As soon as these plants begin to fill out and show healthy growth, you can start snipping the stems to harvest the leaves. Be sure to cut no more than one-third of the current-year growth at any one time. Following this rule ensures that you leave behind a healthy, vigorous plant that will continue to produce foliage. Snip the herbs in the morning, just after the dew evaporates.
To collect sprigs of leafy herbs, it's best to cut just above a leaf cluster. By contrast, parsley and chives should be cut at the bottom of the stem. Some herbs are grown for their flowers rather than their foliage. These include chamomile, lavender, and garlic chives. Harvest the flower buds just before they fully open. This is the time when the intensity of oil and aroma is most concentrated.
You can continue harvesting annual herbs in the fall until the frost kills the plants. But you should stop harvesting perennial herbs in the late summer. This gives the plants a chance to harden off naturally before winter. You'll see them flourish again in the next growing season.
Choose the right tools and disinfect them before harvesting
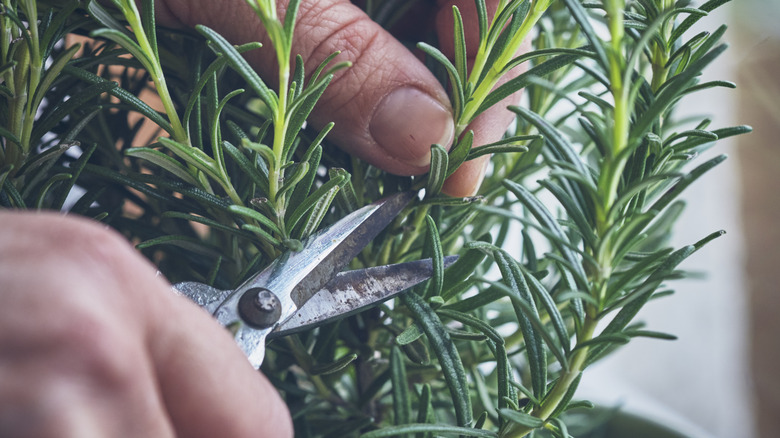
To make clean cuts on your herb plants, you'll want to acquire and maintain sharp gardening tools. Herb snips are made especially for this purpose. They feature short blades and a compact design that fits right in the palm of your hand. Alternatively, the scissor-like garden shears offer longer blades and a slender design. If you're cutting woody herbs like sage, you might reach for hand-held pruning shears. These are larger than garden shears and feature curved blades that fit around the stems of woody plants to make clean cuts.
Before you head out to the herb garden to clip a few leaves and flower buds for tonight's dinner, pause to consider the condition of your tools. Although the pruners might look clean, they can carry pathogens that infect your plants with damaging diseases. The best way to sterilize your gardening tools is to wipe or soak them with a solution that kills harmful microorganisms.
Many gardeners recommend that you wipe tools with isopropyl alcohol to sanitize them. This is a readily available, inexpensive product, and you can use it straight from the bottle. As an alternative, you can soak your tools for 10 minutes in a solution of 1 part bleach to 9 parts water. Similarly, you might mix a solution of 1 part trisodium phosphate (TSP) to 9 parts water, allowing 3 minutes for soaking. Be sure to rinse the tools with clean water after soaking them.
Cut herbs before they flower
Herbs fall into a category that gardeners refer to as cut-and-come-again plants. This means that the plant continues to thrive and produce new growth, even after you've harvested some of its stems and leaves multiple times. Herb plants produce fewer new leaves after they flower, so it's important to start pruning early and continue taking cuttings throughout the growing season. It doesn't hurt the plant if you begin cutting young herbs when they're still in their infancy, as long as you leave at least two-thirds of the foliage intact for continued growth.
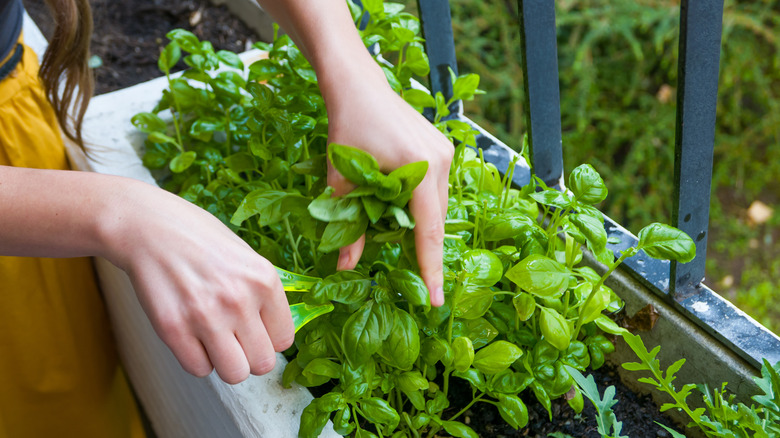
You'll want to use harvesting techniques that benefit your herb plants, and different varieties of herbs exhibit different tendencies for optimal growth. Chives, parsley, cilantro, and dill thrive when the stems are cut approximately ½-inch above the ground. On the other hand, you can cut oregano, thyme, sage, rosemary, and mint anywhere along the stems. These plants flourish with haphazard cuttings. Basil, a favorite of many cooks, is a fast-growing herb that responds well to cuttings near the tops of stems. Find a spot along the stem about 1 or 2 inches from the top, and cut just above a joint where 2 or 3 leaves emerge from the stem.
Provide moisture for fresh herbs when storing them in the fridge
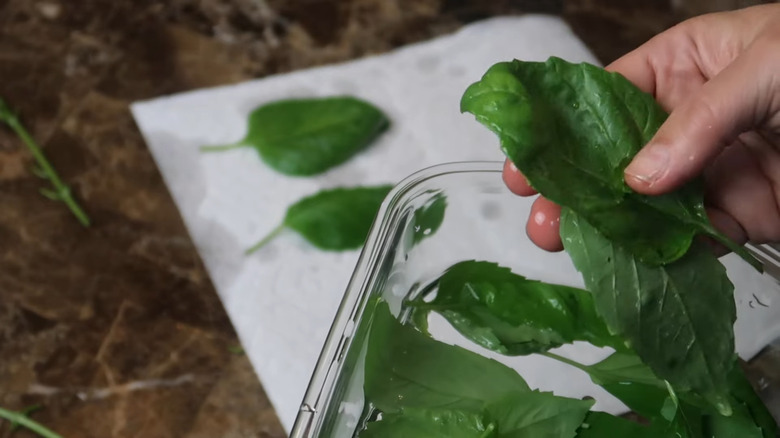
Once they're cut, herbs wilt quickly. After you've completed an early-morning harvest, you'll want to keep the herbs fresh until you're ready to add them to a recipe. If you plan to use them within a week, refrigeration is the best option. But, you don't want to simply toss them in the fridge.
After washing and drying the herb cuttings, you can lay them out lengthwise on a damp paper towel and roll them up, similar to making a jelly roll. Then, pop the rolled-up towel into a sealable plastic bag. Close the bag and store it in the fridge. If you're keeping the herbs for more than a few days you'll need to re-moisten the paper towel as it dries out. Be careful not to use too much water in this process, as the wet herbs will begin to rot. It's important to keep them in a moist (not wet), airtight, refrigerated environment.
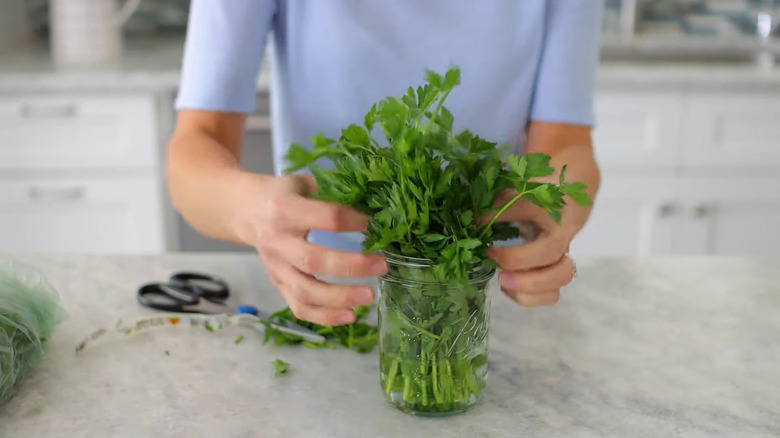
An alternative method for storing fresh herbs in your fridge is to stand them up in water, like bouquets of flowers in vases. For this method, you'll want to start by washing and drying the herbs. Then, trim the bottom inch from the stems. Place bunches of herbs in glass jars containing enough water to cover the bottom stems but not the leaves. Cover the herbs and jars with inverted plastic bags to keep air out.
Preserve herbs by hanging them to dry
After cultivating and harvesting your herbs, you'll want to keep them on hand to enhance the flavor of your favorite dishes. Hanging them to dry is one of the oldest and easiest ways to preserve fresh herbs. As an added bonus, the aroma and beauty of the suspended herbs lend a gracious, old-fashioned touch to your living space.
Start by rinsing the herbs in clear water. Then, lay them out to dry in the sun where they'll wilt. Next, you'll want to divide the herb stems into small bunches and tie the stems together with string near their base. Hang the bunches upside down from a rod or clothesline in a dark closet or basement. Be sure to provide ample ventilation so that air is circulating around the bunches of herbs on all sides.
For best results, you'll want to work with small bundles of four to five stems each. With proper ventilation, the drying process will take two to four weeks. Check to determine if the herbs are fully dried by removing a few leaves and crushing them between your fingers. If they feel crisp, and they crumble easily, they're dry and ready to be stored away for future use.
Dry them in the microwave
A faster, more modern take on drying herbs involves using your microwave oven. The process preserves the herbs by removing any moisture that could support bacterial life in the leaves and stems. Basil, parsley, celery leaves, thyme, savory, marjoram, and oregano are among the thick-leafed plants that make good candidates for drying in the microwave. This super-quick method results in a greater retention of flavor and color when compared with hanging the herbs for air drying over a period of weeks.
Start with fresh sprigs that are rinsed and dried. Pick the leaves off the stems and spread them evenly over a double layer of paper towels set atop a microwave-safe plate. Cover the plate with an additional paper towel or a cloth dish towel. Microwave on high for 30 seconds, then toss the herbs and reset the microwave for 15 to 30 seconds. Repeat in short intervals, checking the herbs in between cooking times to determine if they are completely dry. When the leaves feel brittle and crumble easily between your fingers, they're dry enough for storage.
Use a food dehydrator to preserve them
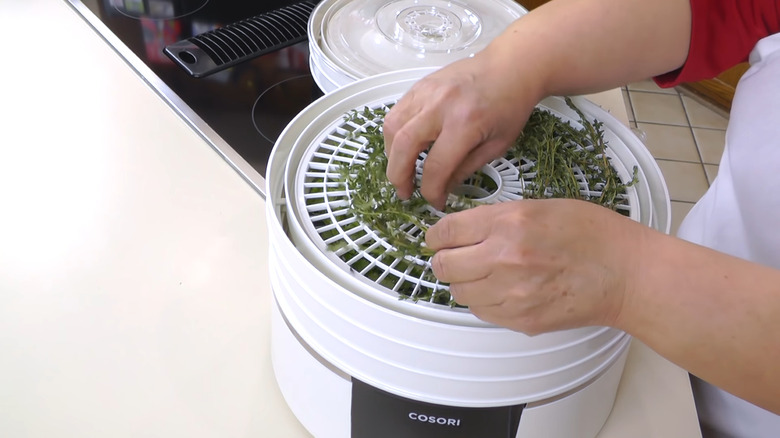
A food dehydrator gives you complete control over the temperature when you're drying herbs. Although it takes longer than microwave drying, dehydrating your herbs is an excellent way to retain their flavor and color. On top of that, it takes only a few hours, compared with weeks of hanging them up to air dry.
Start by rinsing your fresh herbs, then pat them dry with paper towels. If the leaves are small, you can leave them on the stems. Larger leaves should be removed. Spread the herbs in a single layer on the dehydrator trays, and set your dehydrator to 95 to 115 degrees Fahrenheit.
Depending on the type and amount of herbs, it will take one to four hours to dehydrate them. Check the sprigs every hour to determine if they're fully dry. They should crumble easily between your fingers. If you're drying different types of herbs at one time, keep track of where you place them on the drying racks. When they're dried, herbs tend to look alike, and this can be confusing when you're ready to label them for storage.
Store dried herbs in airtight containers

Dried herbs can be stored for up to a year without significant loss of flavor and aroma. Once you've preserved your herbs by removing all moisture from their leaves and stems, it's important to avoid reintroducing moisture. This could cause mold growth, making the herbs unusable. It's best to keep dried herbs in airtight containers that you store in cool, dark locations. Keep them away from heat, humidity, and temperature changes, avoiding window sills and shelves near the stove.
After drying, you can store your herbs in glass jars or metal tins with tight-fitting lids. Be sure the containers and lids are clean and completely dry. Label them for quick identification. To preserve their intensity, don't disturb the dried leaves or seeds before storing them. Instead, you should wait to crush or grind them just before you pop the herbs into a delicious soup, stew, or other recipe that you're preparing.
Freeze your fresh herbs for later use
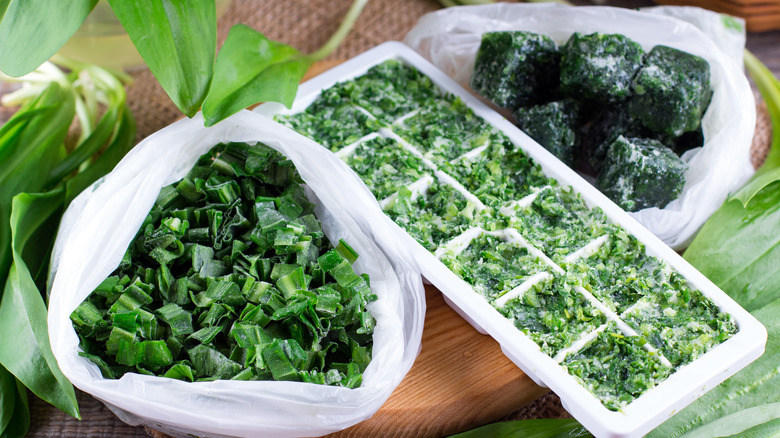
The freezing process allows herbs to retain their oils, flavors, and odors to be released when you add them to your favorite dishes. One of the simplest methods is to freeze whole stems with the leaves attached. Start by rinsing and drying the sprigs. Then, line a cookie sheet with parchment paper and spread the herbs out flat. Pop them into the freezer. When they're frozen, carefully lift them from the paper and store them in airtight, sealable, plastic bags. Label the bags and return the frozen herbs to the freezer until you're ready to use them.
Alternatively, you can make cubes of frozen herbs, using ice-cube trays, muffin tins, or small plastic containers. Start by chopping clean herb leaves into tiny pieces. Then, place them in the cube sections along with a liquid of your choice. You can just use plain water to make ice-encased herbs. On the other hand, herbs frozen in broth make wonderful additions to soups and stews. Or, create frozen cubes of herbs in oil for future use in salad dressings and stir fry. Once the herbs and liquid are frozen in the sectioned containers, you can remove them and store them in airtight freezer bags. Simply pop the frozen herb cubes into your recipes, and they'll thaw to add both liquid and flavor.
Preserve them in vinegar
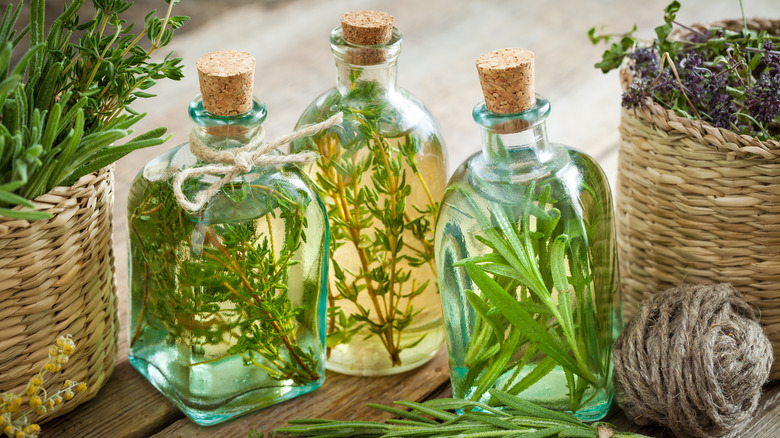
You can make infused vinegar if you're interested in using your herbs to flavor salad dressings, sauteéd vegetable dishes, or marinades for meats. Stored in glass jars, it will last up to 3 months in the refrigerator. For longer storage, you can heat-process it in a boiling water bath. Due to their mild flavors, cider, rice, and wine vinegars make the best choices for preserving herbs. White vinegar is more acidic, and balsamic vinegar is already heavily flavored.
Rosemary, parsley, tarragon, thyme, and dill are good candidates for preservation in vinegar. Start by washing and drying the fresh herbs. Place 5 sprigs of gently crushed herbs in 2 cups of vinegar. If desired, you could add flavorings such as whole peppercorns, cinnamon, sea salt, or garlic. Store the herbal vinegar in sterilized jars with tight lids. Due to the acidity, you'll want to place a piece of plastic wrap between a metal lid and the top of the jar.
Allow the jars of herbal vinegar to steep in a dark cupboard or closet for three to four weeks to develop full flavor. Then, you can strain the vinegar through a coffee filter and re-bottle it in sterilized jars of bottles. You can even add a few sprigs of washed or dried herbs for a decorative effect. These bottles of herbal vinegar make excellent gifts for friends.
Use salt to preserve them
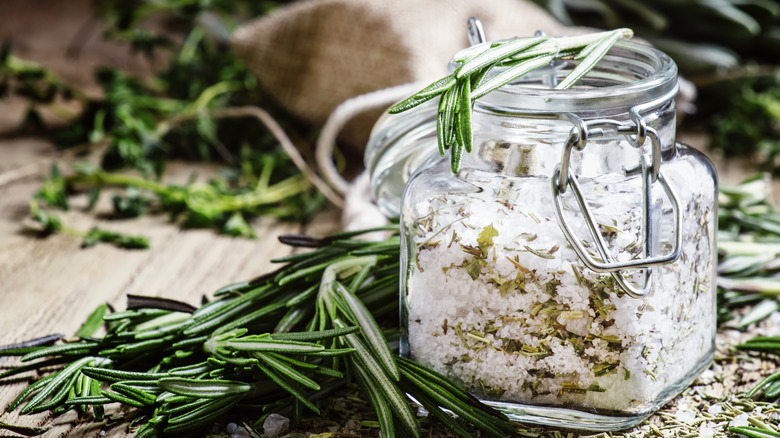
Packing in salt is one of the oldest methods for preserving foods, originating thousands of years before modern refrigeration. Salt maintains food in edible form by inhibiting the growth of bacteria. When fresh herbs are packed in salt, the mineral absorbs the moisture from them. Once the oils are infused into the salt, it takes on the flavor of the herbs. Basil, chives, cilantro, coriander, sage, and parsley are a few of the herbs that produce excellent results from salt-preservation methods.
An easy way to preserve herbs in salt is to build up alternating layers of salt and fresh, whole herbs in a lidded glass jar that you store in the fridge. When you need them for a recipe, remove the desired amount of herbs and brush off the salt. Then rinse the preserved herbs under cold water to remove any excess salt before using them. You'll notice that they retain their color and flavor due to this salt-packing preservation method.
As an alternative to the layering technique, you can create herb-infused salt in a food processor. Add 1 part salt to 4 parts chopped, fresh herbs. Place the mixture in your food processor and churn it for 30 seconds. You can keep the flavored salt in the refrigeration for up to 6 months.