The Design DIY For Lamps That Bargain Block's Keith Bynum & Evans Thomas Swear By
We may receive a commission on purchases made from links.
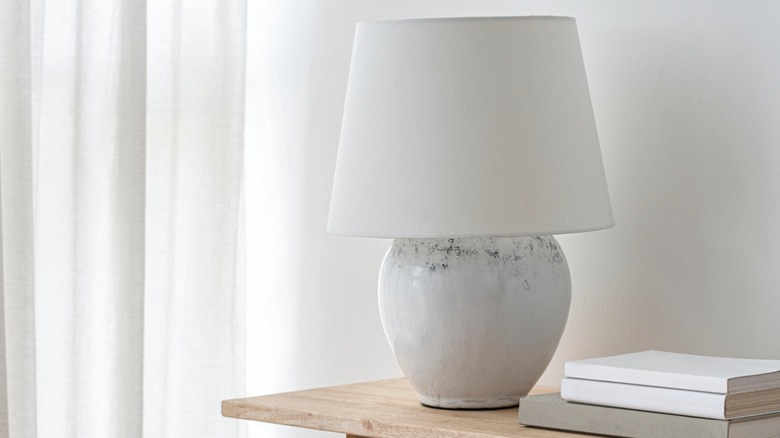
DIY lamp projects are a fabulous way to decorate and customize your space. While there are lots of beginner-level creative ways to revamp your light fixtures, more seasoned DIYers and folks who like to think outside of the box might be ready to explore avant-garde concepts. If you're hungry for a more unique and challenging DIY lamp project, you'll appreciate this funky idea from Keith Bynum and Evan Thomas of HGTV's "Bargain Block." The central focus of this project is dipping a lamp base into cement to create a distinctive, minimalist lamp design.
Before you balk at the mention of the word cement, know that you don't need any sculpting or building experience to use a small batch of cement mix. As Bynum and Thomas demonstrate, pulling off a cement dip is totally doable for an at-home project and will give you a super dynamic lamp design. The project calls for you to paint a lamp base and then dip half of it into cement for a slightly textured, half-and-half look. The main materials you'll need are an old lamp, spray paint, and cement. Choose a lamp with a large base and a plain design — covering up a lamp with a beautiful print would be a waste, so be sure to use a lamp with no special visual features you want to preserve. Once you have the lamp picked out and some paint and cement on hand, you're ready to start making your DIY cement-dipped lamp.
Prep the lamp
The first step is to prepare the lamp with a base coat of spray paint. Before applying the spray paint, remove the lamp shade and tape off any metal or wired parts of the lamp (needless to say, the lamp should also be lightbulb-free). Then, apply a coat of spray paint primer. Evan Thomas warns that spray paint tends to drip, especially on smooth surfaces, so avoid spraying on too much.
After the primer dries, follow up with a coat of paint. Again, apply the paint lightly to prevent dripping — Thomas recommends spraying from a distance to ensure that the paint coat doesn't build up too thickly. This color will be part of the final lamp design, so be mindful of how it will look alongside the gray tone of cement. Bynum and Thomas use a very light, neutral brown. You can do a similar look with a pale neutral, or you can mix it up with a darker tone to add more drama to the lamp design. Bynum and Thomas also spray painted the lamp shade the same color for a monochromatic look. Alternatively, leaving the lamp shade pure white or painting it a contrasting color are great options if you prefer a color-blocked style. For spray painting a fabric lamp shade, Bynum suggests doing two coats for full coverage.
Dip the lamp in concrete
And now, for the exciting step: the cement. You'll need to mix the cement in a container that you aren't attached to — ideally, a wide bucket or plastic bin that the lamp can fit inside. Mix the cement outdoors or in a well-ventilated space, and wear a mask and gloves while you work with cement. To make the cement, combine cement or concrete powder with water — Bynum and Thomas use a paddle mixer extension on a power drill for stirring, but it's okay to manually use a wooden paint stirrer or any other stirring device you're fine getting cement on.
Once the cement is fully mixed, it's time to dip the lamp. You'll really only get one shot at the perfect, smooth dip, so have a clear vision in advance of how you want to achieve this. Hold the lamp steady with two hands so that neither the cord nor the lightbulb socket will get into the mix. Given the construction of most lamps, you'll probably have to do some kind of angled dip, similar to what Keith Bynum and Evan Thomas do. If the cord is positioned differently on your lamp, you could potentially do a slightly deeper dip that covers more of the bottom with cement. After dipping the lamp, leave it out to dry on scrap paper or cloth. While the lamp dries, be sure to check on the right way to dispose of cement in your area.
Pulling off this DIY idea

As long as you're careful using the cement, you should be able to successfully execute this DIY project. However, since you're working with an unusual material, you'll need to put some extra thought into the lamp design and how it will work in your space. Firstly, be mindful of which lamp you choose for this project. The shape of the base will have a big impact on how much surface area you can dip into the cement. A classic, full-rounded base generally works best. For your paint color choices, consider how the gray cement goes with the cohesive color palette of your home – do you need to play up the neutral tones with a coordinating beige or give the lamps more color with a vibrant hue?
Of course, the budget is a concern as well when planning your lamp design. In theory, you'll already have the lamp, but otherwise, you can look for a cheap option from a thrift store. For the spray paint primer, one of the cheapest options is Rust-Oleum Painter's Touch 2X Ultra Cover Spray Primer in white, available on Amazon for around $6. The Rust-Oleum matte spray paint at Home Depot costs about $6 as well and comes in a wide range of colors. Cement mix is usually quite cheap, with a 60-pound bag at Home Depot costing less than $5. In total, that's a beautiful DIY lamp project coming in for under $20 — a truly impressive bargain.