12 Ways To DIY Coasters To Protect The Wood Furniture In Your Home
If you're worried about water stains or heat damage caused by setting glasses and mugs on your furniture, a coaster is an obvious solution. And, while you can definitely purchase a set online or from a store, creating your own can be a great DIY project. Whether you want to get crafty, use up some old supplies from your storage, or just want a one-of-a-kind set, here are a few different ways you can make cute and functional coasters.
Many of these projects involve upcycling materials you may already have lying around, so they are sustainable and cost nothing to make. Plus, by making your own, you are able to have full creative control. You can create exactly what you want, instead of having to settle for plain cork coasters or a pattern designed by someone else. So, are you ready to get crafting? Here are several coaster project ideas to stylishly protect your furniture.
Upcycle old fabric into coasters
This tutorial from Tulip Square creates a design that incorporates two different fabrics. First, you'll cut two layers of squares to create a base and liner. Then, you'll cut patterned fabric squares, fold them, and weave them together to make the top layer. Finally, you'll sew all of the layers together. You could create a matching set using just one fabric or use similar shades for a sleek monochromatic look. You could also mix and match different prints for each coaster for an eclectic touch.
Turn wood pallets into adorable coasters
Another great idea for upcycling is to reuse an old wood pallet and turn it into a coaster. The result is charming and looks much harder to make than it actually is. With some basic tools, you can follow the tutorial created by Taking the Pallet. You'll cut strips of wood and layer them to make a scaled-down version of a pallet. Then, sand and seal the coasters for a smooth, waterproof finish. To make these your own, paint them or use a brightly-colored stain that matches your decor.
Weave felt pieces together
If you do a lot of crafting, you likely have some felt scraps lying around. You can turn these scraps into a coaster with the video tutorial by Try It – Like It – Create It. First, you'll cut the felt into thin, uniform strips. Then, you'll weave them together to form a checkerboard pattern using felt glue to secure them along the way. This project is really simple but leaves you with a result that looks impressive and unique. You can even use your favorite team's colors for sports-themed coasters or holiday colors for seasonal ones.
Give new life to old t-shirts
You likely have old T-shirts lying around. In that case, you can cut them into strips and braid them into a unique coaster set. This process is surprisingly simple, and you can follow the tutorial by T-Shirt.ca for the details. These coasters can be solid color or you can choose up to three different colored shirts to use. Plus, it's a great way to reuse old t-shirts that are too sentimental to toss out but too worn out to wear anymore.
Make a map to your favorite beverage
Using old maps is another great way to create custom coasters. DIY Pete gives a video tutorial on how to do the process on tiles. You can use random clippings of maps, or you can choose a spot that represents a special place or event. Cut the piece out of the map, affix it to the tile with Mod Podge, then seal the whole coaster. You can use this process for many other paper designs like kids' drawings and even photographs.
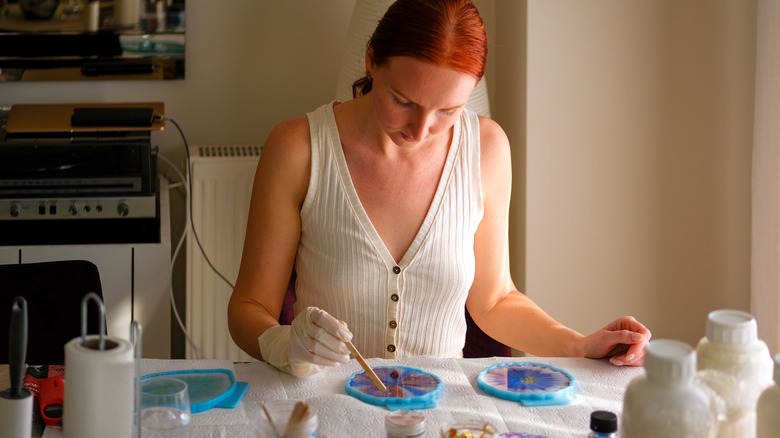
Learn how to use resin
Using resin art techniques to make coasters is a little more complicated than some of the other ideas on this list, but it can still be a really fun project. This tutorial from Joyful Art Creations shows you how to make your own marble-patterned coasters. You'll swirl two contrasting colors of resin together in a shallow mold before allowing it to set. You can also use resin to create solid color coasters or uniquely shaped designs. The versatile material leaves a lot of room for error and will add a decorative touch to your coffee table.
Have fun with Perler beads
For a DIY project that will also transport you to memories of your youth, pull out that old set of Perler beads. Follow the video by Creative V and lay out whatever pattern you choose and then fuse the beads together with an iron and some parchment paper. With these beads, your imagination is the limit when it comes to the colors and design. Plus, there are lots of different Perler pegboards available, so you can create square, circle, or even star-shaped coasters to match your home decor.
Pull out polymer clay and cookie cutters
Polymer clay is one of the most versatile craft supplies. Create simple clay coasters using a video walkthrough by Rachel Metz. Roll out the clay and use a cookie cutter to make clean shapes. Bake the discs, let them cool, and sand the edges. Then, paint them with your own designs before sealing them and showing off your masterpieces. One awesome way to customize these is using stencils to create detailed shapes or letters for a monogram.
Play with colors using clay
If you aren't confident in your painting skills, you can still use polymer clay to make amazing drink holders. In fact, you can even create a marbled effect with almost no skill. WhatsUpMoms demonstrates how to combine thin rolls of different colored clay to emulate the look of marble. Then, roll out the clay, cut out the coasters, and bake them. One tip to guarantee that your color swirls look good is to always include one or two neutrals. This will create an effect where the bright colors really pop and the marbled design looks natural.
Try your hand at weaving a mug rug
Making a miniature mug to set your hot drinks on may not sound like an easy DIY, but this detailed tutorial from Cara Newhart breaks it down into simple-to-follow steps. Using a makeshift cardboard loom, she weaves various colors of yarn together to form a mini rug before tying the ends off to make adorable tassels. Not only is this an effective way to protect your furniture, but it also looks cute. You can, of course, customize the colors using metallic yard for a glam look or twine for a more rustic vibe.
Customize stone tiles with temporary tattoos
Stone tiles make a classic, easily customizable coaster and you can actually tattoo the tiles to turn them into personalized works of art! Katie Bookser gives the rundown in her YouTube tutorial. Apply a temporary tattoo to the coaster by removing the plastic cover, laying it facedown, and dabbing the back with a wet sponge. Seal the image with Mod Podge to protect it. You can even use holiday tattoos to make fun seasonal drink decor. Or, combine and layer tattoos to make a unique collage.
Create lasting memories with photographs
One of the sweetest ways to customize a coaster is by adding a sentimental photograph. You can add pictures of family or friends, adorable shots of your pet, or just pictures that you enjoy. Amanda Kuhlman shows you how to do this process on tiles in her tutorial. Cut the photos to fit and adhere them with Mod Podge. After they're dry, seal the finished coasters. This is a perfect way to personalize coasters using photos of each family member or to create meaningful gifts for grandparents.