11 DIY Popsicle Stick Projects That Are Perfect For Around The House
We may receive a commission on purchases made from links.
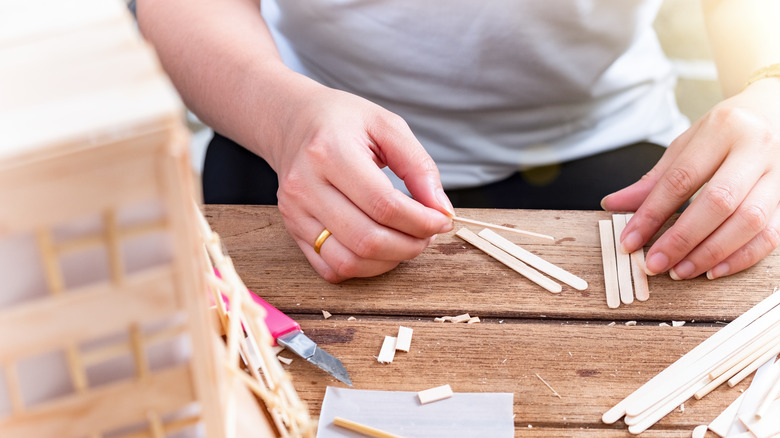
Popsicle sticks are often associated with children's arts and crafts, but many people don't realize they're also fit for grown-up DIY projects. These simple wooden sticks are key pieces in various creative enterprises. Using them, you can build your own decorative objects and household accessories (such as pots for your houseplants), and even customize furniture.
Popsicle sticks are readily available; you can collect them from frozen treats or buy them in bulk online or at local brick-and-mortar shops. Combining these smooth wooden stakes with other basic arts and crafts materials — such as acrylic paints, various glues, and other decorative accessories — can result in beautiful and functional home projects. Do them with your kids, or do them by yourself. After all, creativity has no age limit, and these can be fun hands-on activities. Below are 11 potential popsicle stick ideas you may want to pursue to add a touch of personality and creativity to your home.
Decorate a geometric-style accent wall
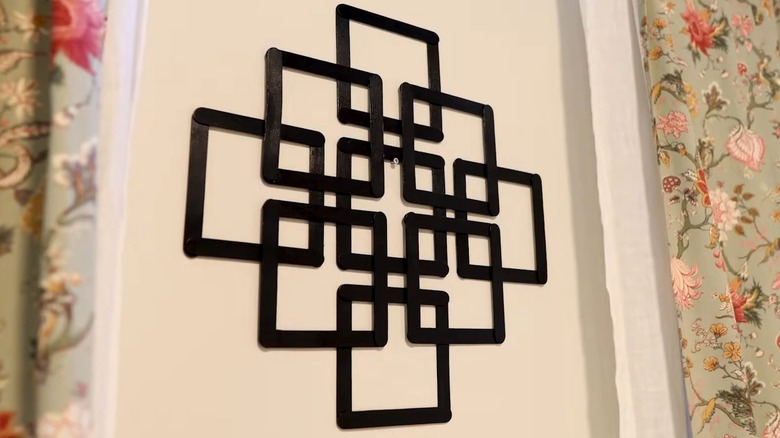
Geometric accent walls are all the rage, and you can create your own decorative wall piece with a bushel of popsicle sticks. Create a simple square by connecting four pieces at the corners. Paint the squares in a color that complements your room theme before staggering them over one another and drilling or gluing them into place. Use an acrylic craft paint intended for indoor wood projects, such as this Apple Barrel set for $16.99 from Amazon. If you use glue, use hot glue or a wood adhesive to ensure it sticks long term. Hot glue guns and wood glue are only $2.99 at Hobby Lobby, making this an affordable craft.
Create a standing honeycomb shelf
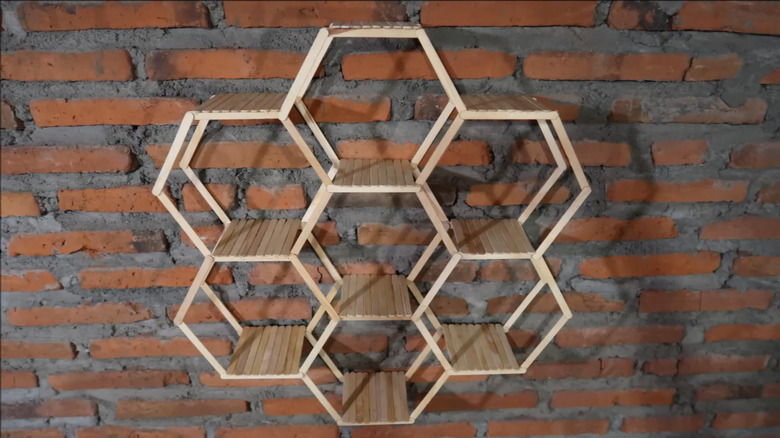
You must connect six popsicle sticks in a hexagon shape to start building a self-standing honeycomb shelf. Either rely on your eyesight to place the sticks or print DLTK's hexagon template on a blank piece of paper for reference. Glue the wooden pieces into place, and add as many layers as you want. The more hexagon layers you pile up, the more popsicle sticks you'll need, and the thicker the shelf will be. Be careful to lay them evenly so that the shelf is well-balanced. This makes it easier to prop decorative objects upright when you finish the project. If you want to make a multiple-shelf design with several honeycombs, don't layer just yet. Instead, you'll want to watch Dyartorin Crafts' video tutorial on laying the foundation and connecting the shelves.
Make a handmade keepsake or jewelry box
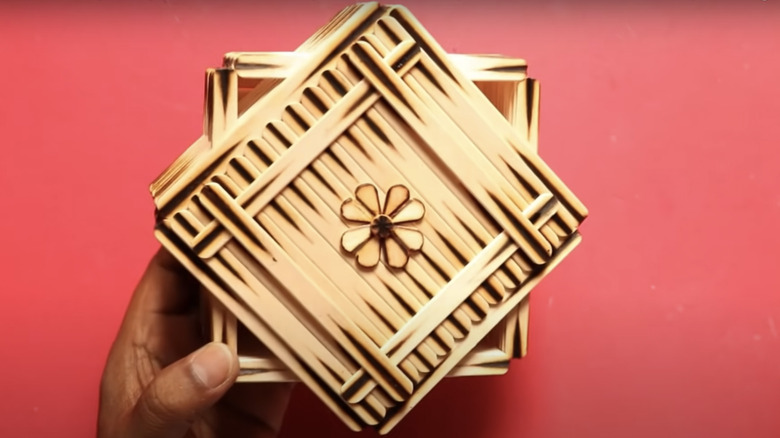
Crafting a handmade knick-knack storage box starts the same as the DIY accent wall. Glue four ice cream sticks in a square shape, and continue layering more wooden sticks over the first four. Recall your childhood memories of building toy houses with Legos or Lincoln Logs for these initial steps. You'll need about 64 popsicle sticks for every 1 to 1 1/2 inches of box height, depending on how thick the sticks are and how heavily you lather on the glue. Once you get to the right height, you can create a basic square lid using the same technique as before. Finish off the box and lid with a small wooden knob from this $1.99 Hobby Lobby set. Most online shops only sell small wooden knobs in bulk (since it's more practical for shipping reasons). Keeping this in mind, you're better off going to a local craft store if you only plan on making one or two jewelry boxes.
Craft a square tabletop lamp

You'll need more than popsicle sticks and a glue gun to create this DIY craft. Before you begin, acquire an LED bulb, white parchment paper, and a lamp base with wire; you can find that last item on Amazon for $13.97. Build the popsicle sticks upward in a geometric shape of your choosing, leaving it hollow enough in the center to fit the bulb holder and light bulb. Once you build the popsicle stick shape, line the inside with parchment paper and put the bulb holder at the base. Ensure you use an LED bulb since this type does not produce heat. Since the lamp is made of paper and wood, you want to avoid using heat-emitting light bulbs, which could turn your DIY creation into a dangerous fire hazard.
Construct a mini planter for seedlings and succulents
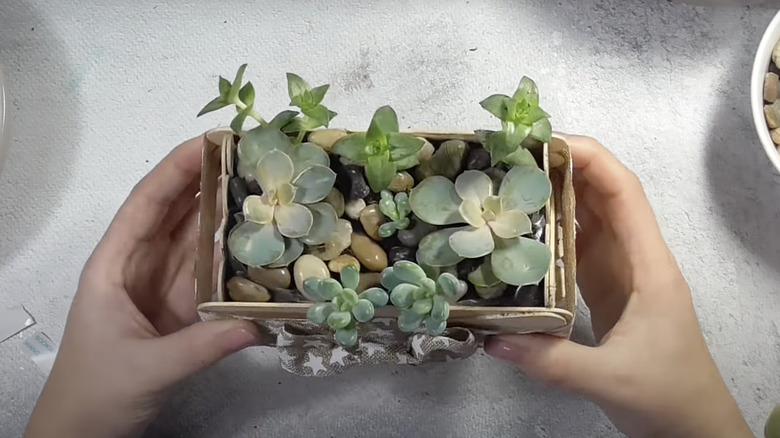
Make a cute planter reminiscent of picket fences by creating a rectangular box out of wide popsicle sticks. Use a thin line of glue to connect the sticks side-by-side. Create a flat base by sticking a set of four popsicle sticks together. Once you complete the box, line the inside with a plastic bag before filling it with soil and your chosen plant(s). You can also use a small rectangular container for the inside, such as these $2.00 storage trays from Target. However, if you use the trays, you'll want to glue the popsicle sticks around the plastic insert directly to ensure the wooden square fits around it. No matter which plastic insert you use, it is a necessary barrier between the soil and the sticks. Otherwise, water will rot the wood over time.
Embellish old furniture with a herringbone design
Any dresser, desk, TV stand, coffee table, or other piece of wooden furniture is upgradable with this DIY herringbone hack. Use Gorilla wood glue, such as this light tan variation for $4.99 from Ace Hardware, and a large number of popsicle sticks. Start by gluing a pair in a V-shape and repeat the pattern across the area you want to cover. You may have to trim the pieces at the top, bottom, and sides to make them fit evenly within the furniture's dimensions. Fill the gaps with Gorilla all-purpose wood filler, which you can find on Amazon for $8.99, and paint over the sticks with wood stain or acrylic paint to give it a finished look. If you decide to do a wood stain finish, use Flood's online calculator to estimate how much you'll need for the job.
Design herb garden plant markers
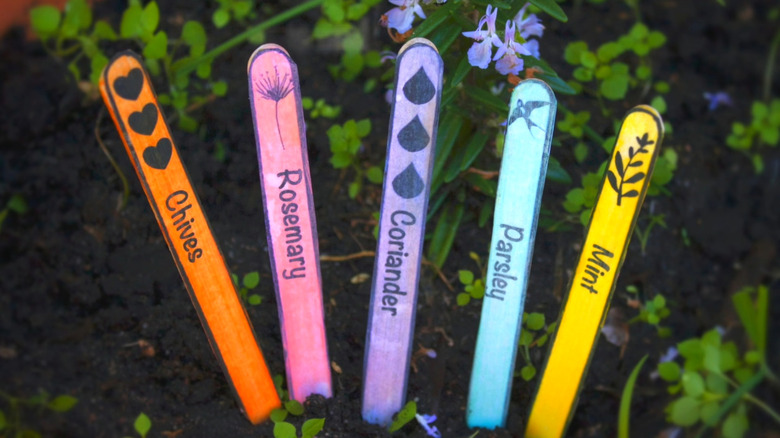
One of the easiest DIY projects on this list is creating plant markers from ice cream sticks – a perfect craft for the small herb garden in your kitchen or outside. All you need to do is razor off one side of each stick into a fine point using serrated scissors or wire cutters. This is the side you'll be inserting into the soil, so don't worry about making the points pretty or even, as you won't see them. On the other side, use a fine-point paintbrush to write the name of the herb or plant, and color or decorate it as you see fit. Make the stakes flashier by adding tiny wooden embellishments, like this $7.69 pack of wooden floral cutouts from Amazon. A little color using paint or glitter also goes a long way. Mod Podge is only $4.99 at Target and is great for sticking glitter to wooden surfaces.
Put together pallet-style cup coasters
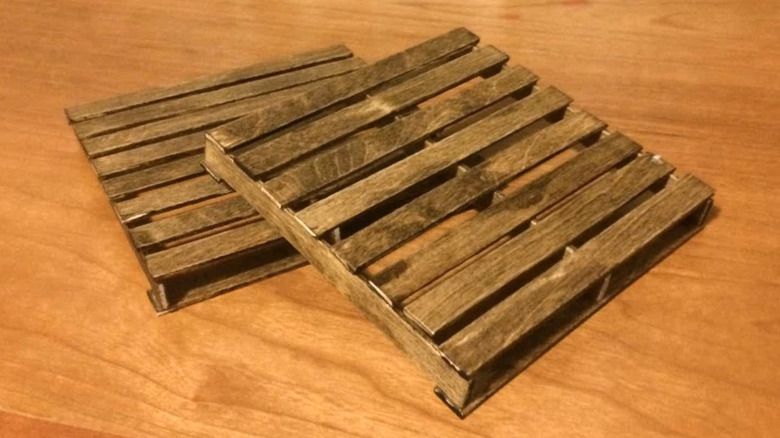
Start by painting or staining a bulk pack of popsicle sticks. Buy at least 200 to ensure you have enough to build multiple coasters, such as this $4.99 pack from Amazon. Make sure you use thinner popsicle sticks since these are more aesthetically fitting for this DIY project. To get the rustic look of a wooden pallet, you should stain them using DecoArt's gel stain collection. If you're looking for inspiration, use the maple color from Hobby Lobby for only $2.99. Afterward, all you need to do is start assembling the coaster. If you aren't familiar with a generic pallet design, follow the steps in How To With Kristin's YouTube tutorial.
Assemble homemade holiday ornaments
To make holiday ornaments, you only need 2x3-inch photos, either printed at home, at an office supply retailer, or on a wireless mobile photo printer. Buy an assortment of popsicle sticks. You'll need three per ornament, so plan accordingly based on how many planned photo drafts you have in mind. Paint each ornament as you wish and add embellishments, like the trinkets found in this $17.99 Christmas DIY set on Amazon. Hot glue the finished popsicle sticks in a triangle shape and glue them over the top of your chosen photo so that the scene is visible from the middle. Also, use a glue gun to attach a string or hook to the triangle's peak. Using this, hang the homemade ornament on trees, garlands, wreaths, and other holiday décor as you see fit.
Dress up an eccentric wall mirror
Begin with a generic frameless mirror, which you can find in-person at Ikea or online on Amazon. Cut a piece of scrap cardboard in a circle, making sure the diameter extends beyond that of the mirror. Hot glue the mirror to the cardboard so that you can use the paper backing as a foundation to start attaching the popsicle sticks. You can either paint the wood ice cream sticks before you begin or after you glue them in a circular formation around the mirror. If you choose to paint them afterward, you may want to fix a protective layer of painter's tape over the glass to keep from accidentally coloring on the mirror itself. Painter's tape is easy to find, and Ace Hardware carries it for only $4.59 a roll.
Build an inviting birdhouse
A popsicle stick birdhouse is a craft for children and adults alike. Set yourself up with a pile of popsicle sticks and a hot glue gun, as you do for most of these projects. While building the house, remember that it will need to have an entryway large enough for a bird to fit and possibly nest inside. TheBroCrafts on YouTube has an easy tutorial to create a very simple birdhouse design. Once you complete the home, you only need to string a piece of twine through the roof and dangle it from a metal rod outside. Avoid hanging the house on trees, despite how practical it may seem. Domestic and wild predators, such as cats and snakes, can climb tree trunks and branches, making birdhouses hung in these locations dangerous for nesting.