How To Choose The Best Concrete Patio Finish To Add Instant Charm To Your Backyard
We may receive a commission on purchases made from links.
If you want your home to be the envy of the neighborhood, look no further than your backyard. Outdoor upgrades have been a huge trend over the last few years, and according to a report from PR Newswire, 90% of Americans agree that their yards, patios, porches, and gardens are highly important parts of their homes. Gone are the days when the backyard was just for kicking a ball around with the kids or chucking a toy for Fido. In the 2020s, outdoor spaces have become prized for relaxation, rejuvenation, entertaining, and connecting with nature.
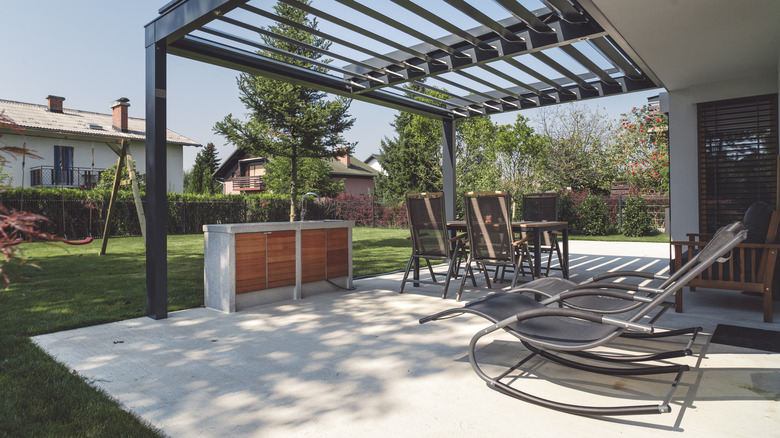
The first step to creating the outdoor living area of your dreams is installing a patio, and concrete is one of the most cost-effective options there is. Although it's cheaper than tile or natural stone, concrete can last for decades, especially if you're living in a climate that doesn't have severe temperature swings. And if you're assuming that a concrete patio is going to look low-budget, think again. Concrete can be used to create a wide array of finishes that can elevate the look of your space and provide practical benefits like increased traction. From honed concrete to exposed aggregate to stamped designs, there is a lot to think about before you pick a particular finish. Ready to find the finish that will best suit your yard, budget, and performance requirements? Buckle up for a full breakdown of the main options to consider.
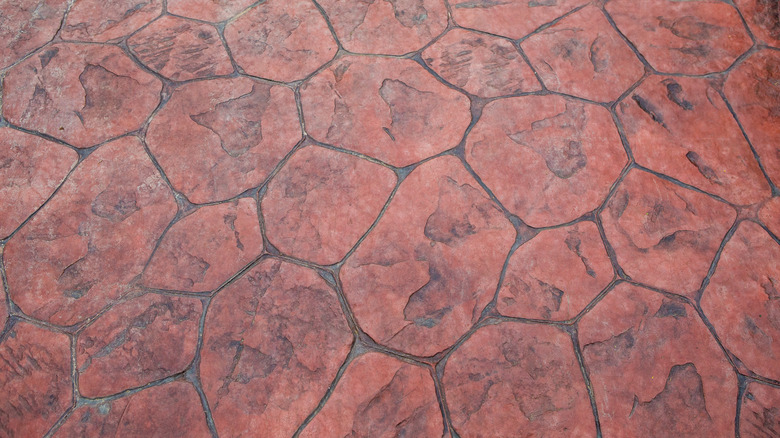
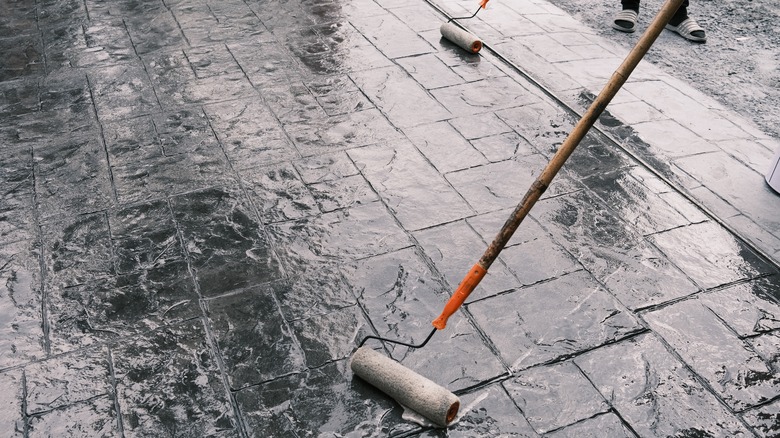
Achieve a stone look for less with stamped concrete
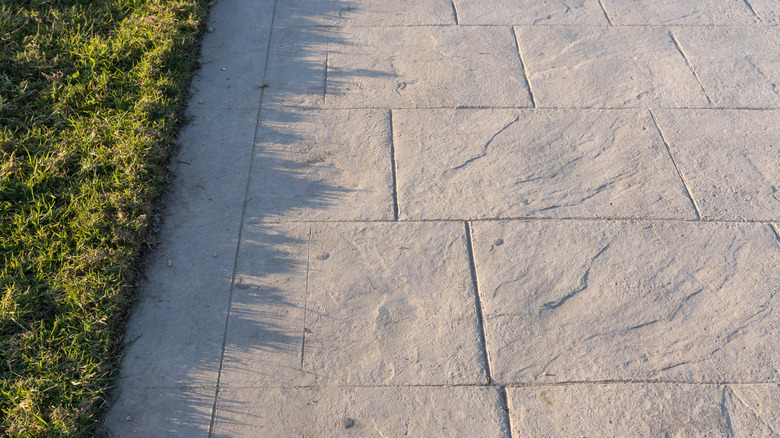
If you're yearning for a stone patio, but your budget doesn't agree, stamped concrete could be the ideal option. With stamped concrete, you can achieve an artificial stone look for less than you'd have to spend laying stone, tiles, or pavers. The process is relatively fast, as there are no tiles or stones to cut. Instead of setting tiles into a cement base, the paving design is stamped directly into the concrete using flat molds. The molds create a pattern that mimics the look of seams and grout lines. Before stamping the design into the concrete, a release powder is applied. This prevents the concrete from sticking to the molds.
Stamped concrete installations may be relatively quick and simple, but they can also be tricky to DIY. The reason for this is timing. Picking the right time to lay your molds is critical. If the concrete is too soft, you can create an uneven finish and sink too deeply into the surface. If the concrete is too hard, you might not be able to stamp in enough of the print. Once the surface is right, you have to work quickly to ensure that the final areas don't dry out too much before you get to them with the stamping molds. Unless you have a lot of experience working with concrete, it's best to get a professional contractor in for the job.
Get the look of grout with stenciled concrete
Like stamped finishes, stenciled concrete can give you the look of bricks, stone, tiles, cobbles, or other kinds of paving by creating an artificial effect on the surface of the cement. As the name suggests, instead of stamping the design down with a mold, this method uses stencils. Concrete stencils tend to come in large rolls, and you can pick from a range of designs to suit the look of your home. The best time to apply the stencils is while the concrete is still wet. After laying down the pattern, you will need to trowel it gently into the surface. If you want to create a grout-like look, you can apply a color hardener to the stenciled lines. Color hardener is a powdered mix of chemical additives, pigments, cement, and aggregates that change the final color of concrete. You mix it into the grout lines with a trowel after you remove the stencil. You usually do so when it is still slightly wet, but the bleeding water sitting on top has dried.
Stenciled concrete is a bit easier to DIY than stamped designs since you don't need much experience to do them. All you need to do is position the stencil, fill it in, and lift it. You don't have to worry about laying it down when the concrete is at just the right consistency, or stress about how much pressure you're applying with a mold.
Stick to your budget with a troweled finish
If you're after the quickest, most cost-effective concrete patio solution, you can also settle for troweled concrete. This is the most basic finish, but it won't break the bank, is relatively DIY-friendly, and has a minimalistic look, which can be ideal if you want a modern outdoor space. However, the main downside to troweled concrete is that it can be pretty slippery when wet. Because of this, it can only be used in covered patio spaces that stay dry; it's not a safe option anywhere else.
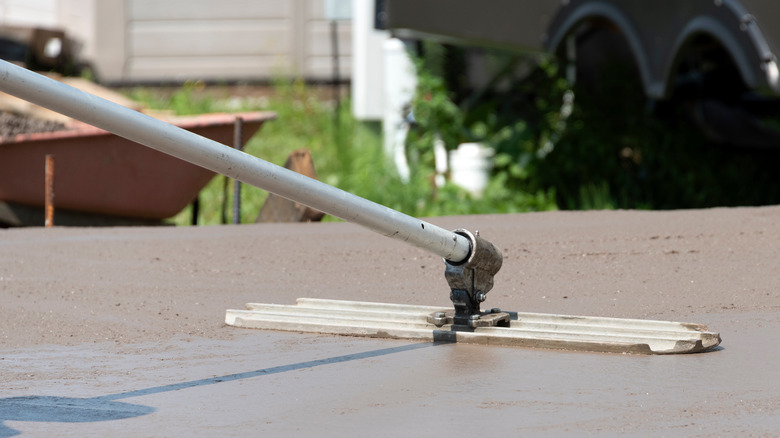
To achieve a trowel finish, all you have to do is pour your concrete, level it off with a float, and then trowel the surface to be as flat, uniform, and even as possible. A lot of contractors use power trowel machines, but troweling by hand is also perfectly acceptable and can allow for more precision. The finished result won't be as shiny as polished concrete, but it can look very neat, smart, and professional if done right. If you want as perfect a finish as possible, you're best off calling a contractor. But if you're okay with some irregularities or mistakes here and there, and you have experience working with concrete, DIYing your own trowel finish is doable.
Get more grip with a broom finish
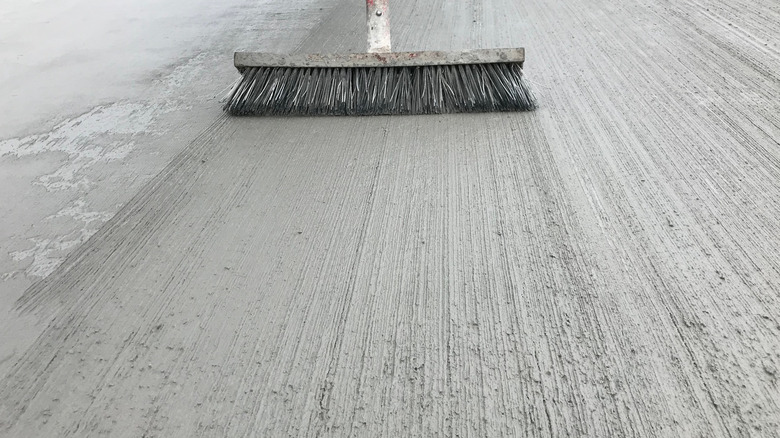
Traction is very important for porch and patio flooring, especially in uncovered areas that are likely to get wet. If you like the simplicity of troweled concrete but want more traction, a broom finish may be your best bet. Creating a broom finish is just as simple and cost-effective. After floating the concrete, your contractor will simply go over the surface with a wide, hard-bristled broom. This will create lines in the finish and give it more grip. If you're planning to pour your own concrete porch, the most straightforward approach is to make all the broom strokes parallel to create a neat, finished look. You'll also need to judge the timing correctly. Brooming wet cement can create a coarser texture. The dryer the finish, the finer the lines will be.
Ironically, broom finishes can be a little harder to sweep than smoother finishes, as brush bristles won't slide so easily over the area. If dirt buildup does occur, a quick pressure wash on a low setting should lift the grime. Another potential con is that broom-finished concrete can be tough on bare feet. If you're worried about the surface being too rough, you can opt for a very light broom finish that has a subtle, soft texture.
Create an attractive design on the cheap with a swirl finish
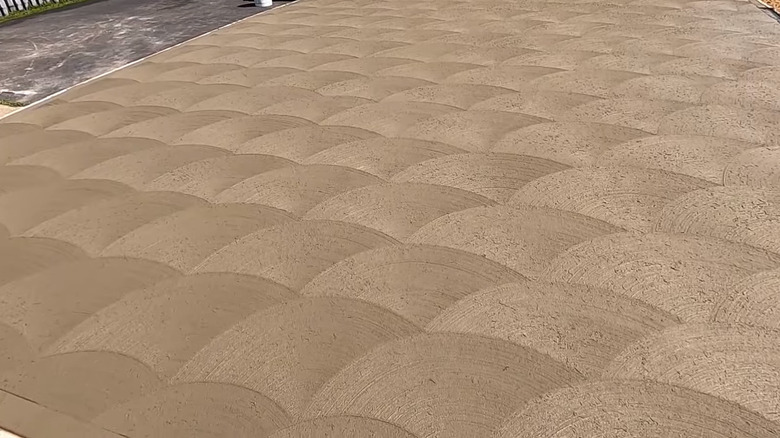
Broom finishes typically have straight lines brushed into them, but this isn't the only option. If you have a patio area that's suitable for a broom finish, but you want something a little more decorative, you can also look into doing a swirl pattern. Swirl finishes also provide great levels of traction, but instead of creating long, straight strokes, the brushes are used to create curved marks. The most common is semi-circles in a scalloped motif, but you can also get creative and opt for anything from a zigzag pattern to full circles. Alternating the direction of strokes while keeping the broom straight will create a checkerboard pattern.
If you're hiring a contractor, ask them what patterns they typically do. If you're thinking of tackling the job yourself, you can test out different designs on a patch of sand. Another thing to consider is the type of brush you're going to choose. If you just want some fine texture that's easy on the feet, horsehair brushes are a good choice. If you prefer a thicker texture, try a thicker nylon bristle. You can also get brushes that have strips of both coarse and fine bristles. This will create a unique pattern in the concrete.
Channel some retro vibes with salt finish concrete
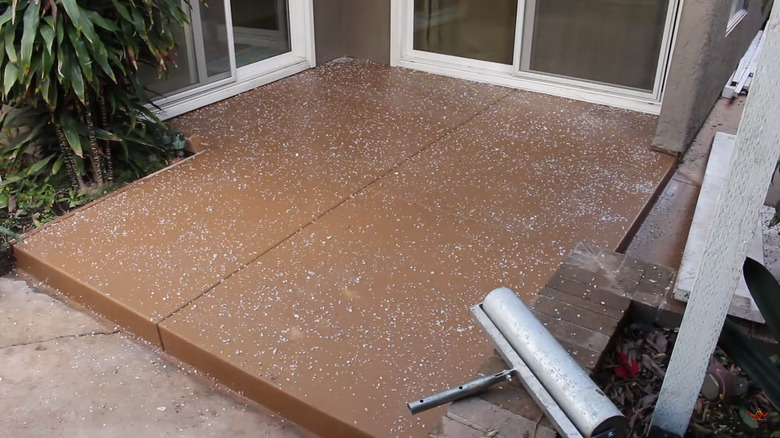
If you want to achieve an upscale look, get some traction, and still keep costs down, a salt finish could be a great option to consider. Salt finishes were very popular a few decades ago, and they offer a slightly more decorative effect than broom finishes while being simple to achieve. Instead of scoring lines into the concrete, coarse salt is sprinkled onto the smooth slab and then pressed into the surface with either a roller or a trowel. After the slab dries, washing it with a hose will dissolve and dislodge the crystals. The result is a series of random indentations that give the concrete an intentionally weathered look. You can tweak the effect with different sizes of salt crystals. Denser sprinklings of salt will create increased pitting, while less will yield a more subtle effect. Salt finishes are one of the easiest concrete looks to DIY, especially if you already have some experience working with cement.
Thanks to the crevices left behind, salt-finished concrete is fairly anti-slip, making it perfect for a porch that sees rain and dew. Besides having an attractive, distressed, and retro aesthetic, salt finishes are also easier on the feet than broom finishes. One caveat to keep in mind is that you will have to add a sealer on top if you live in an area that experiences freeze-thaw cycles. The indentations in the cement can trap water, and if the water freezes, it can expand enough to create cracks in your patio. A sealer should prevent that from happening.
Go contemporary with a honed finish
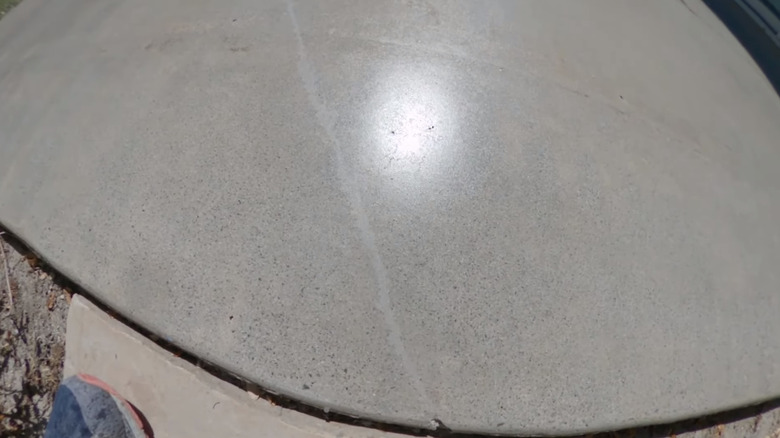
Do you love the modern, simple, upmarket feel of polished concrete? Polished concrete isn't suitable for most outdoor applications, as it can get very slippery. But there is an alternative. Enter honed concrete. Honed concrete offers a similar look but with a little extra grip. It is a premium option that requires more labor, but the extra cost can be worth it. If you already have polished concrete floors indoors, opting for a honed concrete porch can carry this aesthetic outdoors, resulting in a seamless flow between your interior and exterior spaces. To hone concrete, contractors use specialized power grinders to smooth out the surface. The result is a pristine, even matte finish. This can also reveal some of the aggregates within, creating an effect similar to terrazzo. After honing, waterproofing sealants are applied.
Honed concrete isn't as anti-slip as coarser finishes like broomed cement, but it has enough grip for most patios and can even be used around pools. To up the grip factor even further, you can also add an anti-slip product such as Bon Tool Gator Grip Slip Resistant Additive to the concrete sealant. Although honed concrete is typically more expensive to install than a basic trowel finish, it still beats tiling if you're on a budget. Installing builder-grade tiles will typically run you somewhere between $7-$12 per square foot. More luxe options, like large-format tiles, can easily cost you more than $22 per square foot. Basic honed concrete designs clock in at an average cost of $3-$5 per square foot. Along with being relatively cost-effective, honed concrete is also easy to clean and has a very contemporary feel.
Up the design ante with exposed aggregate
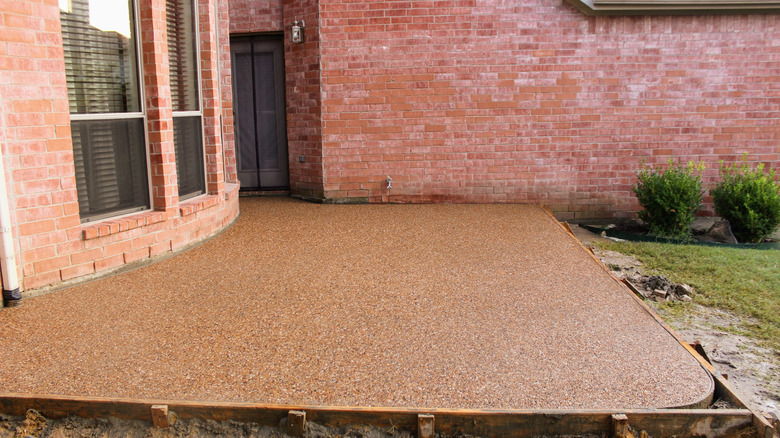
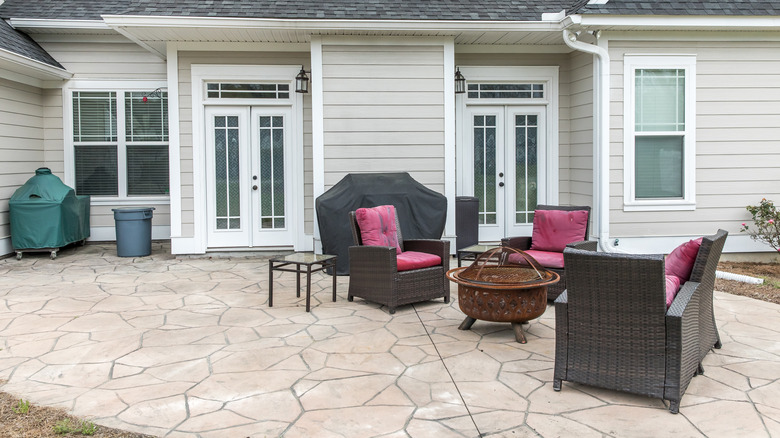
If you want a textured yet natural, soft look, exposed aggregate is a classic option to consider. Sometimes referred to as a pebble finish, this technique has been around for some time, dating back more than 100 years. It's both durable, decorative, and anti-slip, which makes it a popular option for public spaces and areas like sidewalks, fountains, and plazas. But just because exposed aggregate is often seen in parks and public buildings doesn't mean you can't leverage this attractive finish in your own space. Exposed aggregate can be perfect for patio areas that get a lot of sun, moisture, and traffic, as well as paving next to pools. To create the finish, small, smooth stones are sprinkled over the surface of freshly poured concrete and tamped down until they're submerged. After the concrete has partially set, the top layer that's covering the stone is gently rinsed away with water and removed with a broom. This exposes the aggregate, revealing a pebbly texture.
Besides being attractive, exposed aggregate creates a highly durable finish that is stain- and weather-resistant. If done right, this finish is also easy to clean and low-maintenance. Exposed aggregate finishing techniques aren't all that complicated for experienced installers to master. However, unless you're familiar with concrete work, taking the DIY approach might prove trickier than other finishing options.
Increase traction with a sand-washed finish

Another great way to add traction to cement patios and porches is with a sand-wash finish. This leaves a slightly abrasive, uniformly weathered surface. To achieve the look, installers apply a retardant after troweling the floor. This will slow down the rate at which the top of the concrete sets. After the rest of the slab has hardened enough (which usually takes one day), the installer will go back in and use either a pressure washer or broom to remove the upper film of cement that's still soft, exposing the sand particles below. Instead of having the cement create a slick, shiny, slippery surface, you will be left with the grippy texture of the sand.
(Side note: While the pressure washer or broom is more DIY-friendly, both options can leave behind streaks in the cement. For a more even finish, it's best to use a floor polisher with a fine-grit pad. If you're uncomfortable with this, it might be best to hire a contractor to do this.) Although sand-washed concrete has a lot of traction, it's very comfortable to walk on. Unlike broom-finished concrete, it doesn't have any hard, sharp edges.
Color your concrete
One of the easiest ways to elevate a plain concrete patio is through color additives. Perhaps you're not a fan of gray cement but love its practical, versatile nature. If so, playing with the color of your concrete could be the perfect solution. Color additives open up an array of options and allow you to match the tone of the flooring to the palette of your home. Terracotta and peachy tones can add warmth, while darker shades can inject some drama and contrast. You can also opt for hues of blue, green, brown, and everything in between. There are various ways to color concrete.
If you're pouring a fresh slab, you can choose between adding integral dye or applying a color hardener to the surface. Integral dyes are added to the wet concrete and dye the entire batch. That means the concrete slab will be that color all the way through — not just the top surface — and won't require you ever to repaint it. In contrast, color hardeners are only worked into the top layer of cement before it cures. You can also opt for a tinted sealant, but this won't be nearly as long-lasting and will need retouching since it's just a sealant sitting on top of the slab. It hasn't been added to the actual concrete mixture.
Coloring a basic, troweled, concrete patio can help add charm to your outdoor area all on its own. But you can also combine this with other options, such as honed concrete, salt finishes, etc. It can be particularly impactful when used in conjunction with stamping and stenciling techniques, helping to mimic the look of stone and tile paving.
Stain your existing patio a new hue

Do you have an existing concrete patio that you want to bestow a facelift on? Although staining doesn't qualify as a new finish, changing the color of a concrete porch is a cost-effective upgrade that can elevate the space and hide stubborn marks and imperfections. It's also a DIY-friendly project that most homeowners can undertake with a little bit of time and energy.
To start, you'll need to thoroughly clean and prepare the surface. If your concrete is sealed, you will need to remove this coating with a stripper product, such as Smart Strip Advanced Paint Remover. Pressure washing the surface will help to remove grime and dirt buildup. Once the surface is clean, you will need to apply the stain and let it sit. If you use an acid stain, you'll also have to apply a neutralizer like ammonia or baking soda. Water-based staining products don't require this, but they do need more surface preparation to ensure the stain permeates the concrete.
Over time, concrete stains can wear down and become patchy, but they are still a great way to get a new look without resurfacing your entire veranda. You can also use concrete stains to add interest and dimension to stamped and stenciled finishes. For instance, you can color in artificial grout lines, create colored borders, or stain alternating squares to create a checkerboard effect. Overall, staining can be a more long-lasting choice than painting concrete, especially in patio areas that see a lot of sun and traffic.
Seal your concrete to maintain its finish
Concrete sealant isn't technically a finish. Instead, it's there to protect the finish of your patio. Yes, you can leave your concrete porch bare, but applying a sealant has so many advantages that you'd be remiss to skip this final step. Sealants create a barrier that safeguards cement against stains. If you've ever tried to clean a stained concrete patio, you'll know how valuable this is. Besides making cement easier to clean, they can also protect colored concrete from fading and minimize freeze-thaw damage.
But before you grab the first concrete sealant product you see, think about what finish you want. Are you after a natural, matte look? If so, a penetrating sealer can achieve this. Alternatively, you can opt for an ultra-glossy, wet-look sealant or something in between. Just keep in mind that very glossy sealants can increase the slipperiness of your patio. This isn't a concern with all finishes, but for smooth, flat cement areas, you may want to combine an anti-slip additive with your sealant. If you're going to be applying the sealant yourself, keep in mind that the concrete must be fully cured first. Most slabs will need roughly a month to cure completely.