Clever Cutting Board DIYs You'll Want To Use Around The House
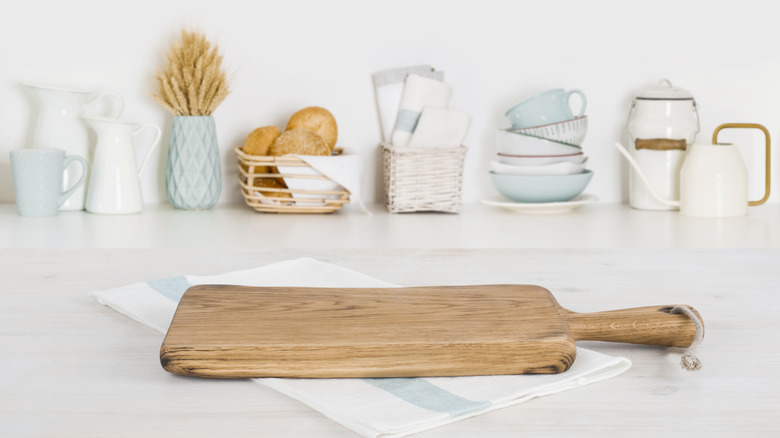
A cutting board can serve as the base and the inspiration to initiate a creative DIY project. Crafters and inventive types repurpose this kitchen accessory for a variety of new functions. Whether it's made from old or new wood, bamboo, or polypropylene plastic, a cutting board can be reimagined and repurposed with inexpensive materials. Start with a cutting board, and you can fashion an object that's both decorative and functional for use around the house.
We've searched and collected an array of cutting board projects that don't require heavy tools or woodworking skill. These DIYs can be achieved with simple tools and materials from dollar stores and craft stores. Your creative arsenal needs only routine supplies like hot glue, super glue, spray paint, stencils, and decorative embellishments. Pair these materials with cutting boards, and you can fashion a variety of tables, shelves, and wall-art pieces that you'll enjoy using around your home.
Create a rope-hung shelf made from a cutting board
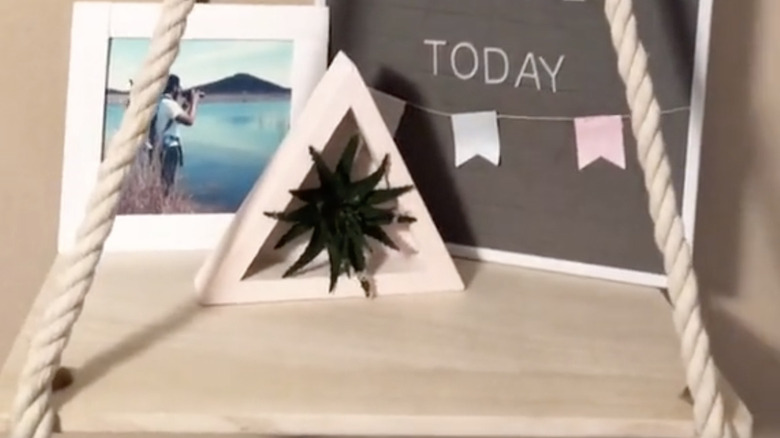
Start with an inexpensive, rectangular-shaped, wooden cutting board. You'll need a length of cotton rope from the craft store along with hot glue and a metal ring to hang the shelf from a hook or nail in the wall.
You might opt to embellish the board by gluing decorative buttons to the corners. Hot-glue the rope to the underside of the board, and bring it up to suspend the shelf from the four corners. Loop the rope through a metal ring, and join the ends with masking tape. You can cover the masking tape with twine, raffia, or ribbon for a more finished look and added decorative interest. Use the shelf to display small, lightweight treasures.
Fashion a book holder from an IKEA cutting board
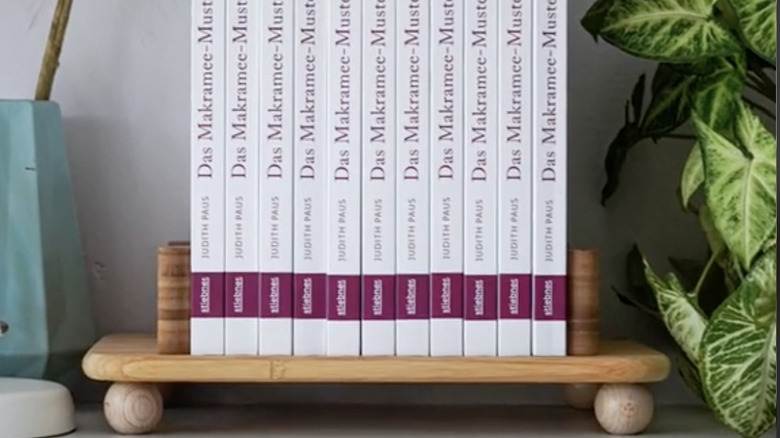
The IKEA Stolthet bamboo cutting board features two vertical legs that extend across the width of the board. It measures 13 ¾ inches in length and 8 ¾ inches in width. If you flip it over, you can nestle a row of books between the two upright pieces to make an attractive display. You'll also need some hot glue and four oversized wooden beads from the craft store.
Hot-glue the four large beads to the top corners of the board. Then, flip the board, allowing the four wooden beads to serve as legs.
Make a wall-hanging shelf from two cutting boards
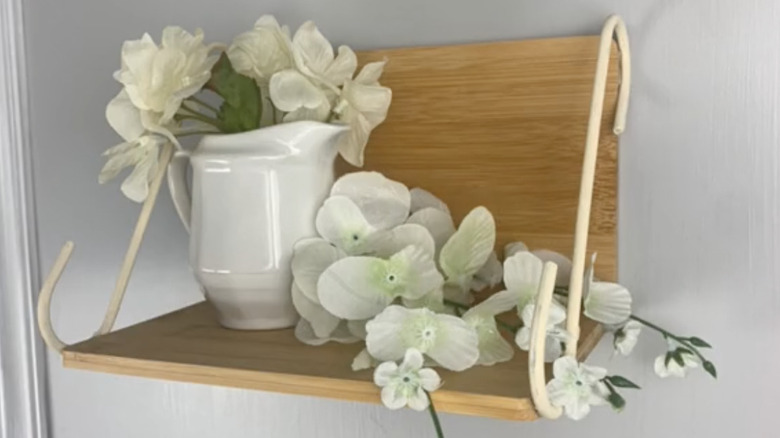
For this wall shelf, you'll need two bamboo cutting boards from the dollar store along with two elongated S-hooks (plant hangers), some craft paint (optional), E-6000 glue, and hot glue.
First, glue the long edges of the two cutting boards at right angles to form an L shape. Paint the two plant-hanger S-hooks (if desired) and hot-glue them to the outer edges of the boards, forming diagonal braces. Hang the shelf using velcro strips to keep it flat to the wall. This project makes an attractive perch for lightweight objects, but it would not hold heavy items.
Create a small shelving unit from cutting boards
Grab a stack of cheap, dollar store cutting boards, some hot glue, and E-6000 glue to build a mini shelving unit for displaying lightweight objects.
Glue the edges of the cutting boards at right angles to create open boxes. On each edge, run a bead of hot glue and follow up with a bit of E-6000 glue in each corner. Make the unit two or three levels tall and use it to display small, dainty items. This shelving unit would not tolerate frequent handling or hold heavy objects.
DIY an art deco side table with plastic pipes and a cutting board
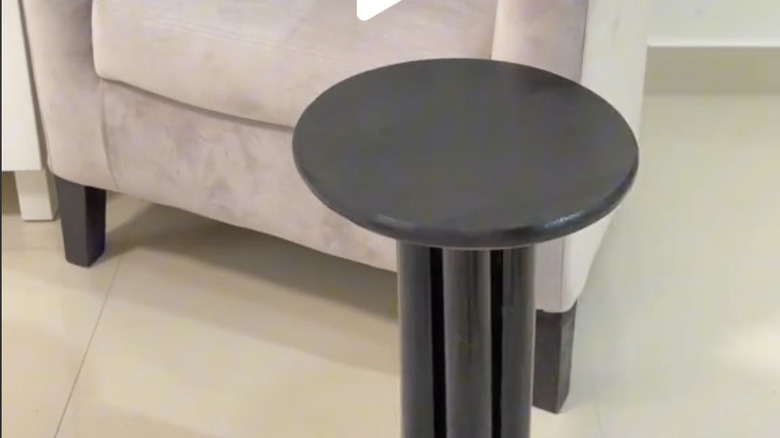
For this small end table, use a round cutting board, seven pieces of plastic pipe in 18-inch lengths, spray paint, and super glue for wood and plastic.
First, glue the pieces of pipe together and add rubber bands to secure them. Allow 15 minutes of drying time. Next, glue the round cutting board to the top of the pipes. Spray-paint the entire assembly in your chosen color. The result is a small table that resembles art deco style. It's an ideal spot for a cup of coffee next to your favorite reading chair.
Create a lovely, natural wood side table from a cutting board
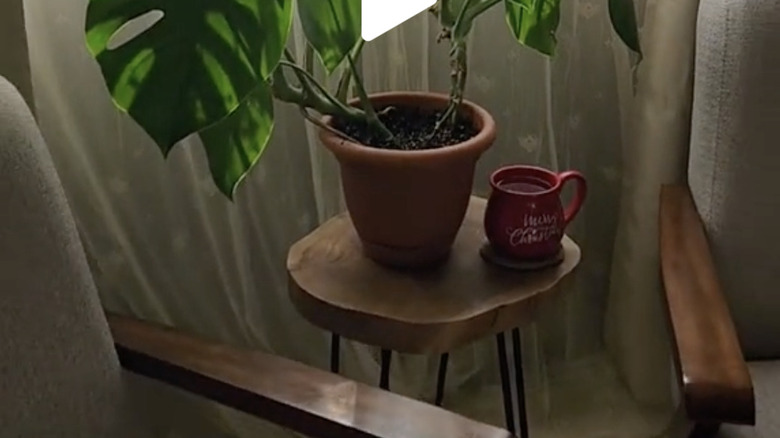
Some wooden cutting boards showcase the beauty of natural wood grain. With legs, they make lovely tabletops for side tables or plant stands. Start with a clean and smooth cutting board in a naturally rounded shape. Then, purchase a set of metal hairpin legs like these from The Home Depot.
Use a power drill and screws to attach the legs to the cutting board, and you're done. A side table for your living room should be 18-to-24 inches tall. Measure the thickness of your cutting board before selecting the desired length of the hairpin legs.
Paint a colorful design on a table made from a cutting board
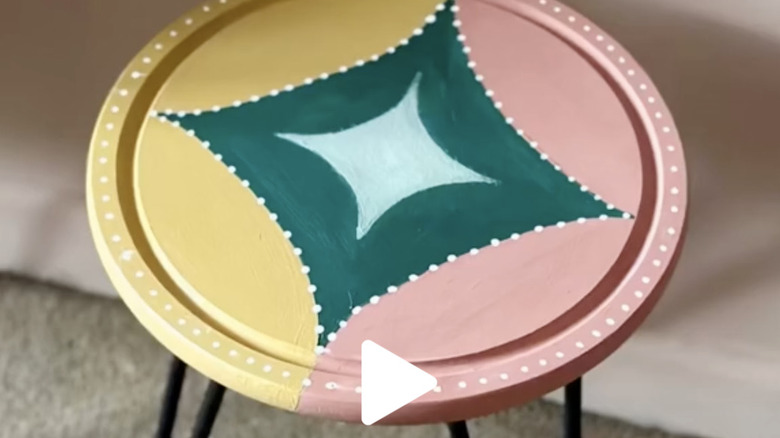
A round, wooden cutting board makes a great top for a small side table with hairpin legs like this option from Lowe's. For this version, you'll also need craft paints and a clear spray sealer.
First, paint a colorful design or image of your choice on the smooth top of the cutting board. When the paint is dry, spray with a clear sealer. Next, flip the board over and attach three hairpin legs approximately 16-to-18 inches in length. Finally, set the table upright on its legs and enjoy.
Fabricate a cookbook or tablet stand from a cutting board

Start with a cutting board to make a stand for your cookbook or tablet. You'll need three small pieces of wood, a power saw and sander, wood stain, wood glue, and clamps.
Cut a narrow strip of wood to serve as the book support along with two diagonal-cut pieces to prop the board upright at an angle that will make it easy for you to read your book or view your tablet. Stain these pieces and sand the rough edges. Then, glue them onto the cutting board and clamp until dry. This project requires a bit of woodworking skill. If you don't have power tools, substitute a handheld saw and sandpaper.
Transform a dollar store cutting board into a message board for your fridge
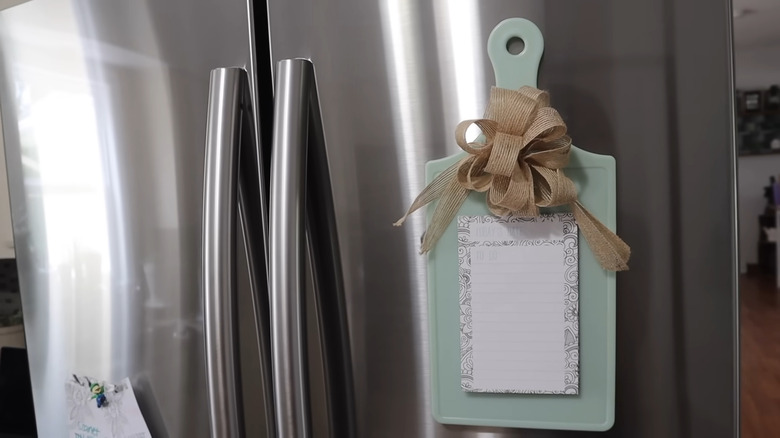
Here's a quick and easy DIY using a plastic cutting board from the dollar store. You'll need a small notepad, hot glue, ribbon, and disk magnets.
First, apply hot glue to attach the notepad to the cutting board. Then, fashion a floral bow from the ribbon of your choice and attach it to the board with hot glue. Next, glue disk magnets to the back of the board and hang it on your fridge. As an add-on, you can glue a magnet to a pencil or pen and stick it on the fridge near the message board.
Use black-ink graphics to create farmhouse decor from old, thrifted cutting boards
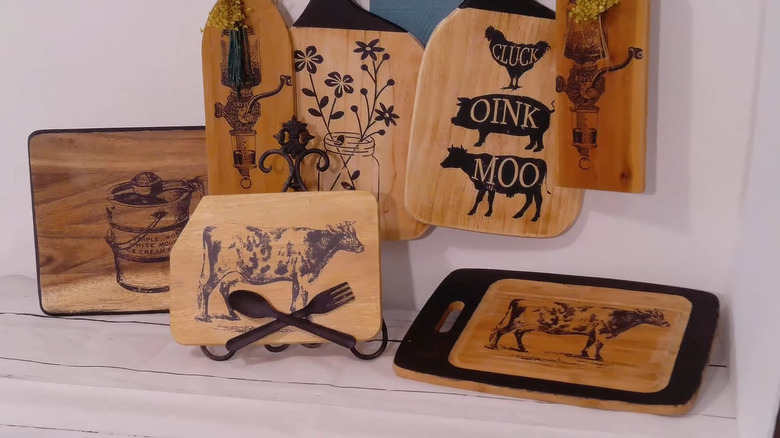
Old, wooden cutting boards from yard sales and thrift stores have tons of character. For this project, you'll need black-ink graphics on white paper, sandpaper, Mod Podge, a brush, a brayer, and spray sealer.
Sand the cutting board until smooth and coat the graphic with Mod Podge. Apply it face-down and roll with a brayer. If you don't have a brayer, the edge of a credit card will do. Dry overnight before spraying the paper with water and peeling away gently, leaving the image on the wood. Spray with polyurethane sealer and add painted accents.
Build these decorative stands from cutting boards
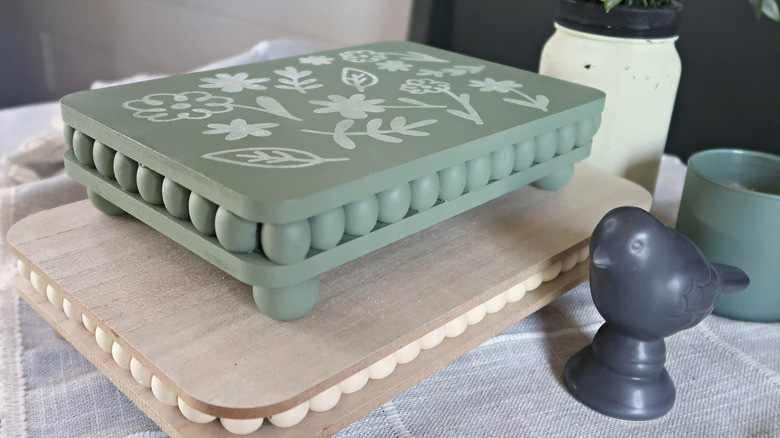
Sometimes, a small pedestal stand is ideal to showcase a potted plant or a small art object. You can make one from two bamboo, dollar-store cutting boards along with wooden beads, hot glue, E-6000 glue, and craft paint.
Use hot glue to attach a row of one- to two-inch wood beads around the edge of one cutting board and then glue the other board on top. Create four legs by gluing four larger wood beads in the corners, adding E-6000 glue for stability. Paint the stand in your desired color and add optional, stenciled graphics.
Craft an embellished, mixed media key holder from an old cutting board
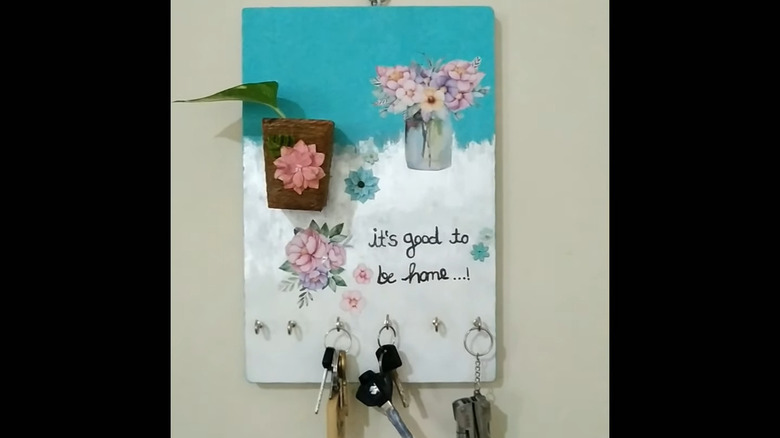
For this project, you'll need a lightweight, wooden cutting board, craft paint, embellishments of your choice, glue, several small cup hooks, one small eye hook, and a metal ring.
Screw the eye hook into the center of one short edge of the cutting board and add the metal ring for hanging. Paint the board in colors and a design of your choice, then glue on 3-dimensional embellishments like faux flowers or seashells. Screw the cup hooks along the lower edge of the board. Hang this key holder on the wall by your door for convenience.
Use an old cutting board and a grater to make a wall-hanging receptacle for kitchen utensils
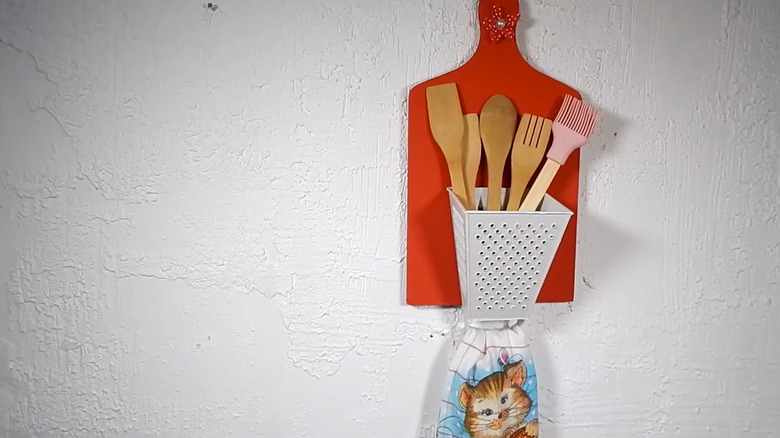
Store your kitchen utensils in this colorful container. Use a wooden cutting board, a box-type grater, paint and brush, two small screws, and a piece of craft foam.
Paint the cutting board and the grater, adding embellishments like faux flowers, if desired. Glue a piece of craft foam to close off the opening at the small end of the box grater. Turn the grater upside down and attach it to the board with small screws. Hang the board on the wall with Command strips.
Make a farmhouse trug basket using dollar store cutting boards
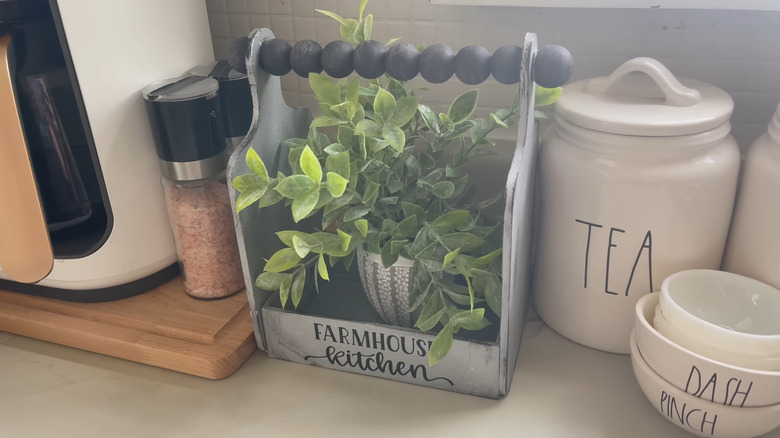
In the crafts section of a dollar store, pick up two MDF-board cutting boards with handles along with a small wooden tray. You'll need hot glue, a wooden skewer, large wooden beads, spray primer, spray paint, craft paint, and graphic transfers.
Glue the two cutting boards in a vertical position to the two ends of the tray. Insert the wooden skewer through the holes in the handles, and string on the wooden beads, using hot glue to secure the ends. Spray with primer and paint of your choice. Use craft paint and graphics to decorate the farmhouse-style trug basket.