DIY Projects That Will Take Your IKEA LACK Table From Boring To Statement Piece
The IKEA LACK table series is iconic for its simplicity and affordability. Both the side table and coffee table are lightweight, come in two different sizes, and also have a few different finishes. These features, along with their minimal profile, easy assembly, and unbeatable price make LACK tables the perfect blank canvas for a number of DIY projects.
Maybe you already own a LACK table that you are dying to makeover. Maybe you found one for a steal on Facebook Marketplace or for free on the curb. Or maybe, you just want to buy one new and let your DIY muse manifest. If you love your LACK just how it is, we completely understand; it's minimal, versatile, and it just makes sense. But if you wish your LACK was a little less, well... lacking – the most simple DIY can make a meaningful impact. Wherever you are in your journey, keep reading for projects that will inspire you to take your LACK from basic to statement!
Elevated side table
This DIY employs two LACK side tables to create a single, more elegant side table for your living room. Glue the top of the second table to the bottom of one fully constructed LACK, creating an open cube. Then, use the remaining legs to create a square base that adds height and structural intrigue to the newly constructed table. To take this DIY up a notch, attach adhesive LED strip lights beneath the surface overhanging the new table base. Not only will you have a stylish new table, but you'll add an unexpected source of ambient light to your space.
Marble marvel cube table
Make your LACK look luxurious by turning it into a faux marble cube. First, have your local home improvement store cut MDF to size for each side of your table. Cover the top of your LACK with marble contact paper, secure the MDF sides with strong glue and a staple gun, and then cover those sides with contact paper, too. To ensure a clean contact paper application, slowly peel away the sticker backing away while using a smoothing tool. This will help to prevent any wrinkles from forming on the table's surface.
Peel and stick wood vinyl table top
To give your LACK coffee table a more sophisticated and durable surface, try applying peel and stick vinyl wood flooring. The adhesive planks make this DIY incredibly straightforward. Give your LACK a good wipe down, and then just peel and stick the planks neatly onto the table top, trimming any excess material at the end. This project is incredibly affordable, and you can find plenty of different wooden looks for the vinyl at a home improvement store like Home Depot.
LACK on wheels
This DIY also uses a second LACK table top to create an open cube, but switches it up by making it mobile. Secure the second table top to the legs of the first LACK by using long screws. Then, add top-plate caster wheels to each corner to make the table even more versatile. Look for wheels with brake options, like these from Amazon, to keep the table in place when you don't want it moving around. Then use it for basically anything – from a sofa end table or laptop workstation, to a crafting surface and storage cart.
Pedestal coffee table
The combination of these two IKEA staples will take your LACK to the next level. Create a designer-looking pedestal coffee table by pairing the LACK coffee table top on top of a single EKET cube. Making sure to center the EKET beneath the table top, secure them to one another with an industrial strength adhesive, like E-6000. For an interesting color block effect, you can pick up the EKET unit in one of its more eye-catching hues – like pale yellow, brown-red, or pink.
Mirrored cube side table
Create an incredibly glam cube table with the smaller-sized LACK side table. Use a strong adhesive to secure mirror tiles to cover all visible sides of the LACK. You will need to get your mirrors cut to size for the LACK's dimensions, which you can do online. But, for a slightly more affordable option, opt for custom-cut acrylic mirror sheets instead of actual mirror tiles. Not only are they more budget-friendly, but they are also lightweight and will be easier to manage than glass mirrors.
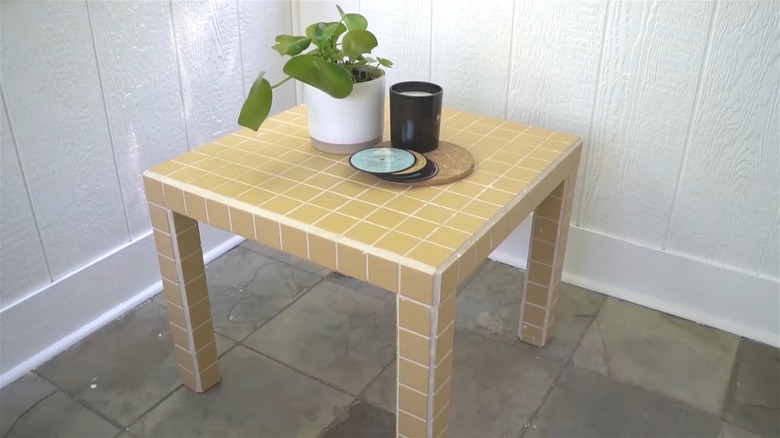
Tiled table
Using 2x2 inch square tiles and tile adhesive, properly grout your tiles to give your LACK table a fun upgrade. There are so many tile colors, styles, and textures on the market to choose from, so you can use this DIY as an opportunity to lean into the details of your own space. If you're feeling extra ambitious, you can use small tile pieces to create an entirely unique mosaic design on your LACK table top. Once you finish placing your mosaic, use the same grouting technique to finish the project.
Concrete column
This project will make your LACK completely unrecognizable, and do it without the use of power tools. DIYer Drew Michael Scott suggests stacking three small LACK side tables to create the frame of the column, using L-brackets and screws. From there, cover the sides with Polywall and finish with a concrete skim coat for a striking pedestal table. If you don't want to use three LACK tables, you can use one for a concrete cube or two for a slightly shorter column.
Disco table
Cover your LACK in sheets of tiny self-adhesive mirror tiles to make it shine like a disco ball. Neatly apply the sheets next to one another, covering the surface of your LACK. The table will look beautiful and reflective as is, but you can take another step to give it a more professional, practical finish. To complete the look and prevent any dirt and debris from getting in between the cracks of your mirror tiles, use non-sanded grout. This kind of grout is made for smaller gaps up to ⅛" and will not scratch mirror glass, unlike typical sanded grout.