Repurpose Those Upper Kitchen Cabinets To Create Stylish Custom Storage
We may receive a commission on purchases made from links.
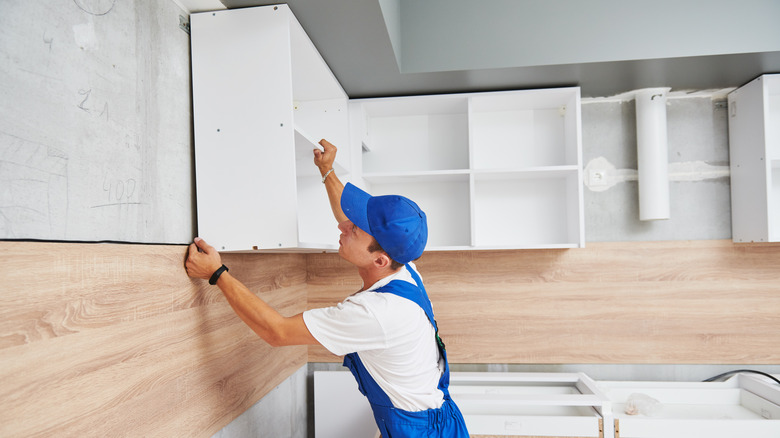
Replacing the kitchen cabinets during a renovation with new ones almost feels like buying a new house. You'll be surrounded by a new style and color, leaving your kitchen unrecognizable. They'll elevate your kitchen's look, allowing you to make other minor changes, such as swapping out the light fixture or incorporating more kitchen décor. The downside to ripping out the old cabinets is not knowing what to do with them. Some folks sell or donate them. However, you can easily repurpose them and create stylish custom storage. TikTok user @simply.diy.home connected two of her upper kitchen cabinets, added a few legs, and turned them into a stunning storage unit for her kid's room.
It's one of the most affordable DIYs you might ever come across since you'll already have the main component. All you need to purchase is the furniture legs, a long piece of plywood, paint, edge banding, bar clamps, and a drill gun with screws. Home improvement retailers like Home Depot, Lowe's, Harbor Freights Tools, and even Amazon have many options for the style of furniture legs to add to your cabinets. For instance, Home Depot sells spiral-style legs for $2.89 each, giving the cabinets an elegant touch. Or, if you prefer something simple, Walmart sells a pack of four square furniture legs for $12.78. You can paint the legs a contrasting color to the cabinets to complement and stand out in the room.
How to create your custom storage
TikTok user @simply.diy.home courageously built and painted her custom cabinet storage on the carpet in her kid's room without getting any paint on the carpet. However, if you're a little clumsy, especially with paint, you'll want to do this DIY outside or in the garage, then when it's complete, carry it inside. When you decide where to do your project, remove all the doors. Then, place the cabinets flush against each other and secure them with a bar clamp. Put the clamp in the middle of the connecting wood where the doors would go. Drill a hole above the clamp closer to the top of the cabinet, then drill in a long, slightly thicker screw than the one you used to make your hole. Repeat the step to add a hole below the clamp closer to the bottom of the cabinet.
After your screws are in place, remove the clamp and prep your plywood with a sander. Using wood glue, attach your plywood to the top of the cabinets, and add edge banding to the plywood and cabinets for a seamless finish. Install the furniture legs to the bottom of the cabinet, following the manual's instructions. Finally, prime and paint your cabinets and doors. Once everything dries, return the doors and fill your new custom storage with all of your items. This unit works perfectly in the living room, bedroom, or home office. You can also customize it by adding an extra cabinet to make it larger or incorporating open shelving.
Customize your storage unit with open shelving
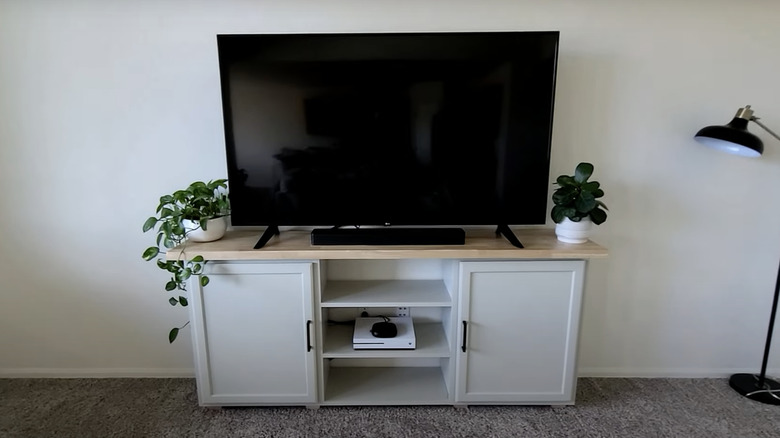
A close-knit storage unit is excellent if you prefer keeping your items behind closed doors. However, you can add a few shelves between the cabinets to display picture frames, candles, and books, as shown by YouTuber Jeanie Marie. It makes a superb TV stand for your living room. Plus, it's effortless to do. If you want to use your cabinets as a TV stand, you'll need plywood for shelves, furniture legs, a nail gun, a table saw, a measuring tape, and a long butcher block. Measure the TV's width from side to side to figure out how long to make the stand. You'll want to add a couple of inches to give the TV some room when it's sitting on the surface.
Then, take your measurements and apply them to the cabinets so that you have a gap between them, which is where you'll install shelves. Measure the width and depth of the gap to figure out how big you need to cut your shelves. Cut out your shelves from the plywood and nail them to the cabinet from the inside, ensuring they're flush to the cabinet's exterior lip. Next, measure your butcher block to be the same width as the stand and cut to size. If you enjoy the overhang look, add a couple of inches to the measurement. Before attaching your butcher block, prime and paint the cabinets. Finally, attach the butcher block by screwing it to the cabinets from the inside and decorate your new TV stand.