Add Color To A Lifeless Corner With This DIY Vertical Plant Hanger
We may receive a commission on purchases made from links.
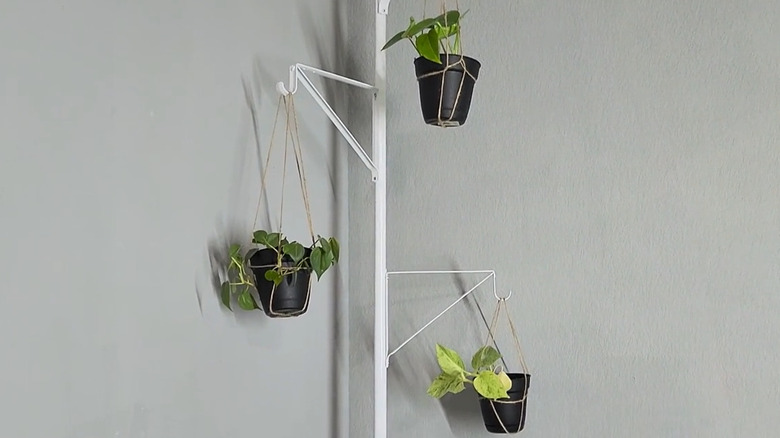
Whether you're looking to brighten up a boring corner of your house or seeking creative ways to store your ever-growing plant collection, this DIY vertical planter by Hometalk is an easy solution. It's small enough to fit in any unused corner and a great way to maximize your space. Hanging plants in your home allows you to fit several plants in a small footprint, space them out enough that higher-up plants won't block the sunlight from their neighbors down below, and keep any toxic plants far out of reach of children and pets. This DIY project works particularly well for cascading plants, which will have plenty of room to grow into a stunning waterfall of foliage.
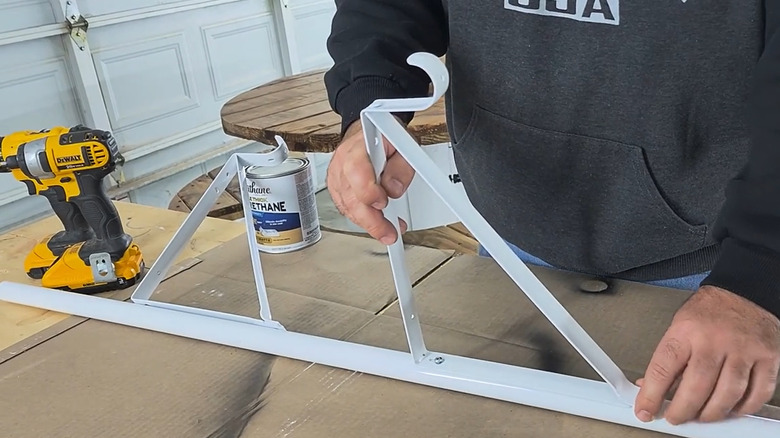
All you'll need is an hour or two of time and some affordable supplies. These include a drill, drill bit set, and pencil, which you probably already have on hand. Then head to the nearest hardware store for a telescoping closet pole, some self-tapping screws, and a handful of shelf brackets. Make sure the closet poles expand far enough to reach from your floor to your ceiling. The size and number of brackets depend on your space, but 8 to 9-inch long brackets are a good place to start. You can find rods and brackets at places like Amazon and Lowes for under $10 each. Then you're ready to get started!
Build the hanger
First, expand the closet pole so that it fits snugly from the floor to the ceiling, and mark where the two rods meet. Lay the pole flat, align the rods to the mark you made, and drill through the screw hole on the outer rod to create a matching hole through the inner rod. Then put a self-tapping screw through the hole to permanently attach the rods together.
Next, determine where you want your brackets to go and mark those places on the pole. Drill a hole for each bracket using the smallest drill bit you can find, then partially screw in a self-tapping screw. Slide the bracket into place and mark where the second screw should go, on the other end of the bracket, then partially screw in the second screw. Check that the bracket fits before fully tightening the screws.
Now that your plant stand is mostly complete, determine where you want to put it and mark the floor and ceiling where the two ends should go. The closet pole will come with a pair of small, round wall brackets to seat the ends of the pole against the wall (or, in this case, ceiling and floor). Screw these into the places you marked, then snap the pole into the brackets to secure it. You can then rotate it if needed so the brackets where the plants will hang are in the right position.
Hang your plants securely
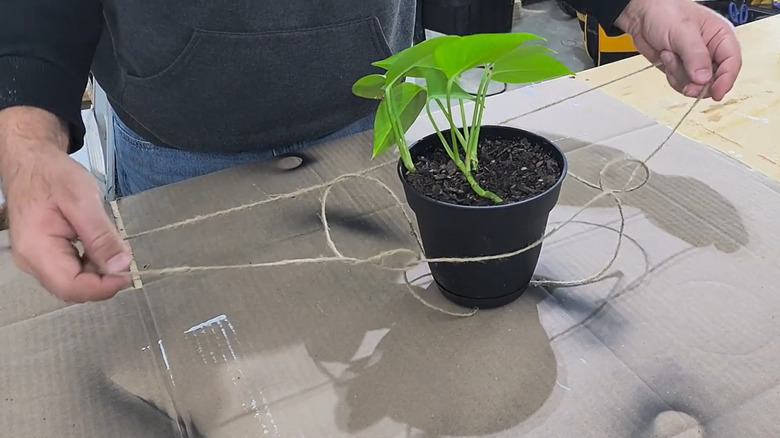
Once you've built the structure, you'll use twine to create sturdy, attractive plant hangers that they can be adjusted to fit any size pot. But keep in mind that this DIY works best for plants in plastic containers, which are considerably lighter than ceramic pots.
Start by cutting a long piece of twine (5 to 6 feet) and knotting the ends to make a big loop. Lay this on a table and push one side in to make a shape like an arch. Pick up the inside piece and twist it to form an X, then set your plant on top of the X. Now there should be a small loop of twine protruding above the plant, near the top of the arch. Lift the top of the arch over and through the loop, then over the plant to the other side of the pot. This will create two hanging loops on the opposite sides of the pot. Raise both of these around the pot, pulling gently to tighten, until the plant is seated snugly.
Then hang your plant on your DIY plant stand! If it hangs higher or lower than you want it, you may have to go back and trim the twine or cut a longer piece. Once you've determined the perfect length of twine, repeat this step for the rest of your plants. Now you have a stunning DIY hanging planter to transform that empty corner into a thriving green space.