TikTok's Quick DIY Wood Project For Genius Tool Storage
We may receive a commission on purchases made from links.
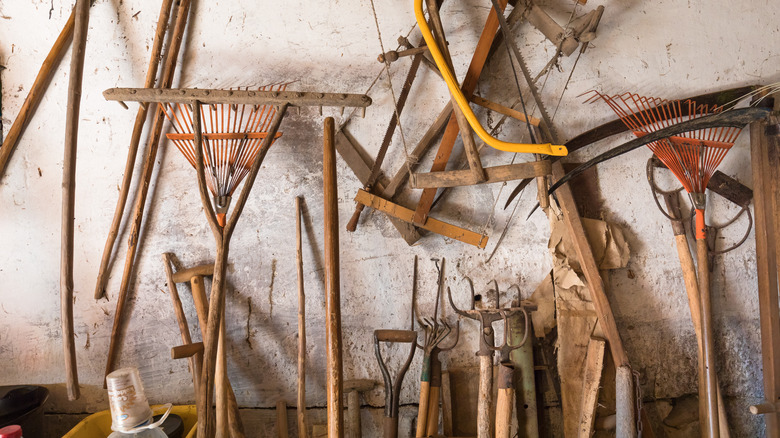
Rob MacCormack is an artist with a practical side. Sometimes he wants to make sculptures, huge audio waveforms made of wood, or live edge epoxy river tables. But when he simply wants to hang up some garden tools, he also applies his prodigious woodworking skills to that problem. What he's come up with and showed off on TikTok is basically a plywood version of the steel ladder hangers and other tool hooks you often see with a rubberized coating and supporting long-handled tools on a garage wall. In the spectrum of budget-friendly ideas for organizing your garage, this one is a real winner.
MacCormack's design is simple, strong, cheap, and (best of all) probably doesn't require a trip to your hardware store. It holds multiple tools, and his version is clearly designed for long-handled implements like shovels and rakes. Given the sheer number of essential gardening tools alone, getting organized is important. But the concept is easy to adapt to just about any need. It's all about the shape.
Make your own tool brackets
In this case, the shape is two triangular brackets, each with a hook to keep tools from sliding off. The triangles are connected to the wall by a mounting plate. Their shape, and the ¾-inch plywood they're made of, lend a lot of strength to the brackets. Construction is straightforward: the two brackets that support the tools are identical right triangles, with a rectangular bit of plywood in between to which they're glued and secured with brads. You could build this with plywood or solid wood, but plywood is most likely to be the affordable option if your brackets are large. If you use plywood in an unconditioned space, it might make more sense to use glue and screws just in case of delamination; no one needs a rake falling on their heads. And since the rectangular piece is what gets secured to the wall, it's probably a good idea to attach the triangular pieces with screws and glue for the added strength.
Exactly how you build it depends on your final design, and as we'll see, your options are nearly endless. If you put a decorative shelf atop yours (like this one at Walmart), for example, that will have a different set of requirements than a long shelf that will need at least two sets of these DIY hangers. But the important part in all cases is to construct your brackets so they are strong enough to hold what you want them to.
Now, make different tool holders
This approach to hanging tools will be familiar to any woodworker, as it's only different in scale from the sorts of things you might see organized on a pegboard or French cleats. You could easily adjust the design to accommodate anything with a long handle or neck (a guitar, for example) or smaller items (screwdrivers, perhaps). You could also make smaller individual holders for small hand tools, or a series of connected brackets for storing things like chisels. Small tools don't necessarily have to be stored in a horizontal row, either. Make your brackets tall and cut slots in the outer face to hold things like a collection of wrenches. Spaced farther apart, the brackets can hold cordless drills hanging upside-down. Larger versions would be perfectly at home storing a long extension cord, a coil of pex tubing, or a garden hose.
And you're not limited to tools; it's not hard to imagine a way to hang just about anything with brackets like these. You could store kitchen utensils as easily as musical instruments, and the best part is you'd never have to worry about things falling off the walls. Properly constructed, these brackets would hold more than you'd care to put on them. You've probably seen those stands for decorative plates or cookbooks, for example, and there's no reason you couldn't use a similar approach to support collectibles, whiteboards, chalkboards, sheet music ... just about anything you might be inclined to hang on a wall.