DIY The Carport You've Been Dreaming Of With This Budget-Friendly Solution
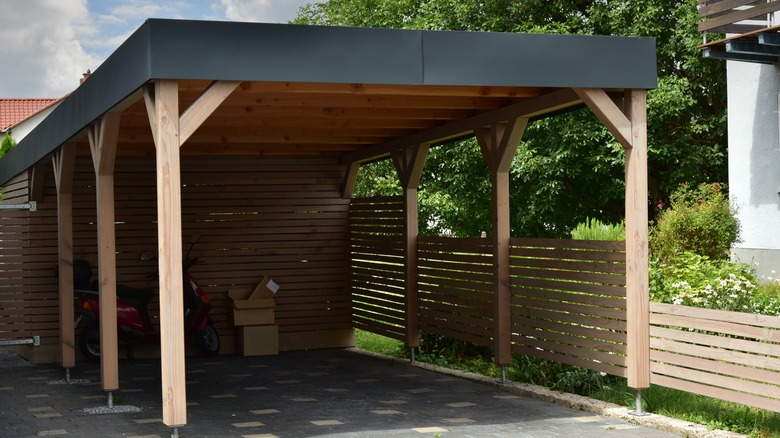
If you purchased a home that didn't have a garage, you may decide to start researching how much it costs to build a garage. When you discover that the national average for this type of structure is $24,000, you may need a minute or two to recover your composure. Maybe you decided your budget needs a simpler, thriftier solution to protect your vehicles, like a carport. There are multiple ways to deploy creative ideas to make a carport parking space look great while remaining practical. However, even building a carport can put quite a dent in your budget, ranging from $2,000 to $7,200 for a single-vehicle unit and up to $12,000 for a double-vehicle unit.
If you need an even cheaper alternative to protect your vehicle from the weather and sun exposure, YouTube user Cotto DIY has the answer for a DIY carport that costs less than $200 for the materials, according to Cotto DIY's estimates. The video explains the process used and shows the progress. The structure is possible to build with just a few common tools and basic skills.
The tools you should have to follow this carport hack include a cordless drill ($99 at Lowe's), various drill bits ($17 at Lowe's), a 10-pound sledge hammer ($50 at Lowe's), a magnetic level ($24 at Lowe's), and an 8-foot stepladder ($125 at Lowe's). You'll also need screws and lag bolts, although the video did not specify amounts or lengths.
How to build a carport on a tight budget
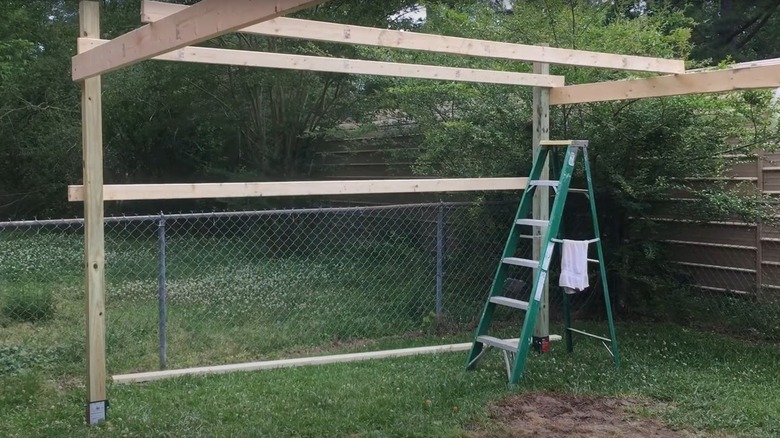
To build a 16-foot long by 12-foot wide carport like Cotto DIY did on YouTube, the materials you will need include four 2-by-6 16-foot pressure-treated lumber pieces ($19 each at Lowe's), two 2-by-6 12-foot pieces ($15 each at Lowe's), six 2-by-4 12-foot pieces ($10 each at Lowe's), four 4-by-4 8-foot posts ($10 each at Lowe's), and four 4-by-4 wood post spikes ($34 each at Lowe's). Although Cotto DIY claimed to spend about $180 on materials, our estimates totaled about $340.
The video instructions called for driving the post spikes into the ground with the sledgehammer at all four corners of the structure, using the magnetic level to ensure the spikes are straight. Use scrap wood to drive the stakes. Once they're in the ground securely, insert and secure the 4-by-4s.
Attach the 16-foot lumber with lag bolts to span the gap between the posts on the sides of the carport. Put one 16-foot piece along the top and one about two-thirds of the way off the ground. Next, attach the two 12-foot 2-by-6 pieces across the back of the carport, one at the top and one about two-thirds of the way off the ground. Use the six 2-by-4s across the top, spreading them evenly, to create beams that support the structure. For a roof, Cotto DIY bought a tarp and attached it to the posts and roof beams with some overhang on all four sides ($57 at Lowe's).
Are there potential drawbacks to constructing an inexpensive DIY carport?
Perhaps the biggest drawback to Cotto DIY's carport solution is the uncertainty as to how long it will last. When making the video, Cotto DIY admitted that the structure may not stand up to extremely tough weather or may only remain standing for several months. The tradeoff is that the cost is so low that potential weather destruction may not bother you all that much.
If you live in an area with a lot of rain, Cotto DIY's solution for using an inexpensive tarp as the roof may not work all that well. Toward the end of the video, which is occurring during a rainstorm, you can see the tarp is sagging a bit between the slats in the roof. The sagging tarp probably means all the rainwater won't drain away, even with the slight slope Cotto DIY added to the frame's construction, potentially tearing the tarp or causing it to end up with an odor and mildew on it.
Finally, don't just assume that you can put up this structure right after buying the materials. Depending on where you live, you will probably need to obtain a building permit before you can start the work. You may need to draw up basic plans that show the exact location of the carport and what it will look like. The simple design that Cotto DIY created may not fit the design requirements of certain neighborhoods or HOAs, either.