Use Leftover Materials To DIY A Rain Barrel Stand
We may receive a commission on purchases made from links.
Rainwater harvesting is a good way to conserve water, reduce your water bill, and live a little more intentionally. It's weirdly satisfying to water a container garden from a rain barrel, knowing that you made that rain with your own two hands. Okay, maybe you just made the DIY rain barrel, but let's not get nitpicky. At some point when you were making the rain barrel — probably around the time you were installing the spigot — you realized that the barrel needs to be on a platform of some kind so you can get a bucket or watering can under the spigot. Otherwise, you'd only be able to drain it onto the ground, which isn't much of an improvement from not having a rain barrel. The good news is that you can easily make a platform with materials you have left over from previous projects.
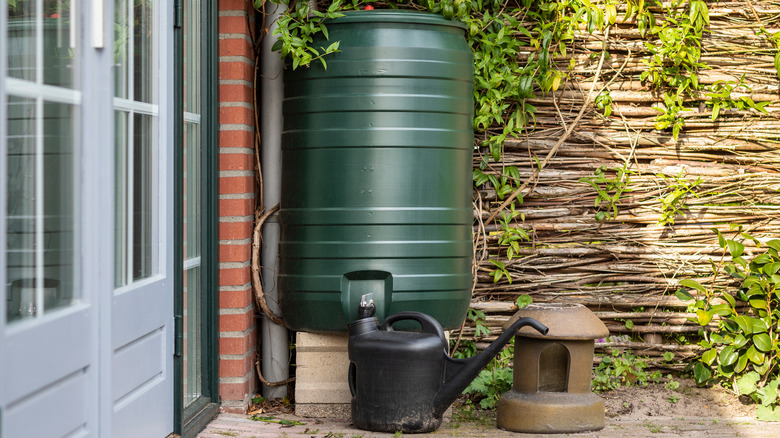
For the sort of platform featured on the @rainbrothers YouTube channel, all you really need is eight concrete blocks and a 2-foot-by-2-foot paver. There's also a version made with fence posts, but that shopping list gets a little more complicated, so we'll come back to it. There are several types of rain barrels to boost gardens of different sizes and conserve water in various amounts, and they all have different requirements in a stand. What we're talking about building here is a typical rain barrel that holds 50-90 gallons.
Making a concrete block rain barrel stand
The @rainbrothers video details the project in one minute. In a nutshell, you'll be leveling a 2-foot-by-2-foot area of ground and stacking four 8-inch-by-8-inch-by-16-inch blocks ($2.36 each at Lowe's) in a square with an empty center. Double-check that they're level, then add a second row of four blocks, cross-stacking them with the first layer so that each block on the second row spans two blocks on the first row. Double-check that the second row is level, then add a cap on which the barrel itself will sit. @rainbrothers uses a 2-foot-by-2-foot paver, and Home Depot stocks 24-inch-by-24-inch-by-2-inch granite-blend concrete pavers ($9.68) in some stores.
You might have noticed that the word "level" comes up repeatedly during the process, and for good reason. It's important to keep the ground underneath your platform level and compacted as you work so that the weight of a full rain barrel doesn't collapse the whole works. Rain barrels tend to go next to houses where the soil has been worked, especially since we're used to un-compacting soil as part of preparing for successful planting. Soil that has been worked can expand by up to 50%, and has to be thoroughly compacted to restore the soil's bearing capacity... the amount of weight it can support. It's best to compact the ground using a motorized jumping jack or vibrating plate compactor, but for concrete block platforms, you can get by with a simple soil tamper ($39.98 at Lowe's).
Making a fence post rain barrel stand... or not
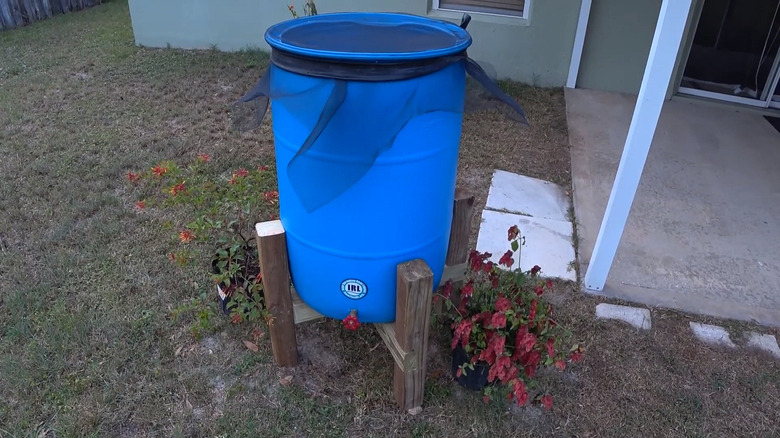
Rain barrel platforms made with 4-inch-by-4-inch wooden posts are fairly common. YouTubers like @livinthenewcomblife and @DrWD40 have made convincing videos showing the process, and it's simple enough. The version made by @livinthenewcomblife involves cutting the posts to the height of your stand, holding them together with a rim made of 2-by-4s, and then capping it off with whatever dimensional lumber you have handy. There's only one problem with this approach, but it's a big one: Your barrel might tip over.
The reason goes back to soil compaction. Loose clay and silt soils can have a load-bearing capacity as low as 1,500 pounds per square foot (psf). When you put a full 55-gallon rain barrel on four posts, the pressure those 3.5-by-3.5-inch feet exert on the soil can be around 1,400 psf. This is a little too close for comfort if your soil isn't properly compacted. Since rain barrels are often placed next to a home's foundation, spills can obviously be damaging. Soil compaction isn't a given even with a properly graded site and soil at or near downspouts is often eroded and may have been replaced with fill dirt or topsoil that hasn't been compacted. One easy solution is to use pads or footings like these from Lowe's ($10.47 each) to distribute the load, but note that those footings would add over $40 to your project since you probably don't have spares handy.