Use Wood Pallets To DIY A Beautiful Clock That Keeps Track Of Time In Style
We may receive a commission on purchases made from links.
If you're looking for a simple project that will make a beautiful, decorative, and functional addition to your home, you can create showstopping home decor with this DIY clock. With just an old pallet, a battery-operated clock mechanism, and some imagination, you'll be able to craft a clock that's also a piece of art. On Amazon, a set of clock repair parts, including a battery and clock hands, is about $8. You may also need wood glue or nails, a saw to cut your pallet, plus paint, sandpaper, or possibly wood stain depending on how you want your clock to look. This project is very versatile — you can create various sizes and styles for your own unique clock.
Additionally, you will need numbers for your clock. The style of your numbers should depend on the size of your clock. The self-adhesive mailbox numbers on Amazon for just under $7 could be an easy choice for a larger clock. Smaller galvanized metal numbers can be found at Dollar Tree. Those of us with steady hands may also be able to paint or etch on numbers, use a stencil, or you could add wooden numbers from a craft store like the Make Market block letters (about $3 at Michaels). If that sounds difficult, consider purchasing a clock kit that includes the numbers, like the Walnut Hollow clock kit for $12 on Amazon.
Preparing your wood pallet to make a DIY clock
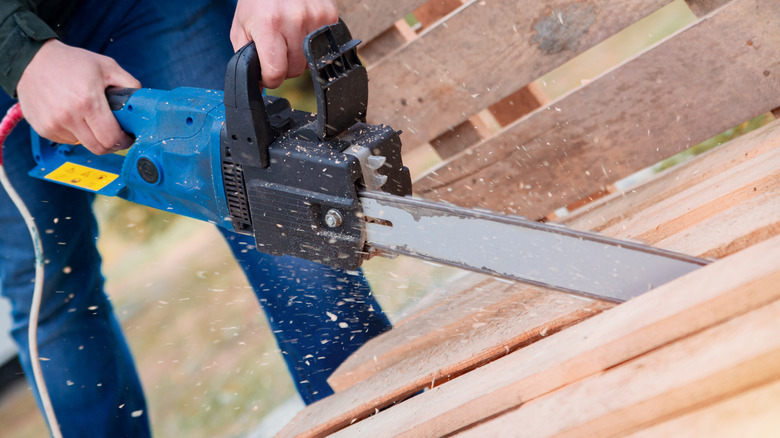
If you don't have any wood pallets left over from other projects, there are places to find free pallets near you such as retail stores. Once you've picked out a pallet, cut the large boards off from one side with a saw. These will act as the face of your clock. For a smaller clock, you may want to cut these boards in half as well. Now, line up the boards and mark where you'd like the center to be. This is where your clock hands will go later. Cut a piece of string the length that you'd like the radius of your circle to be, tie it to a pencil, and hold the string on your center mark. Stretch out the string and move your pencil around the pallet boards to draw your perfect circle. Alternatively, you might trace a round object, like a bucket or bowl.
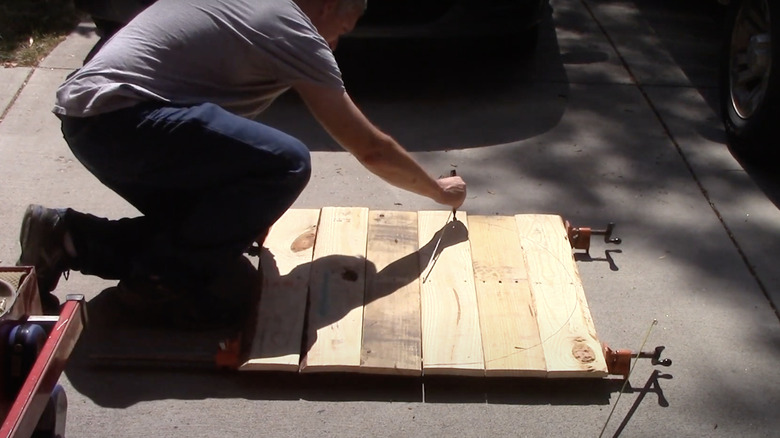
Cut out the circle along the line to make the panels that will form your clock. Make sure to save two small separate scrap pieces which can be used for stability later. Lay out your panels and fit them together to re-form the circle for your clock's face. These can be attached by applying wood glue to the sides and sticking them together. Now, glue your two scrap pieces perpendicular to your panels for support. You may also lay out the panels and supports and nail your clock together, rather than using glue.
Completing your DIY pallet clock
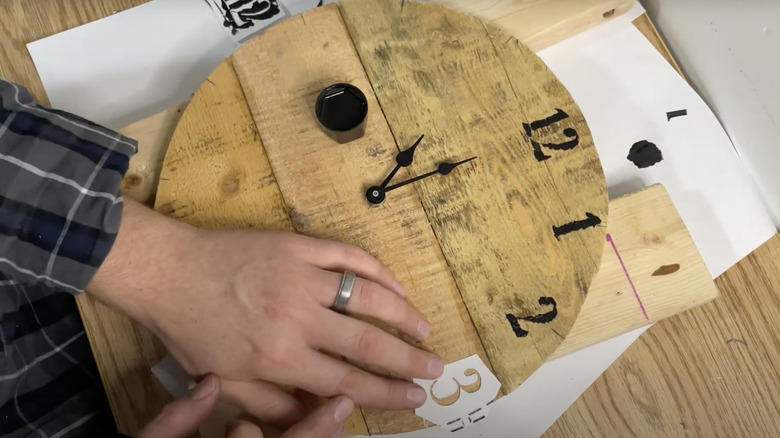
If you're concerned the support pieces won't be enough, you could glue a round piece of plywood to the back of your clock rather than using supports. Once your base has been constructed, drill a hole in the center of the circle for your clock mechanism. You may also want to cut a square partially into the back of the middle pallet board to better hold your battery pack. Once the woodworking aspect of this project is finished, you can style your clock however you'd like. For a farmhouse vibe, you may choose to simply stain the wood or leave it as is if it's a good quality. Otherwise, you could paint your clock a solid color to match the decor in your home.
To get a worn or distressed appearance, try painting your clock with a base of white and then sanding it down to allow the wood to show through. You can then add other colors on top, sanding between each layer of paint. This will create a unique, textured look where the underlying colors and wood poke through the top coat of paint. Once it's dry, attach the battery pack and clock hands to your wood through the hole in the center and add your numbers to the face. Though this is an incredibly simple pallet wood project even beginners can do, it will result in a gorgeous piece of decor for your home that will also tell the time.