DIY A Renter-Friendly Room Divider Using A Few Dollar Tree Items

Are you looking to carve out some privacy in a large room? Or do you need to section off spaces for different purposes all in one space? Room dividers are an easy way to create a feeling of separation. They're practical, portable, and provide you with flexibility in your living layout. There are lots of imaginative ways to create your own room divider, and Youtuber Lots of glitter And shiii shows us an easy and inexpensive DIY featuring 10-inch foam wreaths from Dollar Tree as the main design element. Aside from being budget-friendly, this DIY is also lightweight and easy to reposition around your space.
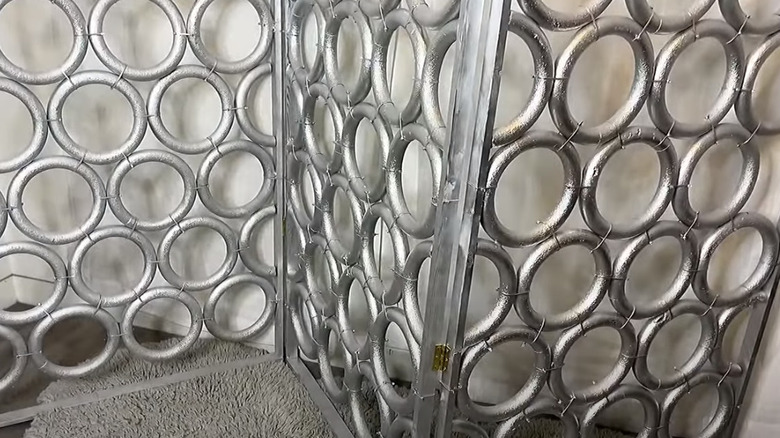
This glitzy and modern room divider is made up of three identical vertical panels, each a 6 x 3-foot wooden frame filled in with rows of foam wreaths. She connected the panels with hinges for them to stand at bent angles and topped it all with a few coats of shimmery silver spray paint.
To copy Lots of glitter And shiii's project, you'll need three 6-foot cuts of wood 1x2s, 25 foam wreaths, and four L-brackets for each panel of the divider. Multiply these numbers by how many panels you decide to create. Gather or purchase zip ties, liquid nails, and at least four 2-inch hinges. Also make sure to grab a utility knife, power screwdriver, some wood screws, and a glue gun. Finally, buy several cans of spray paint in the color of your choice; One or two cans per panel should be enough.
Build your divider
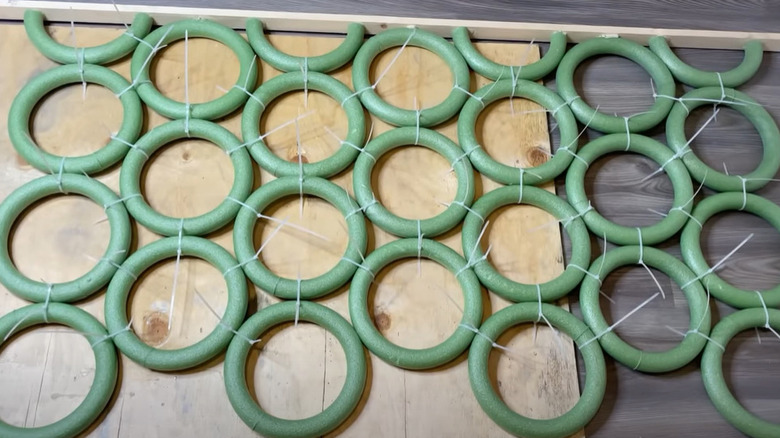
Each divider panel will be 6 feet tall and 3 feet wide with seven horizontal rows of 3 ½ wreaths. Prepare the frame for the first panel by cutting one of the 6-foot 1x2s in half, making two 3-foot pieces of wood. Assemble the wreath layout before framing the panel, starting by attaching the first row of wreaths to one of the 6-foot 1x2s. Cut four wreaths in half with a utility knife; the halves combined with whole wreaths create a staggered arrangement on the panel.
Using both the hot glue and liquid nails, glue the cut ends of the wreath halves onto the 2-inch-wide face of the 6-foot 1x2s. Next to the half wreath, adhere a whole wreath with the glue combination. Repeat that pattern two more times for a total of six rows; three rows will start with halves, and three will start with whole wreaths.
For the next row, connect full wreaths with zip ties at all contact points to each half or whole wreath affixed to the wood, and the staggered design will appear. Also, use one zip tie to connect each whole wreath that's glued to the 6-foot wooden cut. Continue securing wreaths until there are 7 rows, each row made up of 3 ½ wreaths. Have leftover zip ties? Hold on to them! Zip ties can be essential when moving and make taking out the trash so much easier.
Add the finishing touches
Once you've zip-tied and glued all of the wreaths into their pattern, it's time to join the other 6-foot 1x2s to the wreaths. Follow the same instructions you used for the first 6-foot 1x2, simply starting with a whole wreath instead of a half. You will have one half-wreath left over.
Take the two 3-foot 1x2s and place them at what will be the top and the bottom of the panel. Use the L-brackets to link the four 1x2s at each corner of the panel. Secure each bracket well with wood screws. Follow these instructions again for each panel you make. Then trim the excess off of the zip ties, spray paint each panel with several coats, and join the panels with at least two hinges per connecting side.
If your living space is too small for a three-panel divider, simplify things by either making a floor stand for one panel or by hanging one panel from the ceiling. Screw two 16-inch pieces of 1x2 horizontally to the base of your panel as supports. To hang your panel, purchase some eye hooks, two ceiling hooks, and two lengths of chain that match the height you'd like to hang the panel. Attach the eye hooks to the top 3-foot 1x2, link the chains to the hooks, and hang them from ceiling hooks. Although the panel will be lightweight, it is best to sink the ceiling hooks into a support beam.