The DIY Bedroom Makeover That'll Make Your Space Feel Like A Luxury Hotel Room
We may receive a commission on purchases made from links.
Staying in a luxurious hotel is one of the best things about vacationing. Luxury hotel rooms inspire opulence, relaxation, and comfort with their modern interior design, welcoming lighting, and decorative mirrors. You can easily replicate luxe hotel designers' techniques to bring the feeling of glam to your own bedroom, and a bespoke floor-to-ceiling headboard or headboard wall instantly creates these vibes. The typical headboard wall centers the bed in an upholstered section separating decorative panels customized with fabric, mirrors, lights, and more. Luckily, this feature can also easily be replicated at a cheap price. To complete this DIY, you'll cover foam panels in fabric, create reflective separators, mount mirrors, and add statement lighting.
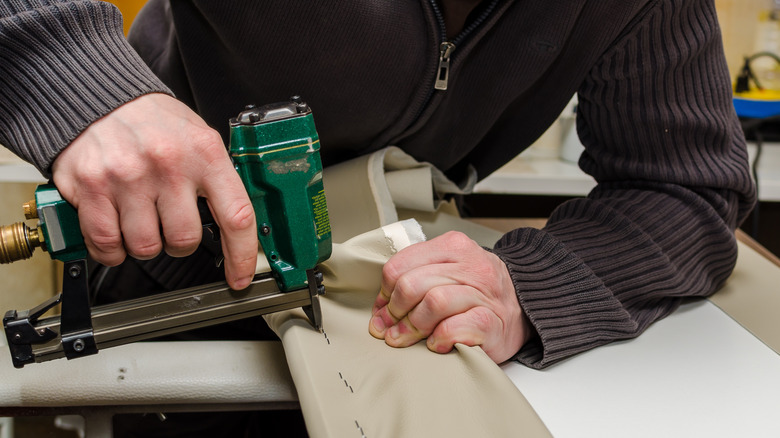
For this project, you will need foam boards, available for $1.25 each at Dollar Tree. You'll also need 2-inch-thick upholstery foam from Amazon for $35 and plain mirror sheets, available in various sizes on Amazon. To customize your headboard, pick out a few yards of fabric. Five small rectangular decorative plaques in any design (since you'll cover them up) are also required. For the headboard's decorative elements, purchase Home Depot's $40 five-pack of PVC strips, decorative tape from Hobby Lobby for $2, and, optionally, a patterned room divider on Amazon for $29. For lighting, check out the $12 LED strip lights on Amazon and a five-pack of battery-powered push lights for $10, also on Amazon. Tools needed include a box cutter, scissors, tape, a hot glue gun, spray adhesive, a strong mirror adhesive, and Command Strips.
Create the headboard wall parts
Start by creating the horizontal lighting panel for your new headboard, which will be placed at the top of your wall. Use a glue gun or strong tape to assemble two foam boards that are as long as the desired width of your headboard. Then, hot glue the decorative plaques along the edge of one of the foam boards — these plaques will be where you place the LED lights, so space them out as you prefer the lights to appear. Next, use decorative tape to cover the plaques and to give them a more glam look. Finish by attaching the other layer of foam board to the other side of the decorative panels; hiding the lights between the boards will create a soft, calming light.
Next, create the upholstered center section of the headboard. Cut six 1-foot-wide foam boards that are all the same length. Or, if needed, you can create more boards so that they cover enough surface area on your wall. Cover these pieces with 2-inch-thick foam, attaching the board and the foam together with hot glue. These pieces will be covered with your chosen fabric, and the fabric can be attached with spray adhesive or staples. You may find this TikTok hack to DIY a luxe upholstered headboard helpful. PVC strips covered with decorative tape will be placed between the pieces of upholstered foam boards on the wall. If you created six fabric foam boards, make five of these.
Piece all the parts together on the wall
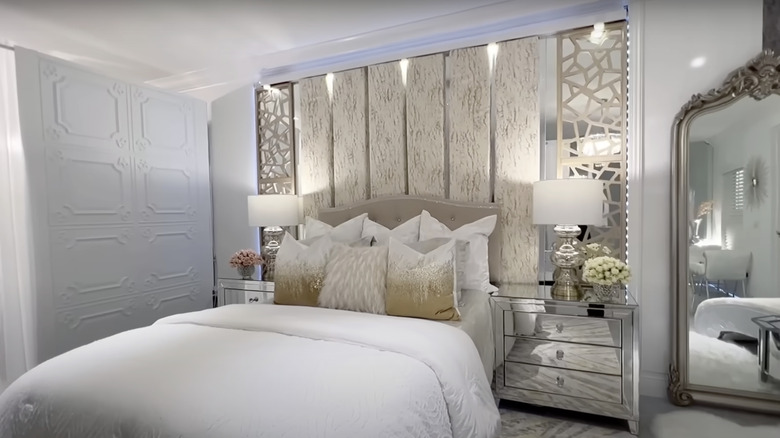
Now, it's time to mount your headboard. At the top of the wall, affix the horizontal lighting panel you created with nails or Command Strips. Then, vertically attach the six fabric panels and five decorated PVC strips with Command Strips, alternating them. Next, adhere plain mirror sheets to the walls on both sides of the headboard with a strong mirror adhesive. Use parts from an old or inexpensive room divider to elevate the mirrors further. Disassemble the room divider at its hinges, then remove the wooden or plastic decorative panels from their opaque backings so that you can see through them. Use hot glue or double-sided tape to adhere the divider's decorative panels on top of the mirrors. If you don't have a room divider, you can choose another way to decorate a mirror, such as this antique mirror DIY to achieve the Regencycore aesthetic trend.
The most important part of this project is the lighting. Starting from the bottom of the mirror on one side, apply the LED lighting strip along the sides of the headboard, finishing at the end of the mirror on the other side. The finishing touch is hot-gluing white battery-powered push lights to the underside of the lighting panel you mounted at the top of the headboard. To further personalize the headboard to your style, you can also add embellishments such as tassels, trim, buttons, or jewels.