The One-Step Trick For Instantly Aging Any Piece Of Furniture
We may receive a commission on purchases made from links.
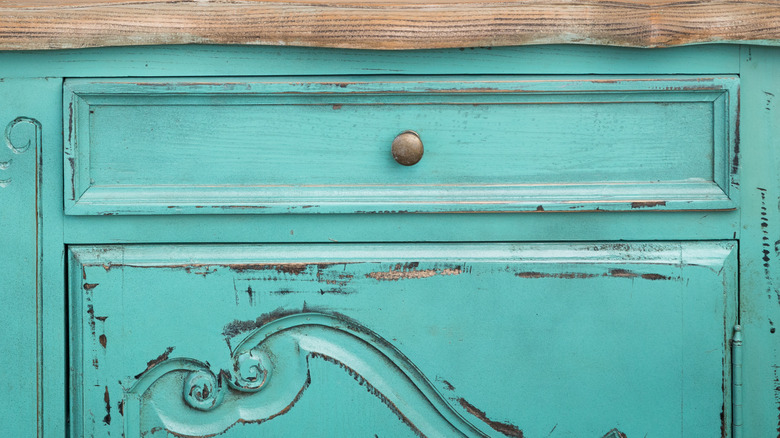
Distressed furniture carries a nostalgic charm, which brings out the warmth and character of a room. The worn finish and imperfections in the texture can add depth and personality to a space, making it feel interesting and inviting. Though some would argue that the distressed furniture trend is going out of style, it still pairs well with certain styles, like farmhouse and boho-chic.
Distressed furniture pieces can look great with any type of decor, as long as the distressed theme isn't overdone. If you are interested in a piece of this type of furniture for your home, you'll find no shortage of these pieces in stores and online; however, DIYing the distressed look is a great way to save money and repurpose existing furniture. Some distressing techniques involve multiple steps like sanding, waxing, and applying different types of paint. There is a much easier way to distress wood furniture, though. This technique involves using a carbide scraper to remove some of the furniture's finish.
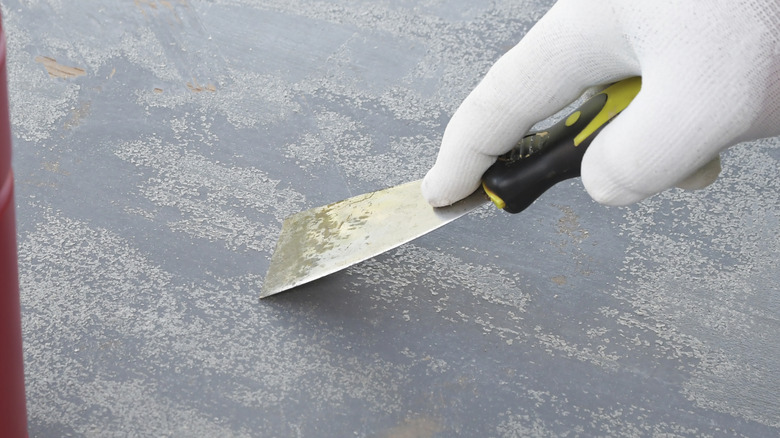
If the piece of wood furniture you are distressing is already painted or stained a color you like, all you will need for this project is the inexpensive scraper, like Allway Tools' 2" Carb Scraper. Since carbide scrapers are durable and efficient, you can use it again and again for other projects.
How to use a carbide scraper to distress furniture
You will use the carbide scraper to distress your furniture piece in a similar way to if you were going to remove the wood stain completely. The major difference is that you won't be using a chemical stripper, just mechanical action. Also, you won't apply the same amount of pressure to the scraper as you would in order to completely scrape away the stain or paint.
To get started on your distressing project, you need to remove any hardware that is attached to the furniture. Then, place your scraper at the far end of the piece and pull it toward you while applying downward pressure. The amount of pressure you apply will depend on the look you are going for. It's wise to do a few test scrapes on the back of the furniture before you scrape visible areas. If you are distressing furniture with doors, place them on a steady surface before scraping them.
There's no rule about how distressed your furniture should look. You can apply very light pressure for a subtle distressed appearance or use significant force for a heavily weathered look. You can even just scrape around the corners. It's all about getting the look you want. If you are in the middle of the project and aren't happy with the look, you can always scrape it clean, stain or paint, let it dry, and try again.
Drawbacks and why this might not work for you
While this DIY furniture distressing hack is easy and effective, you may not want to use it on every piece of furniture. Some wood furniture has been painted multiple times without removing any previous product. If you use a carbide scraper on one of these furniture pieces, you will expose old paint instead of wood. If you aren't sure what's underneath the paint, it may be a good idea to scrape off a small section on an area of the furniture that is hidden. If you are planning on distressing a dresser, you might choose the top corner of a drawer, for example. If the furniture piece is sitting against a wall, a small spot on the back would work. If there is another layer of paint below the top one, it could be a sign that the wood is of low quality or has imperfections that need to be covered.
Another reason this hack may not work for you is that your furniture is made out of particleboard instead of solid wood. Sometimes, a piece of furniture can seem heavy enough to be solid wood or even be deceptively marketed as such, but it's not. If you scrape away at the veneer, you'll just expose an ugly tan-colored wood byproduct. Telltale signs of particleboard furniture are the lack of wood grain and ornate carving details.