10 Surefire Ways To Bring Your Dying Tomato Plants Back To Life
We may receive a commission on purchases made from links.
Hooray for tomato growing season! Getting the literal fruits of your garden labor is always so satisfying. While growing the best tomatoes usually requires a little bit of care, they're generally not high maintenance plants and are pretty versatile, growing in containers without much issue. Some gardeners have even found ways to grow delicious tomatoes without a backyard, which is just incredible.
But sad tomato plants are heartbreaking, especially if you've spent more time, money, and effort than expected, only to get a collection of brown, crispy plants. Don't worry, though, because we can bring your tomato plants back from the dead with just a few tweaks. That's why we've rounded up 10 of our favorite surefire methods for getting tomato plants from hinky tragedies to hunky beefsteaks. And just to prove these simple tricks have dramatic results, we've found videos showing what just one small tweak can do to create dramatic tomato-y goodness.
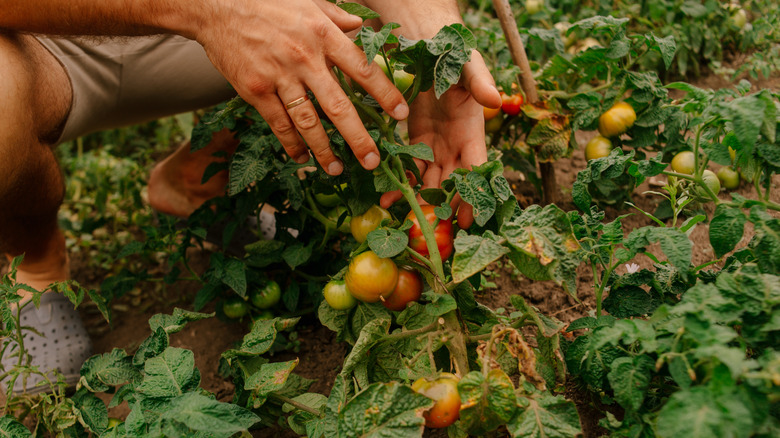
Use the most vigorous sucker to propagate another tomato plant
While we hope things don't come to this, sometimes you've got to do a total tomato plant teardown. Before it gets to that, though, we recommend getting out the pruning shears and cutting the strongest looking sucker off and propagating it. In the best case scenario, you'll get two tomato plants out of one; in the worst case scenario, you've at least saved a healthy enough part that you can grow another plant and start fresh if needed.
Propagating tomato plants is sometimes called "desuckering," and it works a little differently than propagating houseplants. With indoor plants, we typically look to cut around a node, which is where the stem branches off. In tomato plants, they don't have nodes — they have compound leaves. Compound leaves look like a branch with multiple leaves, but it's actually considered one giant leaf. First, sterilize your shears, then pick the healthiest-looking compound leaf you see and cut it as close to the main stem as you can. Inspect it for damage, just to be safe, then stick it in fresh soil to root. If your mother plant is dealing with a bacterial or fungal infection, then you probably want to root your sucker somewhere else that's safe, but if it's just a watering issue, then pop it next to the mother plant and tweak your watering routine to save them both.
Aggressively prune back partially dead, young tomato plants
When a tomato plant's leaves begin to shrivel, there's not much hope for bringing them back, so prune them off. We know it might feel like you're giving up hope, or you may be worried that aggressively pruning will be too much trauma for the plant to heal from, but the less dead (or nearly-dead) baggage your plant has to carry, the more it can move critical resources to the parts that are still alive. Plus, pruning off withered foliage will improve the airflow around your plant, making it less susceptible to bacterial or fungal outbreaks.
So, how ruthless should you be with your pruning? Like this TikTok shows, you can go as far as the soil line if you really need to. Start by sterilizing your pruning shears and begin by trimming down damaged suckers. You may also want to consider removing low suckers that are close to the soil line to improve the plant's growth, but that's usually best when there are other healthy suckers on top that can take over. Pay attention to your young tomato plants and their suckers, as they'll need to spend a lot of energy getting their first fruits to blossom, so the fewer ailing suckers they need to focus on, the better.
Add a nitrogen fertilizer to sad, stunted-looking, yellow tomato plants
If your tomato plant's leaves look a little yellow, that could be a sign of overwatering or nitrogen deficiency. You'll know better than us if you've been a little reckless with your watering schedule, so if you're pretty sure you've been keeping up with it, check your fertilizer routine. Unfortunately, too little nitrogen can be a big problem for tomatoes, causing it to become susceptible to blight or leaf spot, so the amount your plant has access to matters. You can get a soil test if your tomato plants are in the ground to check nitrogen levels, or you can add a little nitrogen to your potted plants and see what happens.
However, be careful with the amount of nitrogen you add ,because too much can result in leafy growth instead of fruits, or even root burn, damaging your tomato plant even further. Some people like to use Espoma's Organic Tomato-Tone 3-4-6 Fertilizer, but this is really only good for routine fertilizing; here, we're looking for a shot of nitrogen. There are lots of ways to add nitrogen to your soil for healthier tomatoes. You can go the natural route and use aquarium water, coffee grounds, or compost, or use a nitrogen-rich store-bought fertilizer like TPS NUTRIENTS Nitrogen for Plants, which has 15% nitrogen and will certainly give your plants a booster shot in the suckers.
Give tomato plants a deep watering to saturate the soil
We know that morning waterings can be rough for some of us. You're still sleepy, the coffee hasn't kicked in, and so a quick once-over with the garden hose feels like a good compromise. Unfortunately, tomatoes need more water than that; they like a good soaking. When you hit it with a light spray, even if it's every day, your tomato plants will end up with shallow roots. Shallow roots mean shallow cover from the sun and heat, stressing your plant out. Therefore, really give your plants a good, deep watering so that those roots grow deep into the soil.
That said, be aware of your soil's makeup, because its consistency matters. Clay-heavy soil holds water, which can be a good thing, or a disaster that promotes root rot. Sandy soil, on the other hand, can have water just move on through, making it harder for your plant to soak up the water it needs before it drains away. If you're not sure or you're using a potting mix, stick a trowel into the soil. If you pull it out and there's only a little bit of moisture on the first inch or so, add more water. Your ultimate goal should be at least 12 inches of moist soil for happy, healthy tomatoes.
Try watering your plants from the bottom
If your container tomato plants are on their last leg due to dehydration, consider giving them a good soak by watering from the bottom. To do this, fill a basin that's bigger than your tomato's pot about halfway with water, then plop your potted plant in and let it soak up what it needs. Be sure to keep an eye on it to prevent overwatering. This works particularly well for severely dried out plants, as soil can become hydrophobic — meaning it repels water — if it's left without a good watering for too long. This happens when the soil ends up coated with a sort of waxy crust that stands in the way of the soil absorbing the moisture. If you notice the soil has begun to pull away from the pot's edges, leaving a little gap, that's a sign of hydrophobic soil, so watering from the top just won't work; the water will just slip through those gaps and out through the drainage holes. Giving your tomatoes a little bath time could be the key to rehydrating the soil and saving your plant.
Speaking of watering, let's make sure we get all of that water where it needs to go so you don't run into problems. Hitting just the foliage of your tomato plants with the soaker hose does a one-two punch of problems. First, much of the water on the leaves will evaporate over the day, instead of getting down into the roots. Also, whatever's left on the foliage will invite a host of bacteria or fungi just looking for the wet leaves they love to breed on.
Try planting your tomato plants a little deeper
One of the reasons suckers take to the soil so well after being pruned from the mother plant is that tomato plants can grow roots along the stems. But those roots can end up being exposed to sun or heat damage, making it difficult for your plant to be drought-resistant. So, if you start to notice more roots popping up above or at the soil line, it's time to put the plant a little deeper into the soil. That way, the roots will remain cool and protected, growing stronger and making your plant super hardy.
How deep should you go? If you have the original nursery pot it came in, dig a hole that's a few inches deeper, to the point that it would be hard to find if you covered it with soil. If you've got a super leggy tomato plant that's top-heavy, plant the root ball deep so that a majority of the bare stem, and any stem roots, are under the soil line. If you don't have the original pot, aim for about six inches deep and see how it goes.
Add some aspirin to a watering can or sprayer and use it on your tomato plants
If you've got a fungal outbreak on your tomato plants, you'll need to act fast to stop the infection from spreading. One trick gardeners like to use is dissolving aspirin into water and spraying the plant, and then soaking the soil with the mixture. The acetylsalicylic acid that is aspirin triggers a tomato plant's natural anti-fungal defenses, called Systemic Acquired Resistance (SAR), which is sort of like giving your immune system a boost when you've got a cold.
As with all things, though, too much of a good thing can turn into a bad thing. Start with one or one-and-a-half tablets of uncoated aspirin — uncoated is key. Dissolve the aspirin into 2 gallons of water and add a few drops of liquid soap — it helps keep the mixture on the foliage — then water your plants. This is one of the few times you want to deliberately hit your tomato plant's foliage with water, as you're looking to contain the fungal outbreak and boost your plant's resistance. Then, pour the rest into the soil to ensure any pathogens down there are killed. Keep up this routine for around three weeks, paying attention to any changes in the foliage. You can even do this once in a while as a preventative measure, but don't go crazy. Plants naturally produce their own salicylic acid, so only need the extra help when necessary.
Give your tomato plants some shade if they're sun scorched
If you start to see wilted or curling leaves, it could be a sign that your tomato plant is getting more sun and heat than it can handle. So, consider giving your tomatoes a little reprieve from the hot sun. If you're growing tomatoes in containers, move the containers into a spot that gets afternoon shade. If you're growing your tomatoes in the ground or in raised beds, you can get creative like this TikTok and stake an umbrella, or use garden shade cloth, instead.
Shade cloth kind of works like how sunblock does for us, and it comes in different strengths. Since tomatoes do best in direct sun, you'll probably want to use a lighter weight cloth, like this QLOFEI 40-50% Sunblock Netting. If you've got a trellis or tomato cage already installed, you can drape that over the structure and secure it by zip tying the grommets to the scaffolding. If you don't have a cage or trellis, head to the Dollar Tree to pick up a hula hoop you can hack into a cheap garden hoop (that also can protect your plants from unwanted pests), then drape and secure the cloth over that.
Use an antacid to stop blossom end rot
Blossom end rot (BER) is a frustrating problem for tomato gardeners, because it usually appears when it's too late to save the fruits. Its cause is a little complicated, so bear with us; BER happens when the plant doesn't have enough calcium. This is often due to a lack of moisture that inhibits the plant from being able to take up calcium. It's basically like putting your plant into resource conservation mode, so it can't regulate what it needs. Sometimes, though, it can be cause by the soil itself not containing enough calcium. In most cases, the remedy involves adding calcium directly into the soil to give tomatoes a boost. Some people opt for crushed eggshells, but we recommend hitting up the medicine cabinet instead and using antacid tablets.
See, the problem with crushed eggshells is two-fold. First, "crushed" is a bit of a misnomer; you really need powdered or pulverized shells for it to be effective, so you'll need something like a coffee grinder. Second, it could take up to a year for the shells to dissolve (depending on their size) and add their calcium to the soil. Antacids, however, are straight calcium-carbonate and are meant to dissolve quickly. Sure, they may also have some food coloring or flavors, but gardeners haven't reported any damage caused by these additives. Still, you probably want to get the purest tablets you can. Crush 7.5 tablets for every square foot of soil you want to infuse, and spread it directly onto the soil, then water so that the powder dissolves. Granted, if you've got a big garden that might mean heading to Costco for the bulk bottle, but it may be worth it to save your tomato's growing season.
Overwatered a tomato living in a container? Put them in fresh soil
There's a little bit of nuance that comes with growing tomatoes in containers, particularly when dealing with watering. Root rot is an unfortunate commonality gardeners will have with container tomatoes that's mostly due to excess water in the soil. The container's drainage holes are blocked or nonexistent, so excess water can't get pushed out away from the roots, then the pathogens find their way right to the roots. Overwatering container tomatoes isn't something you can wait out; you need to act fast to get those roots the oxygen they need. So, rather than just moving your plant to a sunnier spot and hoping evaporation will help, the best way to rescue an overwatered tomato plant is to get it into new soil ASAP.
Fresh soil is like starting anew. It's dry, nutrient-rich, and can be manipulated with additives to improve drainage or fertilization — something much harder with soil that's currently in use. First, take your tomato plant out of its container and clean off whatever excess soil is stuck to it. Next, cut off anything brown or mushy — this will prevent, or at least slow, the spread of rot. Next, get a pot that's at least 1 gallon and has multiple drainage holes (or use a drill to add more holes); don't put your tomato plant into a pot with inadequate drainage or you'll be back to where you started. Then, add soil and the tomato plant and tamp the pot down on a hard surface a few times. This will anchor the plant into place without compressing the soil as much as pushing it down with your hands does. It's worth noting that this method doesn't guarantee a successful rescue of you tomato plant, especially if root rot has already taken hold, but it's certainly worth a shot.