Use Simple Dollar Tree Finds To Create Stunning Wall Art On A Budget
Is there a spot on a wall in the room you're in — or any other room — that's suffering from the decor doldrums? The answer is waiting for you in the aisles of your local discount store. Create a piece of wall art that looks so high end with Dollar Tree supplies. Just visit your local outlet to grab what you need to make this easy faux-woven wooden masterpiece to class-up your space.
While at Dollar Tree, scoop up a Tumbling Tower Game, bottles of paint in black and white, and something you can use as a base/background for your artwork. If your local store has a "PLUS" section, see if they have 12-inch wood squares with a framed edge. If not, a plain stretched canvas will work, but a firm, wooden surface will serve better to the final look of your project. A Crafter's Square Plywood Hanging Sign is the right size and shape to fit the design while leaving an eye-pleasing margin around the wood pieces. A 12-by-12-inch wooden frame with the glass and backing removed can also serve as pretty trim. If the backing of the frame is wood, avoid another purchase and just use that as the base for your wood pattern. Other supplies to have on hand are wood glue, light-colored wood stain, paint brushes, a pencil, and a tape measure.
Gluing and painting your pieces
Tumble your tower game out onto a table, and count out 18 dark blocks and 24 light ones. Pair up all of the like-colored pieces, and glue them together evenly along their thinnest long-side. Let the glue dry while you paint the background. You can speed up the drying process for wood glue by working in an area with good air circulation and by not overdoing the amount of glue you use. You should have 12 pairs of light-colored pieces and nine dark pairs.
Next, prepare the background with a whitewash look: Thin a bit of white paint with water, and paint it over the base board. To test the consistency of the paint before committing it to the wood, try a few brushstrokes on the backside of the wood and adjust the mixture with more paint or water as needed (the wood grain should show through).
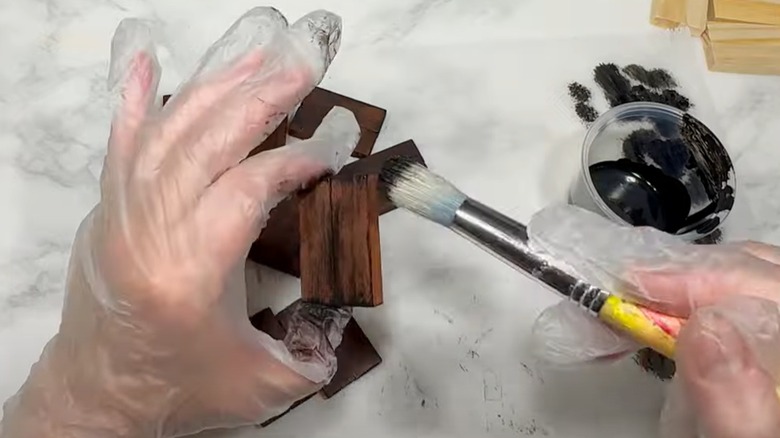
Top your lighter wood game piece pairs with the stain. To give the darker pieces a DIY distressed painted look, dry brush a small amount of black paint onto their edges. Experiment with the process on one or two of the leftover game pieces beforehand. If the paint effect isn't coming out how you'd like, you can either skip it, or thin the paint with some clear finishing wax before brushing it on.
Weave together your final product
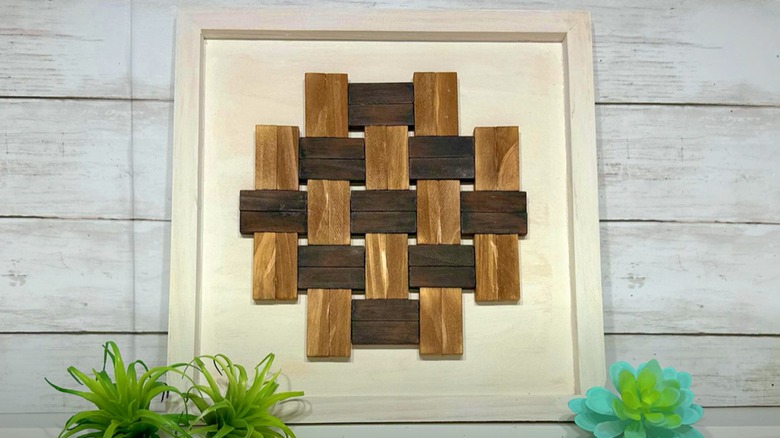
Your woven pattern will come together in a rounded shape with the dark color running horizontally and the light ones coming in vertically. Mock up the design first before uncapping the glue. Sandwich one pair of horizontal dark-colored blocks between two pairs of vertical light wood blocks. Beneath that, create a row of five pairs of blocks alternating between horizontal and vertical like you did for the first pieces. Line up the blocks with their corresponding colors so that the contrast creates a woven illusion. Below that, recreate the first row you made, adding horizontal dark pieces at each end. The last two rows are repetitions of the first two rows.
Once you're content with the layout, finalize it with glue. If freehanding it leaves too much chance for your taste, you can use a pencil to mark where each piece will be connected. Give the glue 24 hours to dry and cure before moving the artwork.
Center your woven creation on the background, and use your measuring tape to ensure that the margins between each side and the background are even. Mark in pencil where you'll secure the design, glue it, and give the glue another 24 hours to solidify. Your masterpiece will be a striking addition to the perfect gallery wall. Or it can serve as a stand-alone piece, leaning against a wall atop a mantel or shelf.