Use Pool Noodles To Make A Showstopping Witch Tree For Halloween

We may receive a commission on purchases made from links.
With the spooky season upon us, it's time to break out your most haunting home decor, and nothing says Halloween like a display of witchy paraphernalia. Whether you want to show off miniature magic shop scenes or present your wand collection, these supernatural staples deserve a thoughtful stage. One way to emphasize the otherworldly elements of these objects is by arranging them on an equally spooky pedestal. In the case of YouTuber Kelley Does Stuff, the chosen vessel is a gnarled tree.
If you're looking for indoor Halloween ideas that will transform your space, this is the one to try. The twisted silhouette of knotted branches poses a chilling backdrop for all things mystical. Best of all, this is something you can make at home. You might be shocked to discover the star ingredient is found in many backyards — the simple foam floatie. In that sweet spot where summer heat wanes into crisp autumn air, swim toys have outlived their use. Breathe new life into old material, and use pool noodles to DIY festive Halloween witch trees. Check out how to make this sinister showstopper yourself.
The tools and materials you'll need to build this Halloween pool noodle tree

To complete this festive Halloween witch tree DIY, you'll need to stock up on some materials. You shopping list for this project should include one 2-by-2-inch wood plank, three 1½-inch-thick wooden discs, and some PVC piping. At Home Depot, 10 feet of 1½-inch PVC tubing costs about $10. You'll also need 90-degree elbow sockets, like these HayEastdor White PVC 90-Degree Elbow Adapters you can scoop up online. Also available online are these FangKingNo Three-Way Fittings and the Rierdge PVC Table Leg Caps you'll need to complete the project.
To put this Halloween DIY together, you'll want to arm yourself with a box cutter, a hack saw, hot glue, duct tape, acrylic paint, a paintbrush, artificial moss and foliage, and any accessories or twinkle lights you want to add. Needless to say, you'll need pool noodles; the more you have on hand, the better, since some of the cuts you make may end up being unsuitable. If you don't have pool noodles left over from the summer, you should have no trouble finding new ones — they're virtually omnipresent, whether you shop at Dollar Tree or online. Since you'll be cutting and drilling wood and PVC pipes, make sure you have some protective gear on hand, like safety goggles and heavy-duty gloves.
Put together the pool noodle tree trunk
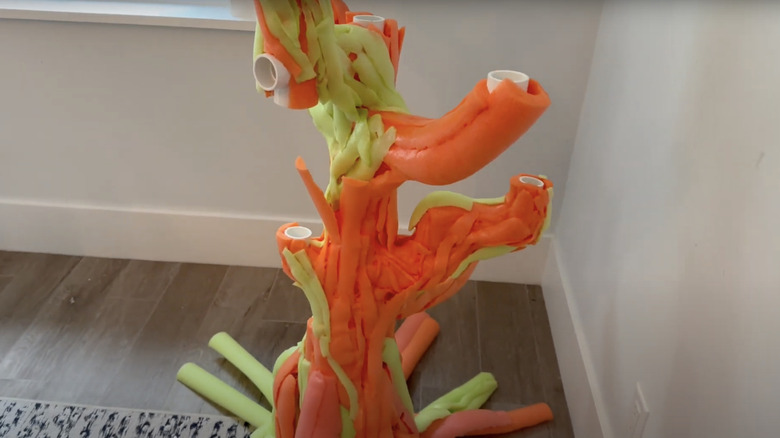
To start, measure and mark the length of the trunk and branches on the PVC pipes. Then make the cuts using either a hacksaw or scissor-type cutters. Now, mark the locations of the branches on the trunk piece and cut it at these locations. Finally, deburr the cut ends to get rid of any rough edges using a utility knife or sandpaper — this will allow for cleaner connections.
Now that the PVC pipes have been cut into the correct segments, screw a flange to the center of the wooden base and each disc. Slide the bottom portion of the trunk into the base and secure it with screws. From there, assemble the tree's structure. The three-way fittings will let you branch out perpendicularly, while the elbow sockets will allow the tree's limbs to take 90-degree turns. Once you're happy with the shape, secure a wood circle to the end of each branch to form display tables.
Now, pull out those pool noodles and cut them to size. To fit the pool noodle pieces over the PVC tubing, you'll have to make horizontal cuts along their lengths then slip them over the branches. You'll notice that the pieces don't fit all that well at angled joints, and that's fine — simply make smaller cutouts from the noodles and use them to cover the gaps. At the end, seal all the joints with a hot glue gun or a heat gun. Allow some of the noodles at the base of the trunk to extend downward — they'll make excellent roots for your tree. And if you have any materials left over at this stage, consider crafting this pool noodle witch to hang from a real tree in your yard.
Finishing and decorating the pool noodle Halloween tree

The next few steps will turn this DIY into the majestic Halloween decoration it's meant to be. First, score the tree with a box cutter to imitate realistic groves and bark patterns. Make all your cuts to the pool noodles before painting — otherwise, the true color of the foam will show through.
Next, paint the tree. Acryclic paint works best on pool noodles, and you'll need a few colors to get the job done. First, give the entire tree a coat of black paint and let it dry. Then apply a brown coat, but do so with light strokes, so that the black paint still shows. Experiement and try adding touches of forest green or orange to give the tree a realistic appearance. Crucially, get the brush into all the tiny grooves you've made with the box cutter so that the noodles' original color is obscured. This Nicpro 14-Color Acrylic Paint Set should give you more than enough paint and color options to complete the project.
Finally, add some lights, foliage, and other accessories to the tree. Start by wrapping string lights around the trunk and branches. If you plan to place the tree on your porch, make sure the lights are rated for outdoor use; for example, these BHCLIGHT LED Fairy Lights can be used indoors and outdoors. Then, adorn the tree's limbs with artificial branches, like these Sggvecsy Greenery Stems; it should be easy enough to stick them into the foam. If you have any spooky accessories at home — or other Halloween decorations like these adorable school glue ghosts — hang them on the branches. Leave the tree indoors to display the ornaments, or use it outside as a stunning fall pumpkin stand and wow the trick-or-treaters (just remember it isn't exactly weatherproof).