Turn Dollar Tree's Popular Stacking Pumpkins Into A Spooky Diorama Display With A DIY
When pumpkin season strikes, so does the urge to decorate indoors and out. Real pumpkins often don't have a long enough shelf life to make it through the entire month of October, but you can have just as much fun with faux pumpkins. If you're looking for budget-friendly Halloween decor crafts to DIY, we spotted a fun upgrade to the 24-inch stacking pumpkin from Dollar Tree that turns it into more than just a basic pumpkin or Jack-o'-lantern stack. With a few miniatures and other craft supplies, this $7 purchase can be transformed into a most intriguing diorama, offering a cheap and easy DIY Halloween decoration.
What we love about this DIY project is that it adds a lot more interest to some basic plastic pumpkins. It's a spooky upcycle that will look good inside the house or on your front porch. The main items you'll need, aside from the stackable pumpkins, include a marker, a soldering tool or a sharp tool for easily cutting plastic, a metal file, and a hot glue gun. Of course, you can tailor your diorama in your own preferred fashion using some different items. Wooden cutout ornaments from Dollar Tree will add a creepy and cute silhouette, which can then be surrounded by other items found at the Dollar Tree, such as plastic skeletons, moss, and small Halloween jars. Be sure to include some cute, battery-operated lights in each level as well so passer-bys can see its haunting glow at night.
Cut Dollar Tree's stacked pumpkin to make fillable scenes
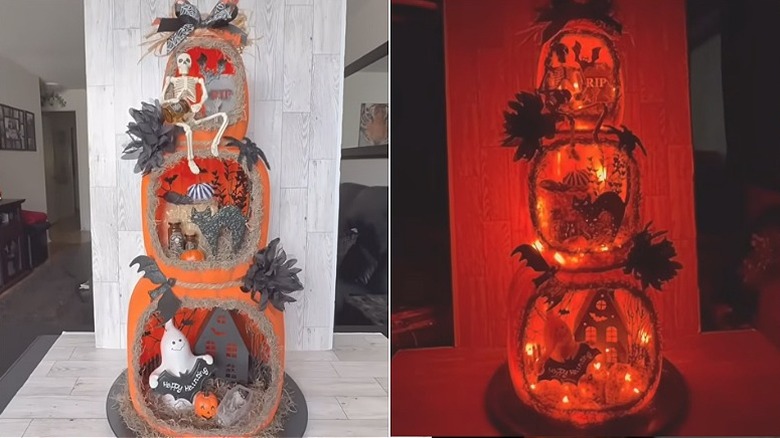
Making the diorama pumpkins is easy. Using the soldering tool or a sharp crafting knife, carefully cut holes in the front of each pumpkin. Trim off any loose pieces and use the file to make the edges smoother and prevent it from cutting your hands during the crafting process. Stack the pumpkins, gluing them together for more stability. You can choose to leave the pumpkins as they are or paint them in a color that matches your decor. Using a coat of spray-on primer can ensure any added paint adheres better to the plastic. To fill the holes at the base of the top two pumpkins, cut cardboard into circles and glue them in. Then, for the bottom pumpkin, use a thick paper plate. Select a plate that offers a sturdy base, and choose one that suits the haunted or whimsical theme you'd like to incorporate into your diorama idea.
Get creative while setting the scene inside each pumpkin. Moss and mushrooms create a whimsical forest look, while skeletons, bats, and miniature gravestones are classic Halloween motifs. DIY a spooky graveyard scene or create something that looks like a haunted house using ghost or zombie miniatures. You can even create a scene of Dracula from the coffin in his castle basement. Once your scenes are done, you can add more embellishments around the outside of the pumpkins with hot glue, such as rope, ribbon, or artificial flowers.