How To Install A Home Theater Without Breaking The Bank

We may receive a commission on purchases made from links.
Love the cinema? A home theater is the perfect way to get that movie experience without leaving your cozy house — or paying outrageous ticket and popcorn prices. Home theater setups aren't cheap, though — they can average around $25,000, but high-end custom installations often surpass $100,000, according to Angi. And there's no guarantee a home theater will increase the value of your home. But you don't have to scrap your plans for a home cinema (although you may need to sacrifice your vision of stadium-style individual reclining, heated theater chairs and that full-scale movie theater concession stand) — there are plenty of ways to achieve an immersive experience without a huge investment. For example, repurposing items you already have or thrifting for the essentials keeps your budget lower.
Planning the theater (sometimes in phases, starting with the essentials and gradually adding more) helps you control the costs and gives you a chance to prioritize the design elements. When possible, work with what you already have — a rectangular room with limited natural light creates a dark setting ideal for movie watching, without a lot of renovations. Bonus points for a room that already has dark walls to minimize glare and carpeting to reduce echoes. And even though it's tempting to DIY your home theater from floor to ceiling, it's sometimes more cost effective to hire a few pros to avoid expensive mistakes that you have to pay to correct.
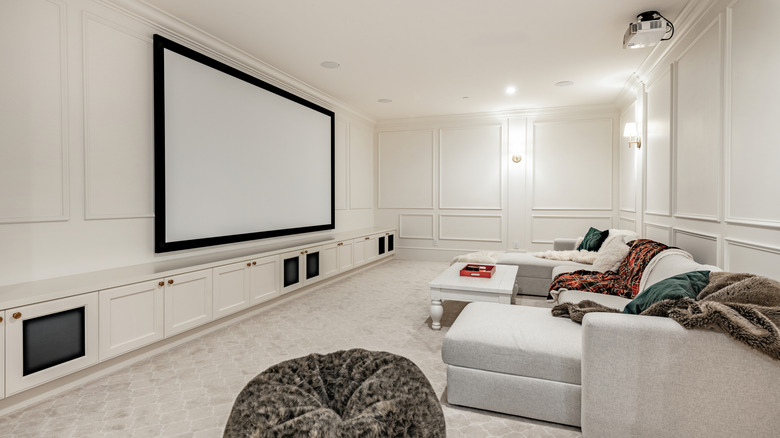
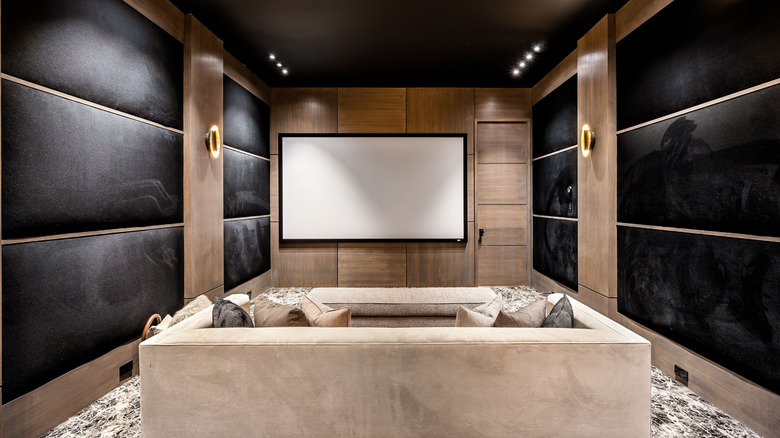
Select a quiet, dark, enclosed room
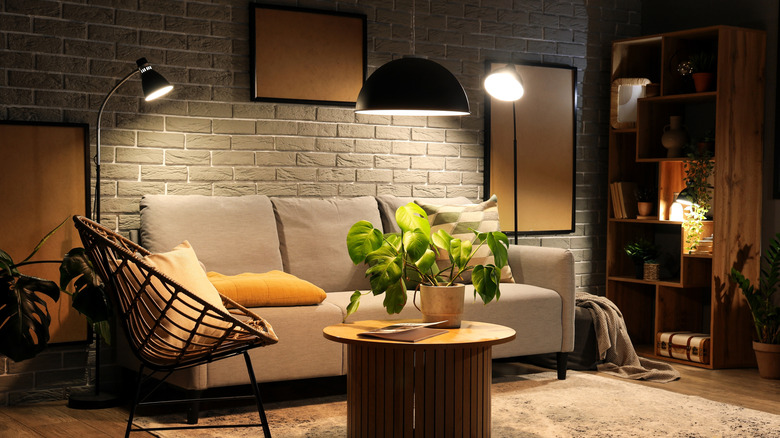
Choosing a room that already has good characteristics of a theater is a cost-saving decision early in the process. Those optimal conditions mean you won't have to make major structural changes. You also won't be starting from scratch, building walls, finishing ceilings, and putting in flooring, like you would if you built a theater in an unfinished basement. That keeps the overall construction costs low and allows you to put more of your budget into the technology for your theater room. When evaluating the available spaces, look for a naturally dark room with good acoustics — preferably a room that's already enclosed with a solid door to help with soundproofing.
A dark room is ideal for a home theater — the darkness minimizes glare and reduces light reflection that can impede viewing of the images on the screen. Rooms with few to no windows make room darkening easier. The acoustics are also important — materials that absorb the sound allow for clearer audio, while hard, sound-reflective surfaces often result in distortion and annoying echoes. Rectangular rooms tend to offer the best picture without distortion, and spaces with drywall and carpet on the floor are also ideal for optimal audio. If you find a room that fits the description, you might have little more to do than add the A/V equipment.
Paint the walls a darker color to improve the viewing experience

Should you paint your room with dark colors? You might be hesitant to go dark in most rooms, but a home theater is the exception. Dark walls put the focus on the screen with less light reflection that can wash out the screen and interfere with your view. Since a coat of paint is relatively inexpensive, this is an affordable way to make a regular room feel more like a theater with a simple cosmetic change. Your color choice can help establish the theme or create a particular feeling in the room. Darker colors tend to make the room feel cozy, while earth tones create a warm, inviting feel. The finish of the paint also matters — stick with a matte or flat finish for whatever color you choose, as shinier finishes will reflect light, again creating glare.
Black is a popular choice for movie theaters, and it works at home, too, since it doesn't reflect light. If you don't want to go quite so dramatic, move to the gray hues — darker gray shades will absorb more light and create less glare than lighter ones. Navy blue can also offer a softer alternative to black with similar light-absorbing qualities. If you want to move away from neutrals and toward warmth, consider dark reds, which are also popular in commercial movie theaters. Not only is red a classic seat color in theaters of all types, but the hue tends to disappear first in low-light situations, so you won't notice red surfaces as much once the movie starts. Earthy options that also work include darker greens and browns.
Incorporate audio/visual equipment you already own
In a perfect world, you would buy all new, top-of-the-line electronics for your home theater, but that's not practical when you're on a tight budget. Instead, using at least some equipment you already own helps you cut costs. A subwoofer can range from $200 to $1,000 or more, for example, so if you already have one, you can put that money toward other components or room modifications.
Before making any purchases or completely planning your theater setup, evaluate the equipment you already have, especially if you don't use it currently. Maybe you have an old soundbar in your storage closet or a set of speakers that you no longer use. If you're moving most of your viewing occasions to the theater room, you might decide to move some of the equipment you use in your living room to the new home entertainment space. Just make sure all of the equipment is compatible with the new components you'll need to purchase — you could end up with unexpected purchases if you find out later that the pieces won't work together.
Shop for outlet, secondhand, or last-gen equipment
Even if you have a few pieces taken care of, you'll likely need more electronic components to complete your theater setup. The latest and greatest electronics also come with a large price tag, which is why a more affordable option is choosing secondhand or older models. Lightly used equipment could be almost as good as new at a much lower price. Likewise, electronics outlets typically offer equipment that's new but has some minor issues, like cosmetic flaws. Sometimes, the outlet inventory is made up of returned items, open-box items, or overstock. However, some outlets sell products that resemble name-brand items but that are actually lower quality, so do your research. The clearance section of regular electronics stores could also land you savings on older models that are being replaced with newer versions.
Inspect secondhand or discounted products carefully to assess the condition to make sure you're okay with any blemishes. Keep in mind that some older models may not have as many features or connectivity options. Check the compatibility between all of the components, especially if they're different ages or brands. Consider buying refurbished items from well-known brands, which may come with warranties or guarantees. Review the return policies to know your options if the items don't work.
Consider installing a screen and projector instead of a TV
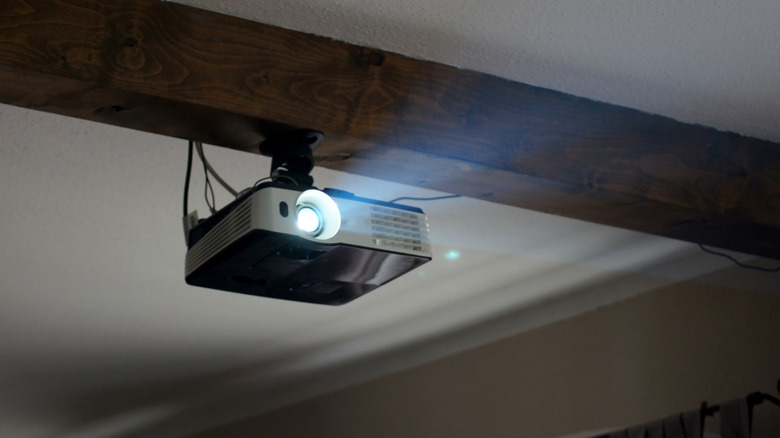
When you think of a theater, you likely think of the large screen. Even at home, a small screen won't do. Of course, the precise screen size depends on the dimensions of the room and your preferences, but the 55-inch average living room TV will look out of place in a home theater, which usually benefits from an 85- to 96-inch screen. Larger screens naturally come with higher price tags, especially when you opt for a higher resolution to improve the picture quality. That's why when you're on a tight budget, you should ditch your TV and switch to a projector — you can typically get a larger screen at a much lower price without sacrificing quality. Plus, a screen creates that movie theater experience better than a TV, enabling a much larger viewing surface.
With a projector, you don't even need to purchase an actual screen — a smooth section of drywall painted white does the trick. Special paint, like this Mollor projector screen paint, is formulated to create a smooth, screen-like surface on your wall, if you want an upgrade. Or, hang a white sheet on the wall for a cost-effective screen until you're ready to update. It also allows you to adjust the screen size easily and typically go larger than a TV. Keep in mind that you'll need sound equipment to pair with the projector, but if you're planning on buying those components anyway, a projector is usually the cheaper option.
Start with the basics and upgrade over time
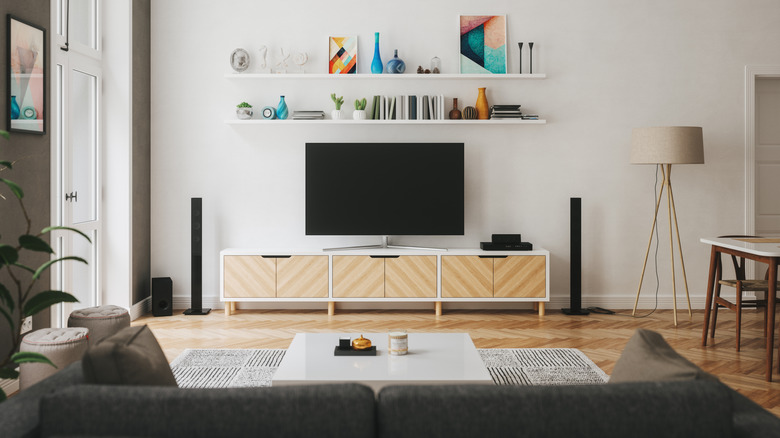
It's okay to have a grand vision of your completed home theater in your mind, but it's also important to note you don't have to complete the job all at once. To keep your costs low, start with just the basics needed to enjoy a movie at home, and then add on over time. Working in phases allows you to reach that end goal eventually while being realistic about your budget. It also allows you to spread out the cost over a longer period. Really, all you need to start is something to play the movies, something to display the movies, a way to hear the audio, and a place to sit. Over time, you can expand the components to create a more upscale and immersive experience.
At the core of your system, you'll need a projector and screen or a large-screen TV. Most home theaters also have some type of surround-sound system to create the immersive experience. Your audio setup typically includes a receiver and speakers — start with just a few speakers and add to them over time as the budget allows. Basic doesn't have to mean boring or ugly — there are simple ways to integrate speakers seamlessly into your home decor or make the space feel more like a theater, even when you're starting with a bare-bones setup.
Thrift the theater seating or pull pieces from other spaces
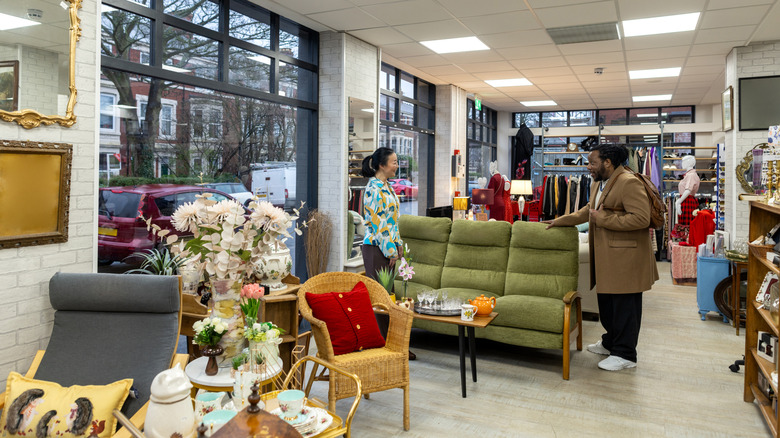
Buying secondhand furniture is an inexpensive way to fill your home theater with comfy seating — buying secondhand vintage furniture could save you as much as 70 to 80 percent. If you have extra furniture around the house, you could fulfill at least some of your theater seating needs for free. You can also do a quick makeover on the used furniture — add coordinating slip covers or reupholster them, for instance.
Using what you have or shopping secondhand might mean you have to compromise on the seating — you likely won't find a set of matching theater-style chairs at the local thrift store. Focus on comfort when selecting the pieces, and have a flexible idea of what you want to have better luck putting together the seating. You can always add little details, like this Heyife cupholder pillow, to create the feel of theater seating on a regular sofa. In addition to individual chairs or sofas, you might consider bean bag chairs or giant floor cushions, for example. Then, check local used furniture stores, estate sales, secondhand shops, and online marketplaces.
Incorporate inexpensive soft materials to improve the acoustics

Finding affordable ways to soundproof a room and reduce echoing improves the movie experience. If you ignore the acoustics, you'll have lots of sounds bouncing around the theater, and that will decrease the sound quality significantly. Soundproofing a room can cost from $500 to $5,000, but there are plenty of ways to dampen the sound yourself. Basically, you want to decrease the number of hard surfaces in the room and increase softer materials — sounds bounce off the hard materials and are absorbed by softer elements.
Softer, plusher fabrics on your theater seating work better than smooth leather, so keep that in mind as you select furniture — opting for a cheaper fabric instead of leather can also save you on the furniture you're already buying. No matter what type of furniture you choose, loading up on throw pillows and blankets creates a cozy environment for movie watchers and soaks up the reverberations to improve sound quality. Ideally, you want a carpeted theater room, but adding an area rug can help, too, without the expense of installing carpet. Heavy curtains or tapestries hanging on the wall help absorb sounds that bounce off of the hard wall surfaces. You can also position softer home furnishings, like large plants, along the walls.
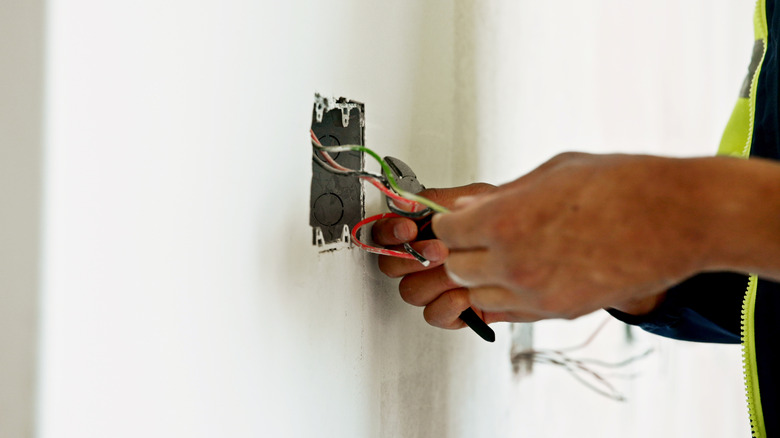
Add a dimmer switch to existing compatible fixtures or use smart light bulbs
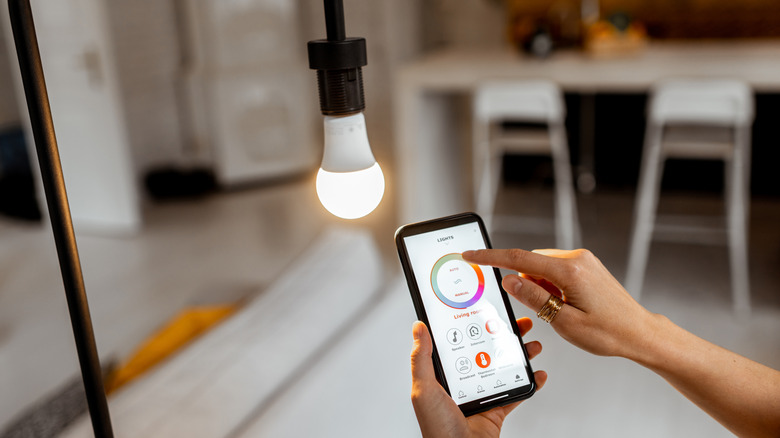
A dark room makes the picture clearer, but you may also want at least some illumination in your theater room for safety, especially before and after watching a movie. Dimmable lighting is ideal because it allows you full control of the lighting levels at any given time. You can ramp it up when you're setting up for the movie and turn it down low once it starts to play. Installing all new lighting can be very expensive, though. If you're lucky, your current lighting fixture will be compatible with a dimmer switch, so that's the only change you'll have to make. If it's not, you still may be able to swap out the light bulbs in the room with smart bulbs, which allow you to adjust light levels and change the light color and temperature.
You may be able to install a dimmer switch in your home without calling an electrician, if you feel comfortable working with wiring. It's important to choose a dimmer switch that's compatible with your fixture, especially if it's an LED fixture. Or, simply screw in a Govee smart light bulb from Amazon for control of the color and brightness from an app or your home assistant device. This model offers movie sync if you like the idea of the lights coordinating with the action on the screen.
Install inexpensive LED strips for an ambient glow
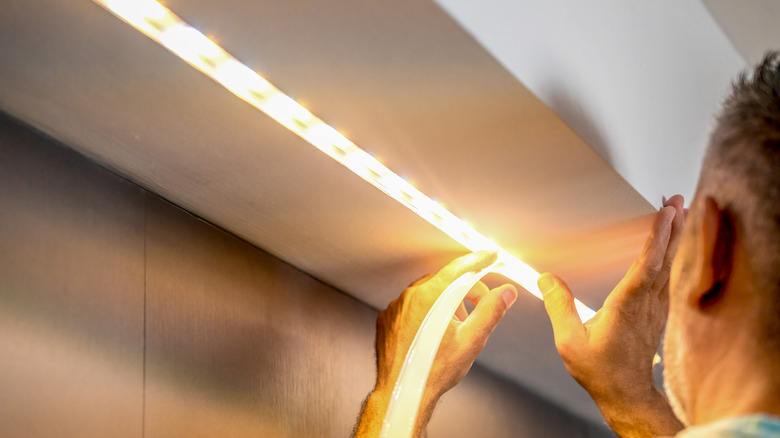
Lighting your theater room is one of many clever ways to use LED light strips to brighten your home. It creates the subtle ambient lighting of a professional movie theater, and it's inexpensive to install — you can find a 200-foot strip of music-synchronized smart LED strip lights for under $20 on Amazon. Turning on just the LED lights during the movie offers a little illumination without interfering with the picture quality on the screen. Color-changing and sound-synchronized strips also give you more control over the experience — go with bright colors for an energetic football game, or set the lights to a steady, warm glow for a cozy viewing experience.
LED strip lights are simple to install — simply peel off the backing and press it against the wall. Placing them along the floor, similar to commercial theater lighting, guides your pathway if you get up during the movie, or install them along the ceiling for an interactive experience. Placing LED strip lights behind your screen can also ease eye strain for a more comfortable viewing experience. Keep in mind that LED adhesive sometimes removes chunks of paint if you don't remove the strips carefully — installing the strips with hooks instead can reduce this risk.
Optimize the room layout to improve the viewing experience
This tip for saving money on your home theater isn't just cheap — it's free. You simply need to take your time during the planning stage to evaluate the room and make sure you design the layout properly. The way you arrange your home theater can make or break the experience. Choosing the right wall and seating arrangement for the theater improves your view of the action and the acoustics to make the auditory experience supreme. The location of the speakers in relationship to the walls and seating position also impacts the sound quality.
If you're working with the ideal rectangular room shape, you'll want the screen to go on a short wall — that way more of the seating can be centered in front of the screen and not too far to the side. If you need two rows of seating, you can build a home theater riser yourself to save money while elevating the second row for a better view. When possible, mount your front speakers so they hit around your ear level at a seated position — ideally, you want the front speakers to create an equidistant triangle, with you as one of the points in that triangle.
Know when to hire professionals and when to DIY
Doing all of the home theater work yourself eliminates all labor fees, making it seem like the cheapest option. However, that's also a good way to make a mistake, whether it's creating a poor design that makes the movie experience bad or messing up wiring and potentially putting your home at risk. Sometimes, it's better to invest a little money in a professional to make sure you do things right the first time — that's also a good way to make sure your home theater is safe.
Before you start any work, consider your level of expertise and comfort with different tasks. Part of that includes how much research you're willing to do — spending time researching the best equipment and home theater layout might make it easier for your to design the project without hiring a designer. However, you might prefer to spend money on a designer to save time on the layout and then execute the design yourself. An electrician is another contractor you may need to hire as part of your theater installation. You might feel comfortable handling basic electrical tasks, but it's important not to attempt certain electrical projects at home unless you're a professional. Adding new lighting and wiring all of the new electronic equipment might be best left to a professional.