Transform A Log And Nursery Pots Into DIY Garden Decor That Look Straight Out Of A Fairytale
Contrast, shape, texture, and form are crucial components in great garden design. A well-balanced garden should have variation in these key areas, encouraging the eye — and the gardener's hands — to explore and making the whole space feel magical. If your garden is feeling a little flat, take a look around your property. The first ingredient for a perfectly whimsical addition could already be lying in your yard: an old log. With a few plastic planter pots and a little vision, you can turn that weathered log into a welcoming, fairy-like feature that adds dimension to your garden space. All you'll need to do is lay it flat in the desired spot, attach plastic nursery pots along the length, and add some eye-catching plants.
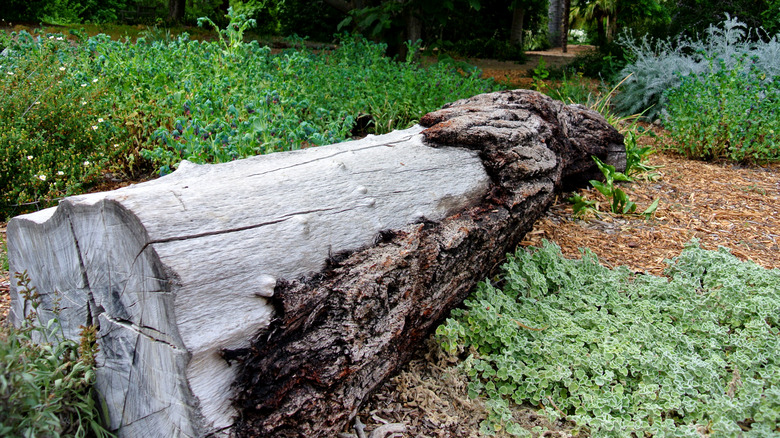
This planter log DIY is an easy, affordable, and gorgeous landscaping idea to liven up your yard, but it starts with picking out the right base. Your log should be sturdy, not rotten, and relatively thick. A log that's at least 4 inches in diameter should be thick enough to accommodate screws and create a noticeable height difference in your yard. If your yard lacks a usable log, check resources like Facebook Marketplace, local arborists, construction projects, or sawmills. You can trim off branches or clean it up as desired, but leaving some moss or lichen on the bark adds to the natural aesthetic, and large offshoot branches can present some creative opportunities.
Attach potted plants to the side of a large log
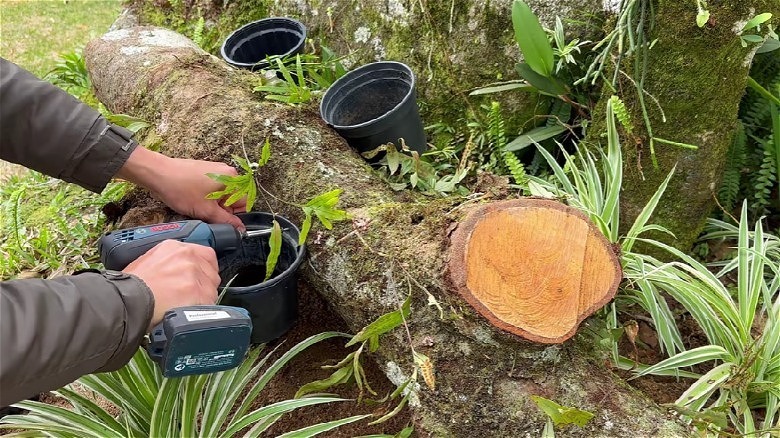
Start by experimenting with the placement of the log in your yard. Clearing out a small patch and laying gravel or mulch will help the feature pop, but you can also place it near an existing pathway, garden bed, or under a shade tree in your yard. When you're settled on the location and positioning of your log, begin pre-drilling a screw through the inner side of one of your plastic pots. Hold the pot to the log, then use the drill again to sink the screw into the wood. Repeat this process with as many pots as you'd like, moving down the length of the log. If you're dissatisfied with any of the pot positions, you can easily unscrew and reattach them. The log's natural shape will put some pots higher than others, creating some visually pleasing levels.
Next, it's time to add your plants. To make the plants easier to remove when needed, plant them in their own separate nursery containers, then pop the plant and its container into your log pots. Since the pots are relatively small and well-draining, it's best to choose plants that don't need a whole lot of root space or soil moisture. Bromeliads, succulents, hostas, or herbs like mint and creeping thyme are perfect to fill out your fairy garden log.
Make your garden log appealing to humans and wildlife
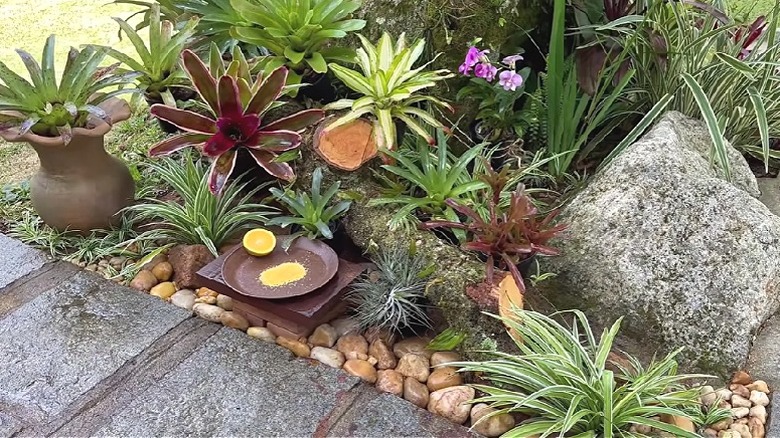
Depending on your log's shape and size and your garden aesthetic, there are endless ways to customize this project. If the log is large enough, you can even carve out holes in the wood itself to plant directly inside. Branches or large roots that stick up from the log are great for hanging planters. Add dollar tree mini fairy houses, river stones, or outdoor-safe fairy lights to decorate your log, or combine this project with other fairy garden ideas that are downright magical. Invite even more movement and magic with a bird bath, small water feature, or insect hotel.
This whimsical little DIY could even benefit your garden by providing winter shelter and nesting spots for insects like native bees, wasps, moths, beetles, and spiders. Other wildlife like woodpeckers, chipmunks, frogs, and lizards may also delight in the lively log you've created. Of course, the log will decompose over time, but it's a great way to repurpose resources that might otherwise be wasted. If you can afford to be picky, choose a hardwood like walnut, hickory, or red oak, leave the bark attached, and remove the plants before watering to avoid wetting the log more than necessary.