12 Maintenance Mistakes You Should Know About To Avoid Damaging Your Home
Given that our homes are often the biggest investments we'll ever make, it's important that we learn to maintain them. And while there are certain jobs that should absolutely be left to the professionals, like rewiring your house or replacing the tiles on your roof, there are others that can actually be quite straightforward. Re-finishing your fence and pressure washing the patio, for example, are both well within the capabilities of the majority of homeowners. Removing and replacing the screws in your deck need not inspire sleepless nights, and if you have a lawn, there's no reason to hire professional help to keep your grass growing healthily. The trick, in all cases, is to learn how to do these jobs properly, as failure to do so can end up costing you more in the long run than you'd have paid to hire a pro.
For example, if you've had a steady bout of rain recently, then painting your fence before it's dried out can lock in moisture and lead to all kinds of problems, including rot. If your lawn needs leveling, then doing it at the wrong time of year can leave it vulnerable and unable to recover, and if you don't pay careful attention to the settings on your pressure washer, you can easily do more harm than good when it comes to cleaning your decking. Fortunately, these are all easy mistakes to avoid, and that's precisely what we're here to help you do. Covering 12 common household tasks and the mistakes that people make with them, if you want to protect your investment instead of putting it in further jeopardy, then this guide may well be for you.
Power washing at too high a pressure can do way more harm than good

There are several pressure washing mistakes you should avoid when using one to clean exterior surfaces like your deck, siding, or patio, but this is one of the most important. As tempting as it can be to stick the machine on its highest setting to get rid of tough dirt and grime, higher pressure settings can easily cause paint to crack and flake away, while certain materials, like wood, can become permanently etched and gouged. And don't forget, wood is a porous material; if you gouge grooves into it with a pressure washer, then that water is likely to settle inside it and lead to rot. Not only that, once the damage has been done, it's usually not possible to undo it.
The best way to prevent any of this from happening is two-fold. Firstly, try not to hold the nozzle too close, as this is the most surefire way to "gouge" the surface you're cleaning. Secondly, try to "work your way up" through your pressure washer's settings. You may just be surprised by how well a low-pressure setting works to clean your deck, house, or patio.
Painting over rotten wood traps in moisture and accelerates decay

If you've spotted rotting wood on the decking, pergola, or fence you're about to repaint, then please, don't be tempted to just paint over it. By far one of the biggest mistakes homeowners make when painting wood around their yard is failing to prepare the surface properly. Yes, it's important to re-paint outdoor surfaces now and then to keep them sealed and weather-proof. But if you ignore any signs of rot and decide to just paint over them, then all it really does is cover up the problem. The rot will continue to spread beneath the new coat of paint, and as it does, it'll compromise more and more of your structure.
Instead, you should try to live by the 18th-century proverb that "a stitch in time saves nine." This means removing any rotted material, no matter how minimal, from the surface of the wood you want to paint. Trim as much away as you can with an oscillating saw or hand saw, and once you're happy that the affected material has been removed, treat the area with a wood hardener or epoxy primer. This approach should stop the rot in its tracks, giving you many more years of use from your wood and potentially saving you from a costly (not to mention untimely) repair bill.
Installing flooring without moisture testing can lead to warping, buckling, and decay

Laying laminate flooring, especially the type that you simply cut to size and click together, is a relatively straightforward home upgrade. At least, it can be — so long as you test your subfloor properly for moisture. As you may have started to notice, water has a habit of wreaking havoc around the home. From a pressure washer, it can damage certain surfaces; if painted over, it can lead to rot; and in the case of laminate flooring, not only can it lead to mold growth, but it can actually cause the planks to swell, lose their shape, and even buckle.
For these reasons, moisture testing is one of the most important considerations for laminate flooring. For the most accurate reading, you'll need a digital moisture tester, and when you have your results, you should consult your local hardware store to find a moisture barrier material that's suitable for your subfloor. Failure to do so can not only lead to floor damage, but it can also mean costly repairs and replacements — perhaps including the cost of a contractor. With this in mind, if you're at all unsure about how to properly prepare your subfloor, then you may be better off employing a professional from the outset.
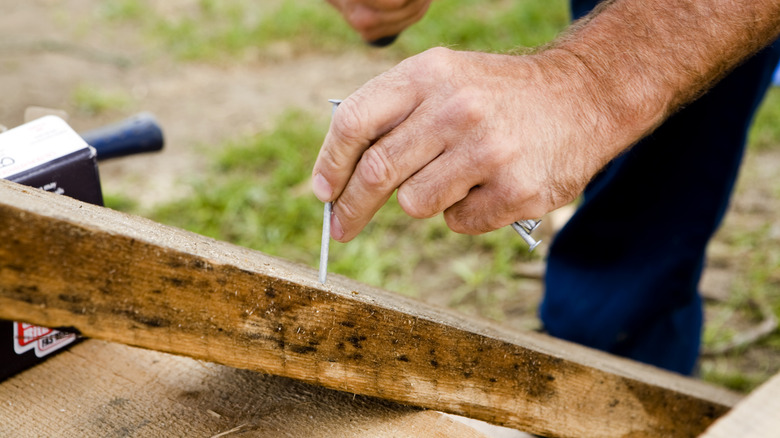
Using interior-grade fasteners outdoors can lead to staining and structural weakening

Whether you're repairing your deck or building a new fence, you'll need to pick up some new fasteners or screws. But if you use the wrong type — like that stash of indoor screws in your DIY cupboard that you've yet to find a use for — then your structure is unlikely to remain stable for long. Not only can this be very unsafe on structures like decking and pergolas, but as interior-grade fastenings begin to rust and weep on your surfaces, they can also leave ugly stains.
Today, it's easy to get hold of outdoor-grade fasteners. These are usually corrosion resistant, and are often made with stainless steel or protective finishes. Crucially, they're much less likely to compromise your structure's integrity, or to leave stains on your newly-painted fence or decking. All you need to do is head down to your local hardware store, let them know what it is that you're building or repairing, and ask them to point you in the right direction. Stainless steel and galvanized screws are both good options, and if you're designing a new decking, then you can buy specially-made decking screws. Not only are these made to resist corrosion from the weather, but they're also designed to withstand the chemicals often found in pressure-treated deck boards.
Overloading circuits with power tools and equipment can lead to overheating and fires

Are you preparing to DIY some repairs to your decking in your garage, with a power drill, sander, and a table saw all plugged in and ready to go? If so, then you should know that's a surefire way to overload your circuits. In fact, this can happen for several reasons, including outdated wiring and the use of faulty appliances. Daisy-chaining extension leads (running several extension leads concurrently from a single power socket) is another common culprit, and even with just a single extension lead, it's possible to overload the circuit with just a few heavy-duty tools. For example, let's say that you have a charger plugged in for your cordless drill, a work light to help you see, a corded hammer drill to bust up that old subfloor, and a radio to keep the vibes buzzy between drilling. Such a combination could easily overload your circuitry, which in turn could overheat and even catch fire.
To avoid this, it's best to ensure that no single circuit is loaded past 80% of its maximum load capacity. As an example, if you have a 20 amp socket (which the National Electrical Code says are common in kitchens and bathrooms), then you should never plug more than 16 amps worth of equipment into them. To ensure you don't surpass this, check your tools to see how many amps they need to run (this should appear on the tool or in the instructions). If not running your radio means you're working within safe limits, then so be it — that's got to be better than starting an electrical fire!
Over-tightening plumbing fittings can strip threads and cause leaks

Many DIYers fall into the trap of thinking "tighter is better" when it comes to addressing leaks in the pipework around their homes. Unfortunately, this is one of the biggest plumbing mistakes DIYers can make. When you over-tighten them, you risk wearing down or even stripping the threads of your pipework, and when that happens, it becomes almost impossible to form a proper seal. You can also damage the rubber seals and O-rings by applying excessive force, and if you really overdo it, it's possible to actually split or crack your fittings — especially those made from more brittle materials, like plastic.
To ensure that you don't overtighten your fittings, follow the "hand-tight plus a half turn" rule. If you're fitting brand-new plumbing, then test your handiwork by turning the water on slowly and checking for drips. Alternatively, if you're fixing a leak — and the "hand-tight plus a half turn" method doesn't work — then try not to force the issue by turning it even tighter. The problem is probably a damaged seal or perhaps a poor installation. In either case, if you're unsure how to fix it, then it's usually worth hiring a plumber to do it for you.
Not grading soil away from your house can lead to damp and even flooding

Whether you're resurfacing your entire lawn or simply trying to iron out those mole hills that have formed in parts of your yard, one of the biggest mistakes you can make when leveling your lawn is grading the soil incorrectly. It's called negative grading, and the reason it's so important to avoid is that it can lead to all kinds of water-related issues in your house. If water isn't encouraged to run away from your house, then there's a chance it'll run towards it, and if it does, your building can start to suffer from damp and even flooding.
With this in mind, it could well be worth hiring a professional landscaper to help you get it right. But if you insist on doing it yourself, then try to ensure your soil falls away from your house at a rate of one inch per foot away from your house, for the first ten feet around it. This sounds drastic — you may even think that it sounds like overkill — but it's important. It prevents undue amounts of damp, protects your foundations, and reduces the likelihood of basement or crawl-space flooding. It also ensures that water isn't allowed to merely pool on your lawn, which can create its own unique set of landscaping problems.
Using vinegar and bleach can dull and weaken natural stone flooring

Featuring unique patterns that have been pressed upon it by the very pressures of the earth, natural stone flooring remains as popular today as ever. However, it's not always the easiest material to clean, and while you might have read that there are lots of ways to use vinegar to clean your kitchen, we'd be willing to bet that natural stone flooring wasn't one of them. Vinegar's high acidity can wreak havoc on the surprisingly delicate surface of natural stone products. Not only can it damage the sealant that's typically used on these floor types, but once it bypasses that, it can actually damage the stone underneath, leading to a dull and even scratched appearance that's far from the flooring you first fell in love with.
Instead, stick to hot water by itself, and if you're really struggling to lift heavy soiling from the floor, try adding a small splash of dish soap. Just try to ensure your dish soap is as close to pH neutral as possible, and make sure that it's well diluted. You need to avoid cleaning your floor with anything that's either too acidic or too alkaline, and honestly, the safest bet is usually to use a dedicated stone flooring cleaner — ideally one that's specially formulated for your specific type of stone. Stone flooring rarely comes cheap, and the last thing you want to do is risk damaging your investment by rolling the dice on a cleaner you're not totally sure about.
Venting your bathroom into the attic is a surefire recipe for mold

If you're tired of fighting an un-winnable battle against mold and want to know how best to vent your bathroom, we'll give you a hint: you should never vent it into your loft. Yes, you should absolutely do something about the build-up of excess condensation in your bathroom, especially if it's leading to the continual build-up of mold. But if you install a vent fan that feeds into your attic, you're not actually solving the problem — you're just moving into a different part of your house. Unfortunately, "out of sight, out of mind" is not the mantra you ought to adopt when it comes to moisture and dampness.
Instead, you should ask yourself where the condensation goes once it's vented into your loft. Is there a secondary vent in your roof that will ensure the condensation is sent out into the ether? If not, then you're basically asking for a mold problem. Don't forget, mold needs less than 48 hours to sprout and start spreading, and it absolutely loves dark spaces — just like the one in your attic. More than that, any beams, joists, and trusses in your roof are likely to start rotting if continuously subjected to damp, which can have serious long-term consequences for your roof's structural integrity.
Addressing lawn issues at the wrong time of year can leave your grass vulnerable

Whether your lawn needs aerating, leveling, or the soil de-compacting, during its period of dormancy seems like the obvious time to do it. After all, why would you want to interfere with your grass when it's actively trying to grow? Unfortunately, the reality is that if you perform any of these tasks when your grass is dormant, you'll leave it extremely vulnerable to long-term damage.
Fortunately, timing your maintenance correctly is quite easy. The key lies in knowing whether you have warm- or cool-season grass in your garden. Per the name, warm-season grasses have adapted to thrive in the warmer parts of the world, while their cool-season cousins tend to fare better in cooler climes. Both can be grown in the USA, however, the regions in which they grow best — and the times at which they spring to life — can vary. Cool-season types, like Kentucky bluegrass, grow best in the northern two thirds of the United States. They're usually most active during the spring and the fall, making these seasons the best time to fix your lawn issues. Warm-season grasses, meanwhile, like Bermuda grass, tend to fare better in the southern third of the United States, and are most active late in the spring and summer.
Over-fertilizing your lawn can lead to browning and attract aphids and mites

If you're the person who tends to err on the side of plenty when it comes to watering and feeding your plants, then you could end up doing serious damage when it comes to feeding your lawn. Yes, you may need to fertilize it from time to time. But if you overdo it, you could run into problems including brown, yellow, and even dead patches of lawn. More than that, once it's weakened, grass becomes considerably more vulnerable to pests like aphids and caterpillars, which will only serve to make the problem worse.
To avoid making this damaging mistake, first work out whether you actually need to fertilize your lawn. Assuming that you haven't recently fertilized your grass, yellow and brown patches are a reliable sign that it needs feeding. A surge in the number of weeds around your lawn is another sign that fertilizer is needed, as is thin and patchy growth. If you think you need to fertilize, then the best advice we can give is to identify which type of grass you have and buy a fertilizer that's specially formulated for that type. When you have it, apply your chosen feed evenly, and make sure you adhere strictly to the manufacturer's instructions.
Adding gutter guards then neglecting to check them is a common mistake that can lead to damage

One of the biggest mistakes people make when installing gutter guards is assuming they're a "set and forget" kind of upgrade. They're not, and if you don't maintain them regularly, they can lead to issues like hidden blockages and even structural damage. They also combine to put extra, unnecessary weight on your gutters, which can cause them to sag.
The solution? Firstly, consider whether you actually need them. If you do, then make sure you continue to check your gutters frequently. Even with guards in place, gutters need regular cleaning; organic matter can continue to build up, and if you don't keep on top of it, it can lead to hidden blockages. In turn, these can cause water to overflow onto the side of your house (instead of running away from it), which can cause a whole host of frustrating moisture-related problems.