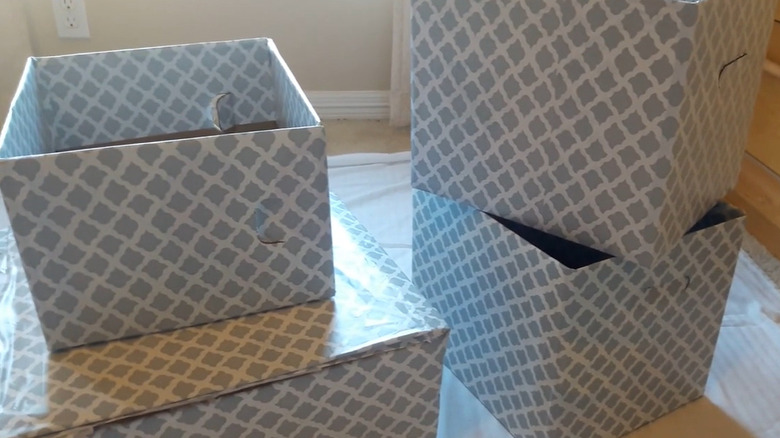
Create A Storage Solution For Blankets By Upcycling A Cardboard Box

We may receive a commission on purchases made from links.
Forget folding blankets and hanging them over the back of the couch; there are new ways to make storing blankets stylish while making them easily accessible. Racks, hooks, or chunky, oversized baskets make blankets easy to grab and keep them out of the way when no one feels a chill. Get in on this handy trend by creating your own blanket-catcher out of an upcycled box. Covered in attractive contact paper and reinforced for longevity, you might value a recently delivered box more than what came in it.
Source a corrugated cardboard box that's big enough for your blanket needs, and purchase two rolls of contact paper or peel-and-stick wallpaper; one in a rustic wood grain and another in a colorful pattern. Also, seek out another sizable cardboard box with a side that's the same size (or larger) as the base of your main box. As for tools, set aside a utility knife, scissors, a credit card, a microfiber rag, a marker, a tape measure, packing tape, and a glue gun with a stock of high-quality sticks, such as Gorilla Glue Hot Glue Sticks.
Make this project worth your time by sourcing the right box, and by following some extra steps to strengthen the container. The box should be big enough to hold the blankets you keep on hand, and the sturdier the box, the better. Check your local grocery store to repurpose cardboard boxes that came with produce. Otherwise, if you get large bags of pet food delivered, this size of box could be just right to fit two or more snuggly blankets.
Prepping and covering the box in contact paper
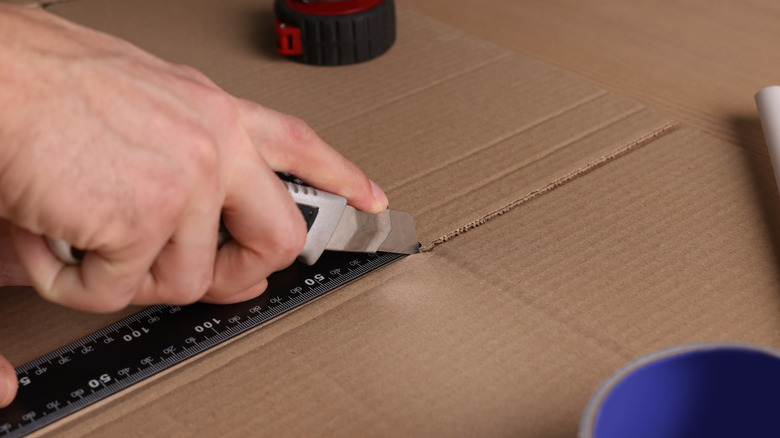
Start by cutting off the box's upper flaps, and set them aside to use later. Protect your time investment by reinforcing the corners and opening with an edging of packing tape. This is less important for double-sided boxes. Measure the box's perimeter, and add 2 inches. Also, measure its height, double this number, and add 6 inches. Measure a rectangle with these dimensions onto the woodgrain contact paper. This material also folds over the bottom of the box and its interior walls.
Pencil a vertical line that's perpendicular to the bottom and top of the box on one of its long sides. Wipe the box with the microfiber cloth, and peel away about 2 inches of the backing from a width-edge of the contact paper. Next, line the sticky edge up with the pencil line and attach it so 4 inches are left to fold over the bottom of the box (the remainder goes on the box's inner walls). Slowly peel away more backing from the contact paper, and smooth out bubbles with a credit card. Continue until you've covered the perimeter of the box with a few inches of overlap. Finally, turn the box on its side, cut the corners of the loose contact paper, and fold and smooth the excess contact paper over the width sides, followed by the length sides, on the bottom of the box. Repeat these steps on the interior of the box, taking time to smooth the extra 2 inches of material over the inner bottom of the box.
Finishing touches to make the box more durable
Instead of lining the box with contact paper as-is, snip up a cardboard lining for the bottom to give you a smooth base to cover with the patterned contact paper. Measure and cut a piece of cardboard from your remaining box, making it just a shade smaller than the inner base of the main box. Also, measure and cut a piece of patterned contact paper that's 4 to 5 inches longer than each side of this cardboard rectangle. Cover the rectangle with this contact paper, following the same steps you used to attach the material to the box. Before placing this new lining in the box, glue the inner flaps of the base down for extra strength. Squeeze a generous squiggle of glue over the bottom of the box, and slide the contact paper-covered lining inside.
This last step is optional, but it can make the container significantly sturdier. With a bit of snipping, glue, and contact paper, the box's upper flaps can become decorative braces to reinforce each corner of the container. Cut eight 5-by-2-inch cardboard rectangles along with eight 7-by-4-inch pieces of contact paper, either woodgrain or patterned. It can help to bend the cardboard pieces in half before applying the contact paper. Cover the bent cardboard rectangles with contact paper, and glue two to each corner of the box, one about 1 inch from the opening and the other 1 inch from the base. Tuck this simple blanket storage solution into a corner, under a table, or slide it right next to the sofa for convenient grabbing.