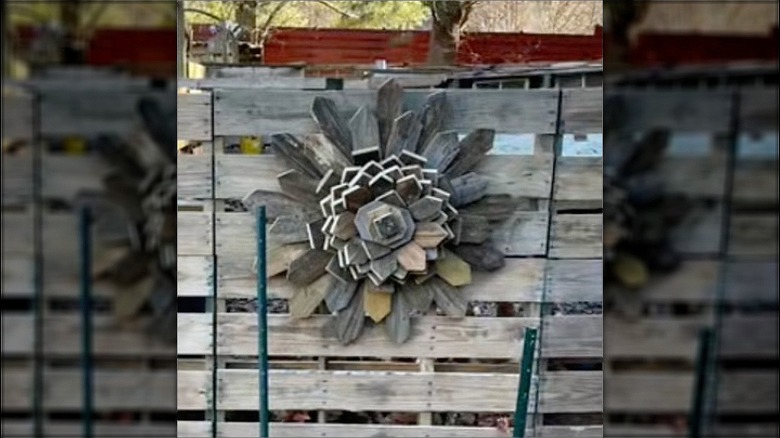
Turn Extra Scrap Wood Into Floral Outdoor Decor That Always Stays In Bloom

Is your wood scrap pile getting a bit out of hand? Sure, you could toss it in the fire pit (as long as it's not pressure treated), but why not enjoy it for longer by cobbling together a charming wooden flower? Little pieces of wood that are too small to be part of future projects can become a wreath of rustic flower petals for a piece of eternally blooming yard art. Your DIY wood flower can even thrive indoors as a unique rustic home decor idea.
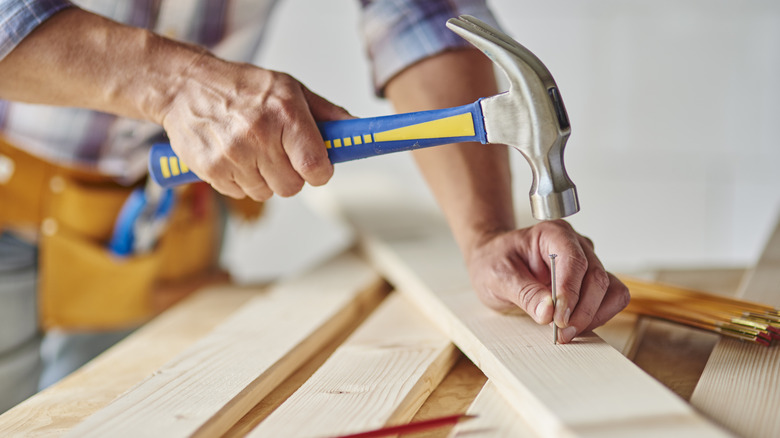
To put together your own sunny wooden flower head, you'll need a piece (or pieces) of wood to use as a backing along with a hefty supply of scraps from 1-inch-by-3 or 4-inch boards. As for tools and hardware, gather up a hand or power saw, hammer, 1 ½- to 1 ¾-inch nails, wood glue, sandpaper, and hanging hardware like a D-hook or a sawtooth picture hanger. A speed square or angle-finding phone app plus a scrap of cardboard and a pencil will also come in handy. Even non-woodworkers and the tool-shy can get in on a lighter version of this DIY by using wood shims, cutting them with heavy scissors or miter shears and affixing them with staples instead of nails. For a wood-scrap flower that will bloom outdoors, coating it with polyurethane is a smart move. You can also use beeswax, an all-natural way to waterproof wood.
Set up a solid base for a wood flower
First off, do a quick mock-up of how the first ring of petals will look; this will help you determine how large the backing piece should be. Lay out longer scraps in a circle with their corners on one end touching. Between 10 and 14 "petals" should leave enough space in the center to stack on further layers of petals, working toward and eventually covering the flower's open center.
Set up the backing according to the size of your first row of "petals". The easiest backing/base material for the flower is a larger, solid, piece of wood like particle board. However, you can also combine a row of individual smaller pieces with several pieces of perpendicular cross bracing, both glued and nailed. Follow the same concept with wood shims, as well.
To prepare the pointed ends of your longest petals, gather up between 10 and 14 pieces of wood that are around 12 inches long. Measure and draw a 70- or an 80-degree angle onto a scrap piece of cardboard, and cut it out. Use this as a template to draw the same angle onto each piece of wood. Trace the cutout at one end of each of the longer pieces of wood, and cut along the lines to make a point. Trim the other ends to make the rest of the petals the same size. Lay the petals out on the backing, radiating out in the way you'll attach them, and trace their ends in pencil. Working one by one, use glue and two nails to affix each petal in the marked spots.
Finishing your everblooming wood flower
The next row of petals will consist of the same amount of scraps, but they should be about half the length of ones in the first row. Prepare them the same way you did the first set of petals. Place them so that each new petal overlaps a space between two petals in the first row. The ends of the second row of petals need to line up with the row below them. The center of the flower is made up of five circular rows of pointed wood scraps. Each piece should be half the length of the second row of petals. Make each piece the same length for each row, although you'll need to do a bit of trimming to make the last two layers fit.
Attach the first row of center pieces to the open area between the petals at an angle, leaning against and overlaying the spaces between the last row of petals. The pieces don't make contact with a flat surface, so you may need longer nails for this row to anchor it to the backing. Continue with four more rows of pieces, trimming them to fit. Top the remaining open bit with a rectangle of wood with its corners cut off to make a sort of hexagon with uneven sides.
Your flower is only as "done" as you want it to be. A bit of paint or stain can go a long way to customize your project while also preserving the wood against the elements. Attach the hanging hardware to the back, and your handmade creation is ready to enhance your outdoor space.