Everyone Will Be Buying Quick-Setting Cement For An Easy-To-Make Outdoor Project
Have you ever seen a really easy DIY project idea and wondered why you didn't think of that? Sometimes, it just takes a bit of ingenuity and a new way of looking at things to come up with ideas that are quick, easy, and surprisingly effective. For example, if you love solar lights and have already found the best spot in the garden to place them, you probably have a collection of them all around your yard. They're so easy to stick into the ground or into plant pots to provide that much-needed touch of illumination. But what if you have a spot where you'd love to place a solar light, but there's no soft ground to put the stake into? Or, what if you have a couple of lights that still work fine, but their stakes have broken, or they're missing? Never fear, because there's a simple DIY project that you're going to love, as shown by Liz Fenwick DIY on YouTube, using quick-setting cement.
In fact, you'll be so blown away by how easy this is to make and how effective the finished project is going to be, that you'll rush out to buy some quick-setting cement along with everyone else who sees this idea. On top of the cement, all you're going to need is a bowl for mixing, a roll of painters' tape, and some food containers that you've saved. Of course, you'll need the solar lights as well. For the food containers, choose ones made from cardboard or foam, like those noodle cups you probably have in the pantry. They don't have to be just round containers either. Any square or rectangular boxes that are going to be easy to cut and peel away will work.
How to make a quick-setting cement base for standing solar lights
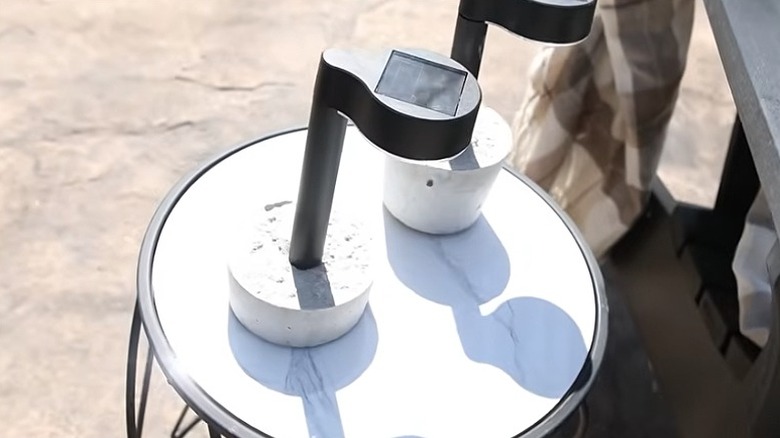
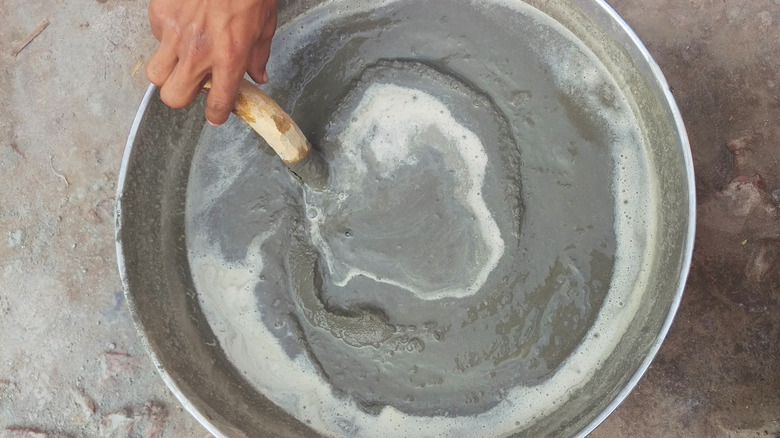
To get started, grab your Quickcrete (the same product you would use to make those DIY leaf stepping stones), a mixing bowl, and a spoon. Mix a small amount of the cement with water until it has a thick paste consistency. Place this into your chosen containers, filling them up about halfway, depending on the size of the container and the light. Remember that you're creating a solid base, so you want it large enough to support the light as a free-standing unit. Put the base of your light into the cement and use some painters' tape to hold it upright. Leave overnight for the cement to dry.
Once the concrete is dry, remove the painter's tape and peel away the used food container. You now have a free-standing solar light that you can place just about anywhere you want a little extra illumination. Wasn't that quick and easy? But you don't have to stop there. You can get a bit creative and paint your new solar light base or even use some hot glue and wrap it with twine or decorative ribbon. If you have a little extra time to embellish your project, you could glue decorative stones right around the base of each light. Or, while you're mixing the cement, consider adding in some pigment, like oxide, to provide a little extra color without having to paint the bases afterwards. Finally, you can use some more of that quick-setting concrete to DIY the cutest ladybug decor for your yard.