15 Clever Ways To Transform Shoe Boxes Into Smart Storage Solutions
We may receive a commission on purchases made from links.
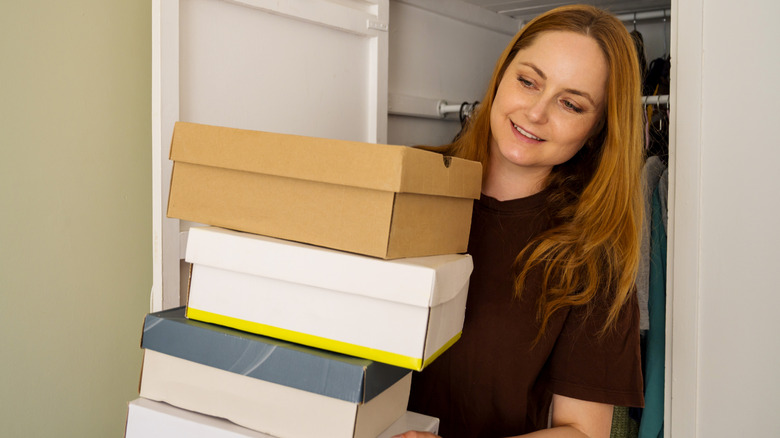
If you're looking to add more storage space on a budget, the solution might be tucked away in the back of your closet: the humble shoe box. If you have a few saved up from shopping, you can repurpose them into clever and even stylish storage solutions. With a little creativity (and often some hot glue), shoe boxes once bound for the recycling bin can become storage shelves, caddies, and more.
We're always in search of DIY storage ideas for the living room, bedroom, and beyond. So we've rounded up a variety of easy projects that help you turn shoe boxes into everything from craft room organizers to countertop spice racks. Store-bought organization products can be pricey, and if you have basic crafting supplies, many of the projects ahead can be made for free. Whether you use these for temporary storage while you figure out your setup, or for customizable, long-term organization, these projects will help you see shoe boxes in a whole new light.
Reconfigure a shoe box to work as a craft supply organizer
This supply organizer, complete with a middle divider, looks like a product you would snag from a craft store, not make for free out of an old shoe box. Like many of the projects on this list, it's one you can accomplish with some scissors and a hot glue gun. This project involves cutting a V-shaped cutout into the middle of the shoe box and then folding the box so the bottom creates the middle divider. Panels cut from the lid complete each side. A bit of tape, as well as glue, can help hold the panel pieces more securely in place, and you can cover it with decorative paper as the last step, so the tape isn't noticeable.
Cover shoe boxes in fabric and accessories for a showstopping decorative container
It's pretty easy to turn an old shoe box into a cute storage bin by covering up the outside. If you cover every surface, like in this project, it can look very nice, far from a budget shoe box project. Using fabric looks more premium than using wrapping paper or contact paper. On a tight budget, the thrift store can be a go-to location for cheap fabric in the form of bedsheets, curtains, tablecloths, or even large articles of clothing. Finishing touches like rope detailing and decorative trim make this project look store-bought and not self-made.
Design your very own countertop spice rack with a shoe box and pieces of cardboard
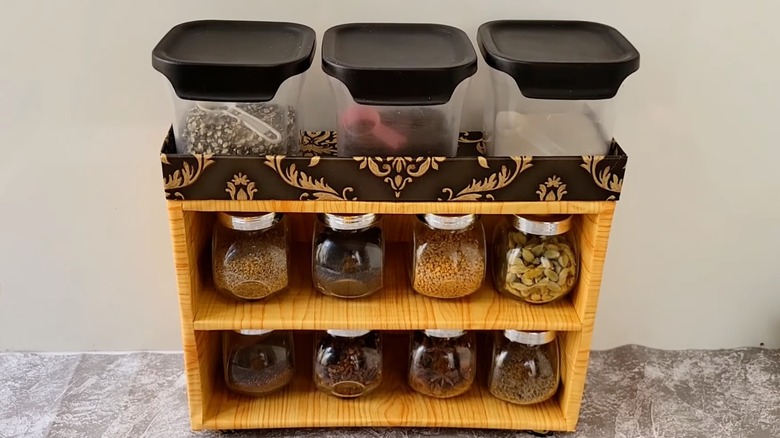
This project uses a shoe box and strategically cut pieces of cardboard to make a spice rack. It's a great project for the budget-conscious, but since it's made of cardboard, you don't want to overload it with weight. Also, avoid getting oil or liquid spills on it, since the material is porous. Water-resistant contact paper can help to lower the chance of damage. For example, this wood grain option does an impressive job at concealing the cardboard. While the finished project is a great spice rack, you can absolutely use it elsewhere as a tabletop shelf, like in the office to organize desk supplies or in a hobby room to display small craft pieces.
Enlist two of the same-size shoe boxes to make a four compartment organizer
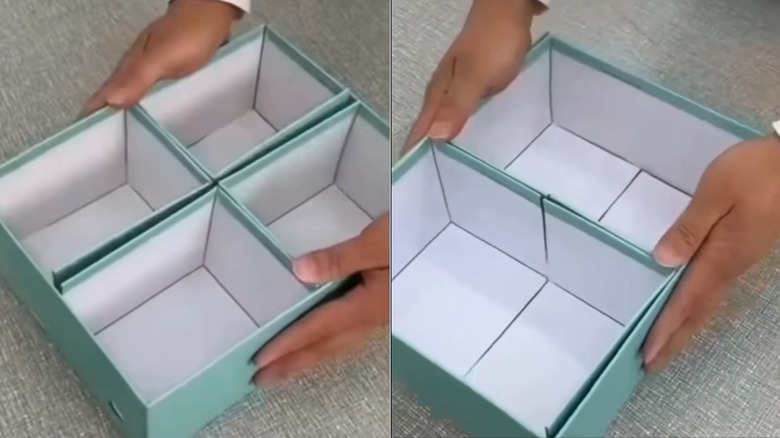
Some of the other DIYs on this list are rather involved. This one is simple. If you have a shoe box that works for your storage needs as-is, but could use a bit more organization, cut a shoebox of the same size into four to make internal dividers. You can use them to split the shoe box in half or in quarters, depending on how you place the sections.
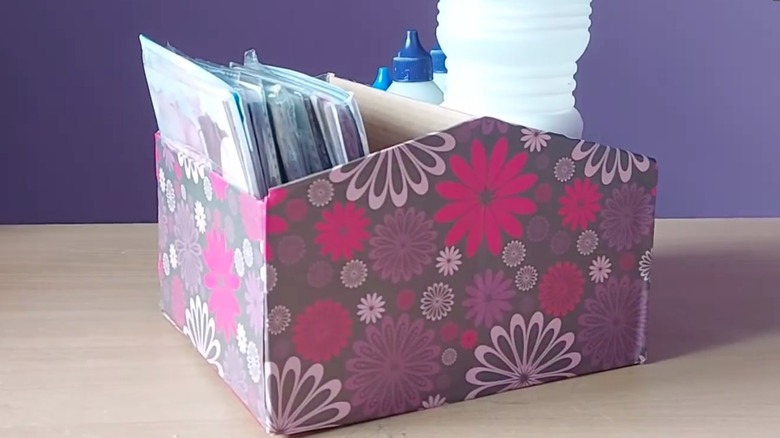
Organize your knitting corner by converting a shoe box into a stylish yarn holder
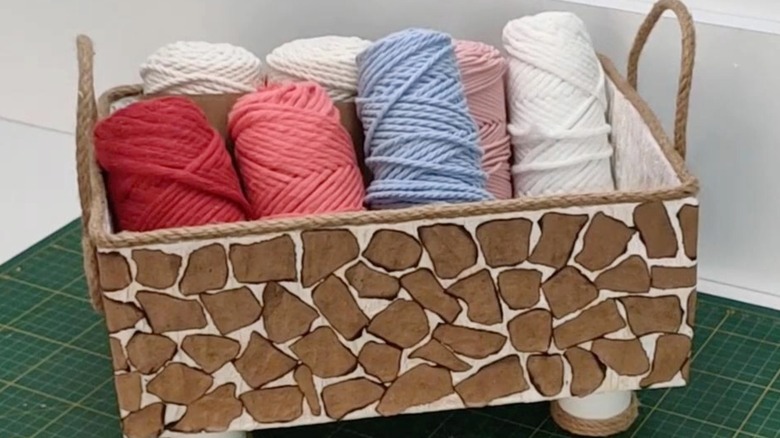
This is another project that shows you how to transform a shoe box into a pretty storage bin. It uses newspaper and paper towels to add texture, which you can stick to the shoe box with a liquid adhesive like Mod Podge Gloss Sealer. You can simply coat the dried layer with acrylic paint for a solid, textural look. However, this project takes it a step further and creates a stone wall-like pattern with bits of paper. A rope trim and rope handles are a nice finishing touch. The end result is rustic and quaint, great for cozy craft supplies.
Sort your go-to accessories in a homemade jewelry box
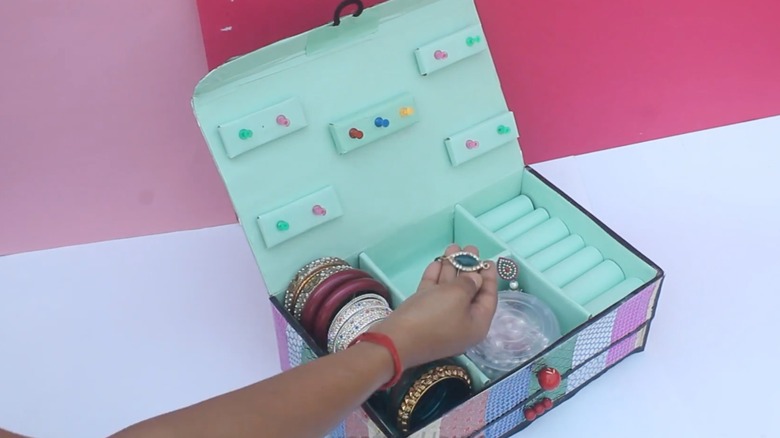
At first glance, it's hard to tell that this homemade jewelry box came from a humble shoe box. It uses extra pieces of cardboard, fashioned into dividers and necklace posts (with the help of thumb tacks). An insert, like the SSWBasics Foam Ring Holder, can provide secure storage for rings. In this project, various pieces of patterned and colorful paper cover the cardboard, which gives it a fun boho look. It would look even more upscale if you used a pretty fabric instead of paper.
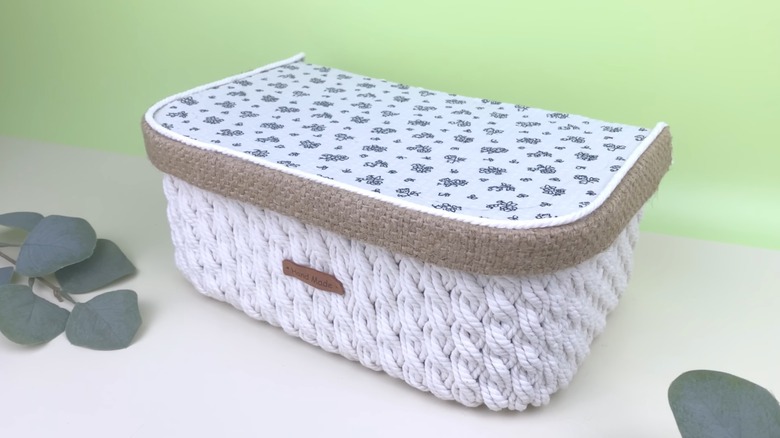
Mimic a woven basket with a shoe box and rope

Even on the affordable side, a woven basket with a fabric insert costs upwards of $15. So, if you already have a shoe box and some jute rope and fabric on hand, this is an affordable and worthwhile upcycle. The end result looks premium, like something you'd buy from a store, rather than a budget DIY. If you have to buy these supplies new, Dollar Tree offers rolls of jute cord and squares of craft fabric for $1.25 each, still making it a low-cost project.
DIY a diaper caddy using two shoe boxes and repurposed lids
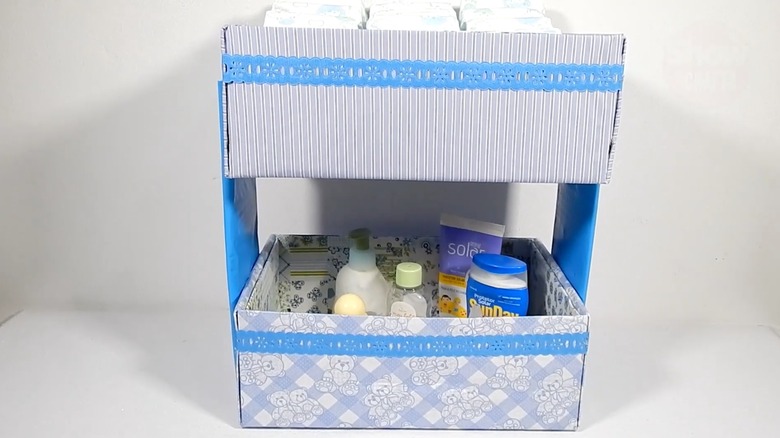
The diaper phase of parenthood may only last a few years, so there's no need for an expensive storage solution. If you want something very affordable, you can make this tiered diaper caddy using two shoe boxes and some extra cardboard pieces. Alternatively, consider using thin pieces of wood for the side supports for a sturdier finished project.
Upgrade your present-wrapping station with a ribbon storage dispenser
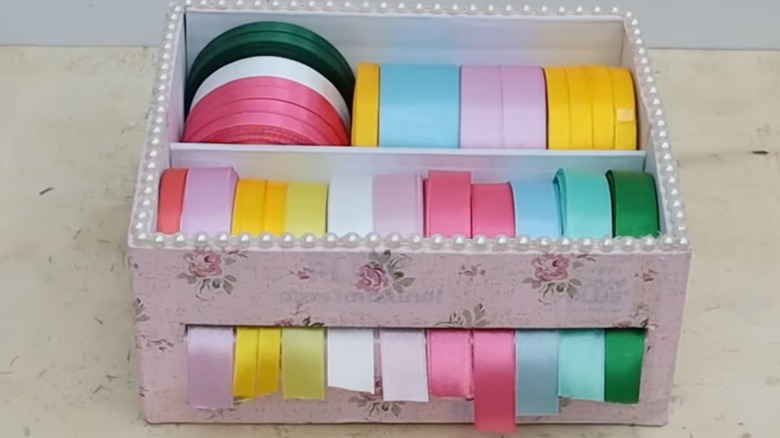
Having a collection of ribbons makes gift wrapping and crafting a lot more fun, but they can create quite a mess in a drawer. This project is a clever addition for organizing a craft room and storing your rolls of ribbons. If you cut a hole in the front, it also works as a handy dispenser. Pop the shoe box lid on top if you want to turn it into hidden, stackable storage.
Corral cords via a savvy shoe box charging station
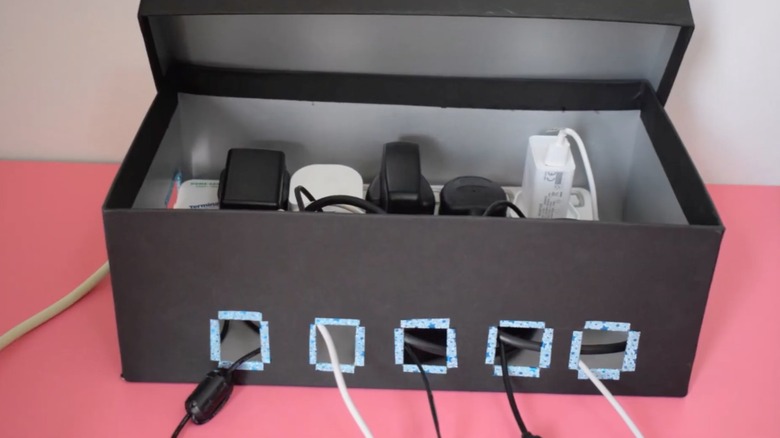
While there are some fabulous home products to keep cords tidy, they cost money. This is one solution you can DIY for free with some scissors. You can also use washi tape, contact paper, or decorative fabric if you want to make it look nicer. Cut holes in a shoe box to thread charger cords through. Then, place a power strip inside to plug them in. It's a great way to keep your charging station looking neat as well as to stop cords from getting tangled.
Craft a functional bathroom toiletry organizer and tissue holder with a reconstructed shoe box
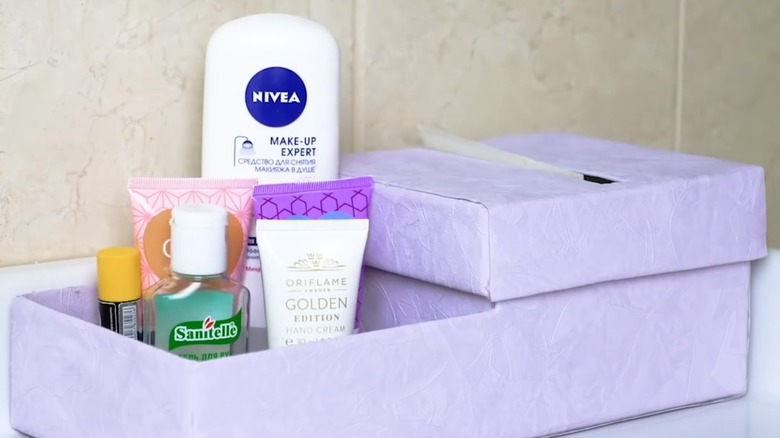
This project is an excellent way to use shoe boxes for organization in the bathroom. It's simple, and involves dividing the shoe box in half, placing a divider in the middle, and then using one half as a storage tray, and the other for tissues. If you don't use tissues often in the bathroom, skip cutting a hole in the top of that section, and use it to store cotton pads, Q-tips, or any bits you want to hide out of sight.
Put shoe boxes in dresser drawers for large, organized compartments
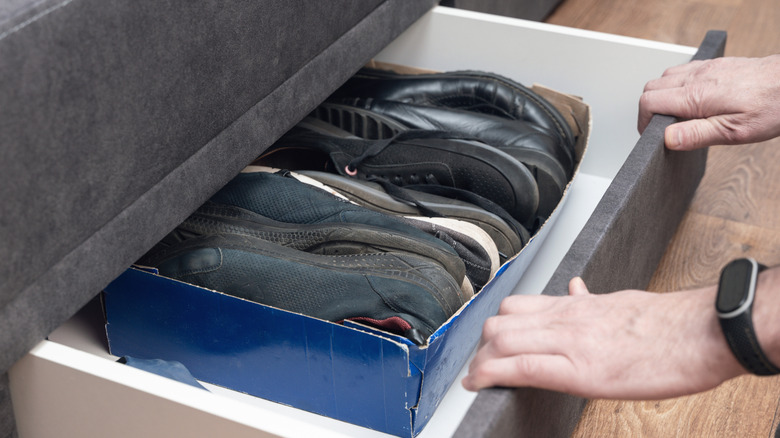
If you have a drawer that needs urgent organization, a shoe box can turn into a divider with little effort and no extra cost. You can just use it as-is, especially in spots like junk drawers, where you might not care too much about how it looks. If the drawer is shallow, cut the shoe box down to height. You can also dress the box up a bit by wrapping it with a layer of paper or fabric to cover up shoe brand logos or designs.
Design a makeup organizer from a shoe box
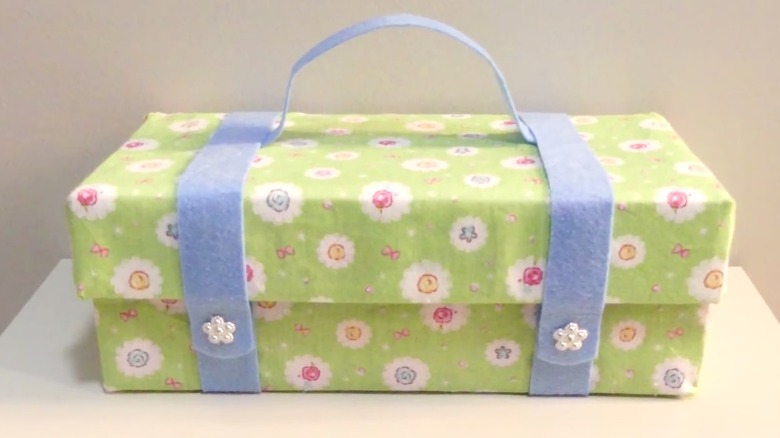
This DIY is appealing because it doesn't require disassembling the shoe box like many others on this list. Choose one with a hinged lid and cover it up with fabric to conceal the box's origins. The strap is what really elevates the project and makes it look like a makeup chest. You can follow the lead of this project and use felt, but for a more upscale look, use another sturdy material like ribbon or leather.
Install a wall-mounted shoe display and storage using shoe boxes
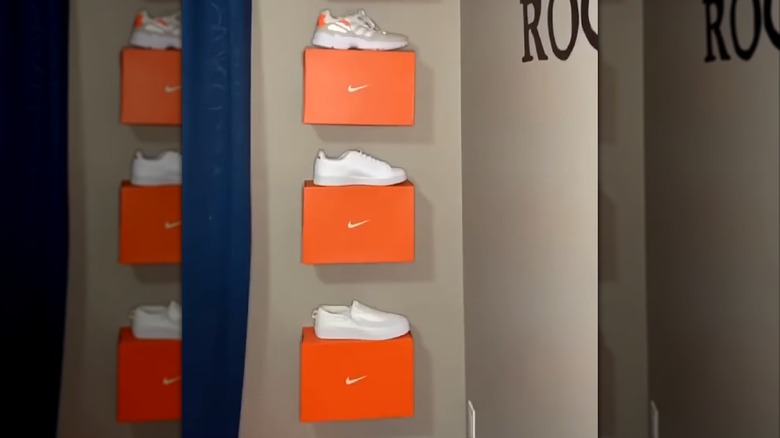
If you're a sneakerhead or if you just absolutely love shoes, you might not want to cover up the label on your shoe boxes. Maybe you even want to show off the brand, and this DIY lets you do so. It also leans into the footwear theme, using the boxes as shoe displays, rather than trying to turn them into something else. It involves mounting the boxes to the wall, which you can do with heavy-duty Command Picture Hanging Strips for a damage-free hanging option.
Use shoe boxes of different sizes to create stacked entryway cubbies
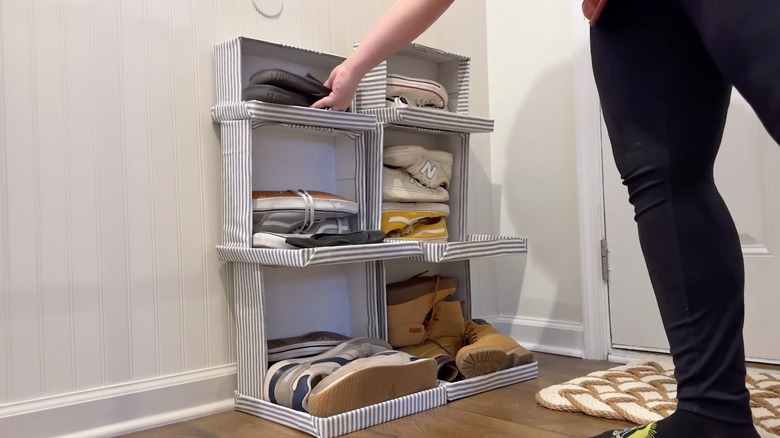
Entryway storage cubbies can cost a pretty penny. Even a notoriously affordable product like the IKEA Kallax Shelf Unit costs nearly $50. On the other hand, if you have the right shoe boxes, a hot glue gun, and something pretty to cover up the boxes, you can make this DIY for free. It requires boxes of different sizes. You want the largest on the bottom for stability, since you will use the boxes and their lids to create stacked cubbies. The end result is best for light-duty storage.