Don't Throw Away Plastic Container Lids: Use Two For Adorable Hanging Decor
You're about to toss a plastic tub and its lid into the recycling bin, but something makes you pause. You remember that the container is most likely made of easily-recyclable polyethylene terephthalate (PET) plastic and the lids are often made from polypropylene (PP) plastic. You recall that PP isn't as easily recyclable and often ends up in landfills. However, the same qualities that will make that lid live for an eternity in a landfill will make it a sustainable canvas for a cute, customizable decor project.
Don't toss the container, since there are so many useful and crafty ways to upcycle it. For example, crafter Camelia DIY shared a YouTube tutorial on how to convert two oval-shaped ice cream lids into a charming two-tiered rustic wall hanging to bid visitors "hello" at the front door. However, there are also countless ways to tweak the project to match your style or preferences.
It will probably not be difficult to find such perfectly oval plastic lids, but even large ones with curved corners will look graceful under fabric and provide wide spaces for decorating or adding lettering like Camelia's creation. Consider lids from tray-style takeout container lids or something like laundry or dishwasher pod packaging. Old plastic lids from food storage containers that have lost their better halves are even better choices. Along with the lid, you'll need scissors, hot glue, about 3 feet of rope (Jute or white cotton are good choices), cardboard, a marker, wire, and enough fabric to cover both sides of both lids. For adornments, you can copy Camelia's with faux greenery, burlap ribbon, and a spool of ¼-inch white cotton cord. To help outline the lettering, you can use a straight edge and a piece of chalk.
Create the base for your lid wall hanging
Make sure your lids are squeaky clean, trace them onto the cardboard, and cut out the pieces. These matching shapes will fit inside the lids' inner rim to bulk them up. If you have styrofoam trays or takeout containers, you can use these instead of the cardboard. Despite the recycling code on styrofoam containers, you really shouldn't be putting these common items in your recycling bin anyway.
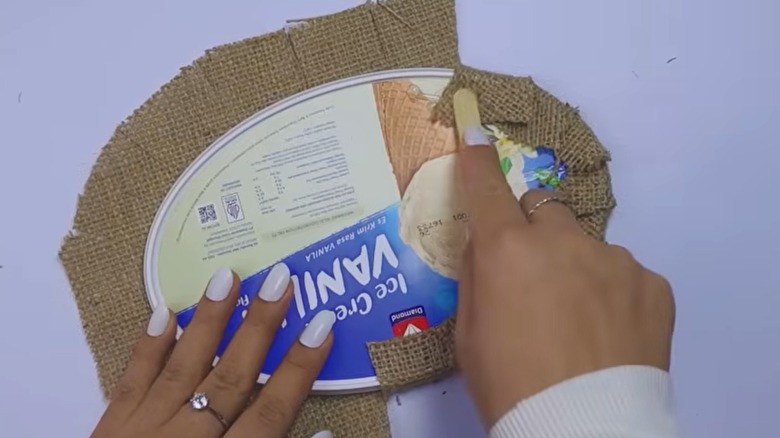
Next, edge the cardboard pieces in glue, and press them in place. Spread out the fabric and trace the lid onto it for the backing. Then prepare another piece of fabric to cover the front of the lid. Lay the lid on the cloth, cardboard side up, and cut around it, leaving about a 1½-inch margin of fabric around its edges. Snip 1½-inch tabs into the excess fabric. Fold the tabs over the edge of the lid, and glue them to the cardboard. Glue the backing piece over the tabs and cardboard, and trace a light line of glue over the raw edges of the cloth to prevent fraying. Repeat this process with the other lid.
Flip the cloth-covered lids over, and arrange the rope in a long, open-ended loop over the lids' backs. Space the two sections of rope about 4 inches apart on the lids, depending on the size of the lids, with the hanging loop extending 3 to 4 inches above the upper lid. Glue the rope in place.
Finishing touches for your lid decor piece
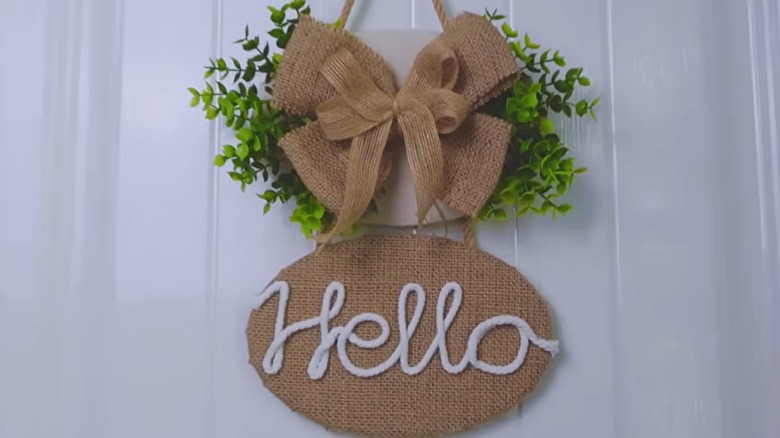
Follow Camelia DIY's design for the finishing touches, or make this wall hanging entirely your own. An oversized cloth bow like Camelia's will look best if you're using thick fabric like denim or burlap that will hold its shape. If you've covered the lids with thinner cloth, a wide, wire-edged ribbon in a color that complements the color and/or pattern will make a good substitute. Cut two strips of cloth that are 4 inches wide and 12 to 14 inches long. However, adjust the length — and possibly the width — of the cloth to the size of your lids. Fold each piece into a flattened loop, and glue the ends together. Set one loop atop the other, and cinch the combined loops together at the middle with a piece of wire. Manipulate the loops into a bow shape. Tie a burlap ribbon bow to glue on top of the wire binding the larger bow together, and glue the ensemble to the center of the upper lid. Glue faux greenery under the bow's loops in sprays that radiate over the lid's edges.
Camila creates an effortless cursive message from a coiled white cord for the lower lid. This may be the most challenging bit to recreate. Whether it's "hello" or another message, use your straight edge and chalk to mark two guidelines for the letters. Between these lines, write out the cursive lettering in chalk. Trace the lettering a bit at a time with glue, and press the cord immediately in place. Hung in your entryway, this pretty piece will make your foyer or front door more inviting to guests.