Reuse Broken Glass To Create Budget-Friendly Pavers With This Clever DIY
We may receive a commission on purchases made from links.
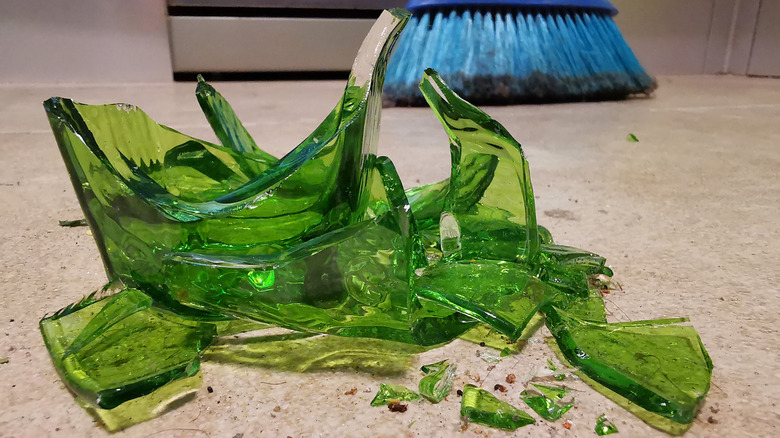
Uh oh, a poor grip and gravity have turned your empty wine bottle into dangerous shards. Unfortunately, you shouldn't put the pieces in the recycling bin. The shards can intermix with and contaminate other recyclables. Worse, they can hurt workers. However, you can keep this glass from languishing in a landfill. Mixed with concrete, this material can make striking stepping stones. This is more or less the process for making terrazzo. On YouTube, Odell Complete Concrete shows just how to do this. So, sweep up those pieces, and set them aside for a gorgeous DIY.
Gather up a good stash of broken glass. Colored glass looks the most striking set in concrete, but clear pieces might give you a glittery finish worth trying. (You can also add your own color to clear glass with alcohol ink.) You'll also need a drop cloth, a colander, a sieve, a mixing bowl, and some plastic bags to safely sift out and contain powdered glass and tiny fragments. Lastly, set aside a paver mold, a bucket, a bag of concrete, a concrete finishing trowel, a soft broom or brush, and something to mix the material with. Lastly, you'll finish off the paver with a sealant like YFK Wet Look Stone Sealer applied with a paintbrush or roller.
Tackle the project in two steps: preparing the glass and forming the paver. Glass rarely breaks uniformly, so to crush it into more consistent shapes, set aside a hammer, old plastic bags, and thick scrap fabric. Cut-resistant gloves, eye protection, and a particle mask are musts, since broken glass brings tons of potential danger with it.
Start by preparing the broken glass
Let's deal with the glass first, and it's best to do this outside. Spread a work surface with a protective sheet of plastic or cloth, and grab a large piece of thick fabric. (This is a great excuse to reuse old denim.) Don the protective gear, and wear it for each of these steps. Wrap the broken glass in several layers of fabric. Rolling the glass inside the cloth burrito-style is a good method. Tap the glass pieces evenly through the fabric with the hammer, checking periodically on the progress. Once you're content with the consistency, set the colander on top of the sieve, and place both atop the mixing bowl.
Empty the glass from the cloth bundle into the sieve and colander. Work the pieces through the two layers, and discard all the glass bits except for what's left in the colander. If necessary, break any pieces that are still too large into smaller bits, following the same process as before.
To dye your glass, it'll be best to use a disposable container (such as an empty yogurt cup, though these are also great for making chic baskets) and a stirrer like a popsicle stick. The steps here are similar to mixing food coloring into frosting. First, pour the amount of glass you want to dye into a small container; a funnel may help. Then, add a few drops of alcohol ink to the container, and evenly mix the contents. Be conservative with the ink. Remember, you can always add more. Once you've arrived at a color you like, spread the glass pieces onto a clean plastic bag to dry.
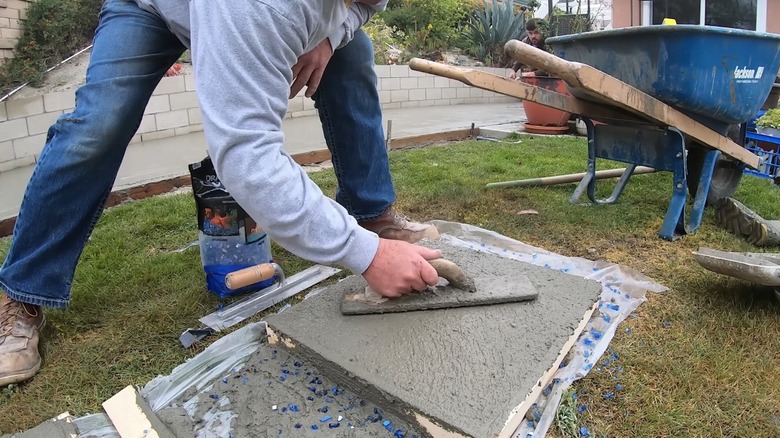
Once you're prepped, create the paver
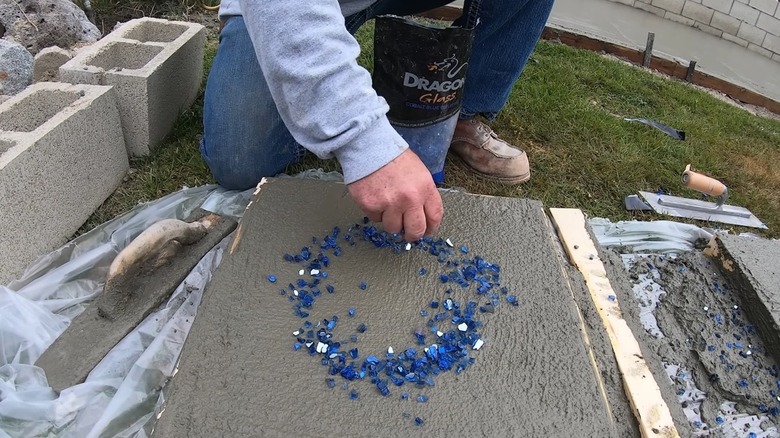
While you're outdoors, move toward a water source and a hose. Spread a drop cloth on your work surface. Put your protective gear back on, and mix up enough concrete to fit in the mold. Take the guesswork out of the measurements by using this concrete volume calculator. When the concrete is fully mixed, pour it into the mold. Arrange the glass pieces across the concrete's surface in a pleasing pattern. Press them lightly into the material using the finishing trowel, and smooth the concrete over the glass. Let the mold set for an hour before again smoothing the surface with the trowel. Let it rest for two more hours, giving the surface an additional pass with the trowel after each hour. Every time you smooth the concrete, use one corner of the trowel to carve out a gap around the edges of the mold to give the concrete a clean edge and make the paver easier to extract.
Rinsing away the top layer of concrete takes longer than you might expect. The key is patience and very light pressure. The glass pieces will want to move in the still-soft concrete, so you may have to smooth them back flush with the concrete surface. Without using an extra nozzle, gently hose away enough concrete that the glass pieces are visible but still flush with the concrete's surface. Rinse the material several times, running a broom or brush over the surface after each flush. Afterward, let the paver cure in the mold for between 36 and 48 hours without disturbing it. From there, you can pop the paver out of the mold and seal it according to your product's directions.