Turn An Old Frying Pan Into Countertop Storage That Looks Good With A Savvy DIY
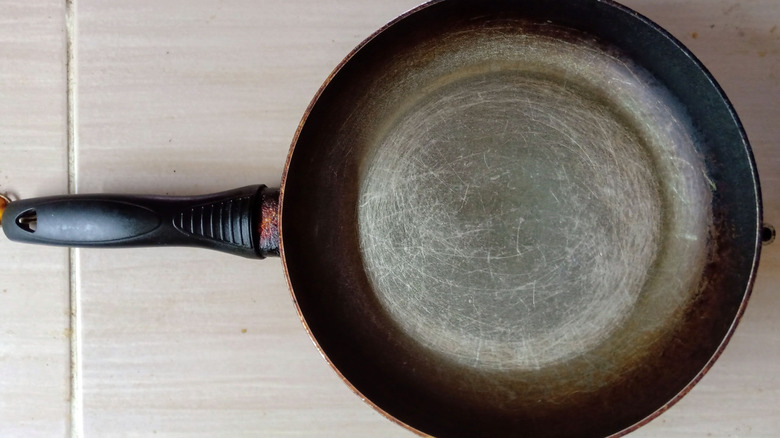
Scratched Teflon, dented sides, a bowed base, or a missing handle are all reasons to ditch an old frying pan. But "ditch" doesn't have to mean "throw away." What a useful shape a frying pan has! Broad and flat with raised sides, you can convert a weathered one into scores of new items. With decorative paper, Mod Podge, a clay pot, and some trim, a sad pan can become a countertop pedestal tray that's as useful as it is cute. Caroline from the YouTube channel Caroline's Creative Corner did just this with a tired old pan. An autumnal paper napkin decoupaged to the exterior hides the pan's past life. An upturned terracotta pot acts as a pedestal, raising the pan up cake stand-style, and a lick of paint and jute twine trim top it off.
Take advantage of an old pan's potential with the abovementioned supplies along with a couple of paint brushes, fine grit sandpaper, a glue gun, and a reliably durable glue like E6000. If your pan handle has accessible screws (since you'll be removing it), grab a screw driver. If not, you can jimmy the handle off like Caroline did — a pair of pliers and a bit of might should bend away any damage incurred by the less than delicate process.
Using paper napkins for decoupage is growing in popularity. For beginners, it's an easy intro to using decoupage in your home, since the thin material smooths well over surfaces. Plus, printed paper napkins come in just about any pattern you can imagine. You can even forgo decoupage in favor of a solid paint color for your creation.
Prepping the pieces of a frying pan counter stand
Caroline clearly has a steady hand for painting, but since many of us don't, the first step you should take after removing the pan's handle is painting the interior of the pan. Alternatively, you can paint the pan's exterior and decoupage the interior; in the latter case, invest in the more durable Mod Podge Hard Coat. (It's not water-resistant, but it will do a better job safeguarding the decoupage against wear and tear.) If you plan to place food on the tray, use a food-safe finish where appropriate. Mod Podge isn't food-safe, so it's best not to place fruit, vegetables, or other uncovered foods directly on surfaces treated with it.
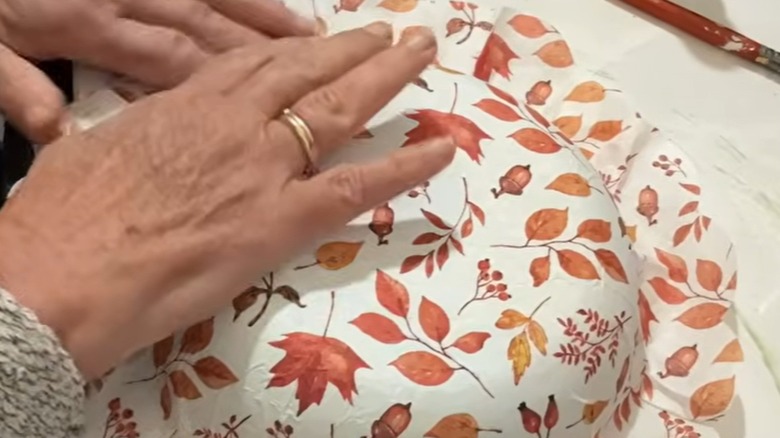
Give your de-handled pan a wipe down with soap and water, and paint whichever portions of it that you'd like — paint the whole thing if you want! Let the coat(s) of paint dry fully before moving on to the decoupage task. Unfold the paper napkin, and peel away the non-printed ply. Paint a generous layer of Mod Podge over the area you'll be applying the napkin, and place the center of the open napkin over the center of the pan. Smooth the thin paper over the surface, gently pressing out folds and wrinkles.
The sandpaper is useful for removing excess napkin material. Working from the outside in, use light pressure to sand away the paper where it overlaps the lip of the pan. Conversely, if you've decoupaged the pan's interior, work the sandpaper from inside out. Save your napkin scraps; they're brown materials to give your compost pile a serious carbon boost.
Finishing touches on a pan-turned-counter stand
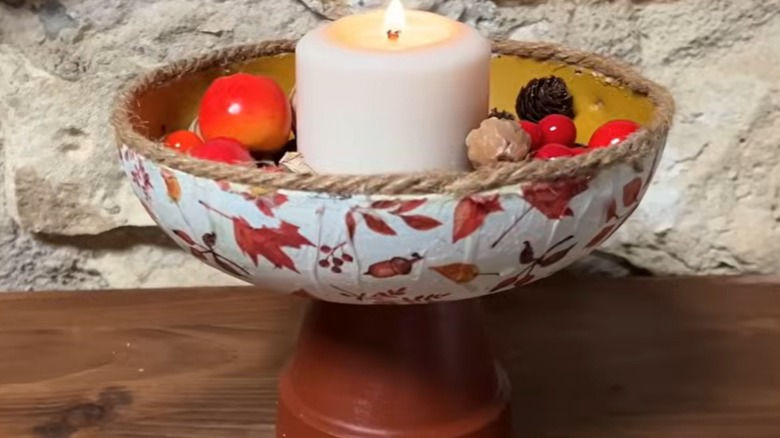
Before mounting the pan atop the terracotta pot, give the paper surface at least one coat of Mod Podge, and let it dry before handling it. Warm terracotta tones might complement your napkin pattern. If so, enhance its earthy glow. Rubbing a little olive oil on your terracotta planter can temporarily deepen its color and help disguise white mineral deposits if you're repurposing an older one. Plain vegetable oil works for this trick, too. You can also paint the pot in a color that complements the napkin print.
Squeeze a liberal amount of E6000 to the base of the upturned clay pot, then center the pan on top. Patience is key here; give the glue a good 72 hours to cure and reach its maximum hold before manipulating the stand too much.
If the open screw hole left behind by the handle bothers you, gluing on some trim is a quick fix. To edge the lip of your pan with jute or another attractive trim, dab a bit of glue on the cut end to prevent the material from fraying before gluing the string to the pan's lip. Gluing as you go, press the trim around the rim of the pan. A second rotation with the trim could be useful to cover the handle's screw hole completely. Seal the cut end of the trim again with glue before pressing the last bit into place. Once it's ready, it'll look polished on a countertop or as part of a centerpiece. It can even accessorize a coffee table while showing off a rock, shell, or pinecone collection.