Not A Traditional Shoe Cabinet: A DIY Way To Store Shoes With Rustic Charm
We may receive a commission on purchases made from links.
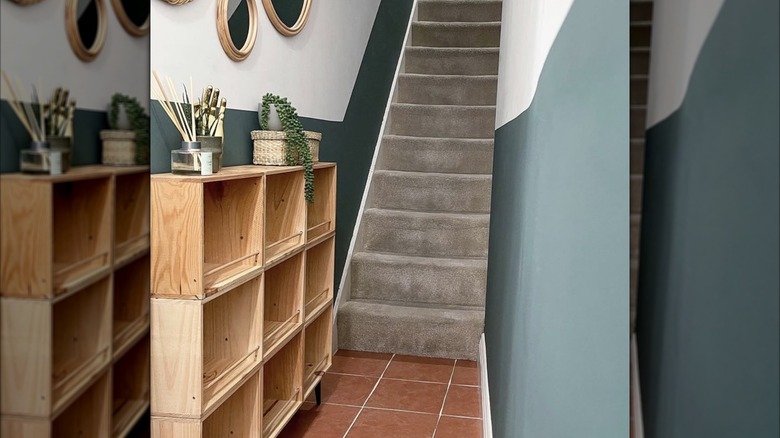
Whether everyone in your family is leaving their shoes strewn about the floor or your own collection has grown substantially over the past year or so, you need somewhere to store your footwear so it doesn't become a trip hazard. In short, it's time to add some shoe storage. However, shoe cabinets aren't always the most attractive pieces of furniture. If you care about aesthetics, you need a new approach to ditch the entryway clutter. A better way to store shoes and save space means DIYing footwear shelving from old wooden wine crates. You simply lightly clean up the boxes, screw them together, and add some feet.
By using an upcycled product, you're creating compact, cube-style shelving that comes with some heritage. Real used wine crates have stamped branding and a natural patina that exudes warmth and charm. Plus, since wine crates are less than 17 to 18 inches deep, they're especially helpful for anyone with a narrow space to fill. For comparison, standard shoe cabinets are typically 12 to 16 inches deep.
You'll need, of course, some old wine crates — a three crate by three crate cabinet requires nine crates in total, though you can vary the number based on your needs. Etsy and eBay have authentic wine crates, as do specialist suppliers like The Crate People. This could also be a clever way to repurpose Dollar Tree wood crates for home decor and storage. The discount store's Standard Wooden Crate with Handles measures a bit under 10 inches wide, 13 inches tall, and 18 inches long, which easily accommodates the average men's and women's shoe sizes. You'll also need some sandpaper, a drill, a ¼ inch Forstner bit, wood screws, and a level. Finally, get a long length of ¼ inch-thick dowel for each row of shelves.
How to craft a shoe shelf from old wine crates for your entryway
Begin by lightly sanding your wine crates to remove any rough texture and splinters — be careful not to damage the lettering or branding. Lay the wine crates, base-down, on the floor or other large work surface and drill them together using the wood screws. Periodically check that they're level as you go. Once the crates are connected securely, it's time to add a gallery rail to each row. This is what will keep your shoes in place. Fit your drill with the Forstner bit and drill adjacent holes in each crate wall, about an inch above what will be the bottom of each row when the cabinet is standing upright. You can use pieces of masking tape as guides if you need them. Slide the long dowels through the holes and screw them in place on the outside of the cabinet.
The last step in making this cabinet is adding some legs, and this is where you can get a little creative. If you've been reading through a few ultimate guides to rustic decor, you'll know that the countryside vibes of a classic, all-timber look simply can't be beat. Consider something like these 6-inch Kddeon Solid Oak Wood Furniture Legs for about $30. Or these 6-inch SunVFaFa Heavy-Duty Satin Black Metal Furniture Legs for about $24 will give your shoe cabinet a mid-century modern vibe. Once the cabinet is put together and feels sturdy, you can set it in place in your entryway, mudroom, or walk-in closet. The garage is another great spot for this crate, if you typically enter the home from there after parking your car, as is outside on a covered porch. Finally, you're ready to store your shoes!