

Transform A Simple Plank Of Wood Into A Chic Countertop Tray With Thrifted Door Knobs

We may receive a commission on purchases made from links.
As the saying goes, the road to a cluttered garage is paved with good intentions — or something like that. Whether you've actually built a treehouse, finished a furniture piece, or reinforced your roofing, chances are you have leftover wood pieces sitting in your garage. They might stay there for months or years unless you take action! If you're eager to free up space on your workbench, combat countertop clutter, or set the stage for a fun tablescape idea for any occasion, you're in luck. There's a beautiful wood trivet you can DIY, and you'll only need a plank of wood and four small door knobs for the feat.
Nearly any size board will do! Consider cutting it down to the shape you'd like. Screws and a drill will be helpful to assemble the tray, although a sturdy glue can also be used either to build the tray or to provide extra security. If you're having trouble hunting cabinet door knobs down in a thrift store, check your local building salvage yard, furniture resale shops, or antique stores. Amazon also has affordable options, like these Cangder 20-piece Unfinished Wooden Cabinet Knobs. Wood knobs will be easiest to drill through and attach to the bottom of your project, but metal or ceramic knobs could work too. Before bringing them home, make sure all four knobs are the same size, since you'll want your tray to stand without wobbling.
Knobs turn a simple board into a footed tray
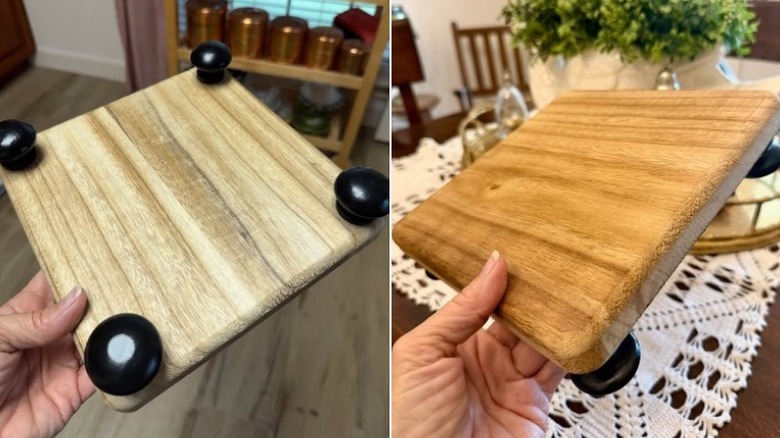
To begin this DIY project, prepare your wooden board by sanding all sides until you're happy with the feel. If you prefer a more rustic look, consider leaving the board with some rough texture, choosing a live-edge option, or reaching for a rough-hewn cedar plank. To prepare each of your cabinet door knobs, drill a pilot hole that reaches all the way through from the front. Using screws that are long enough to pass through the hole and into your board, attach each of the four knobs at four corners on underside of the board. Be careful that your screws don't poke through on the other side. You can use super glue for extra hold or as an alternative to screws.
Once the basic construction is done, customize this tray to complement your kitchen! For example, you could paint or stencil small floral details or use a soldering iron to burnish a custom family name, then apply a semi-gloss clear coat for a polished yet natural look. Alternatively, paint the tray a solid color or use chalk paint for a vintage look. This DIY is just meant to be decorative, but if you plan to serve foods on the tray, be sure to use only food-safe paints, finishes, or sealants.
In addition to wrangling countertop clutter, this tray is excellent for creating an elevated holiday tablescape. Display flower vases and votive candles up on the platform, or use it like a trivet to hold big dishes during family meals. However, don't put hot dishes on top of your tray unless you leave the wood bare, since direct heat can discolor or deform many sealants or cause them to stain your cookware.