

Gardener Builds Epic Garden Stepping Stones Entirely From Concrete And Serving Trays
We may receive a commission on purchases made from links.
Because no two are exactly alike, DIY stepping stones can add a fun, personal touch to your yard. Making your own stepping stones is also often cheaper than buying them pre-cast, especially if you're covering a long pathway. For example, a three-pack of PINPON 10-inch Sunflower Stepping Stones on Amazon will run you over $30. But with a few basic materials and a little creativity, you can make as many stepping stones as you need for a fraction of the cost. That's what Instagram creator Natalie Nuernberger (@nuernherkeep) did. Inspired by an image she saw online, Nuernberger took viewers through her process for making DIY stepping stones from plastic serving trays. After filling the trays with quick-set concrete, she pops out the hardened molds and paints them to look like flowers — perfect for a whimsical garden.
Nuernberger uses Quikrete Sand Topping Mix, which worked flawlessly for her stepping-stone DIY. That said, for the steps' shapes, there's no need to use exactly the same trays as molds if you plan to replicate her project. Search your local thrift store or the dollar store for party serving platters, pie pans, veggie trays, deviled egg trays, and more. Round trays with separated compartments are ideal to achieve the flower-like shape, but there's no shortage of funky designs you can experiment with. For this project, you'll also need something like these Cooking Concept Mesh Grill Trays from Dollar Tree, cooking spray to grease the molds, and a mask to protect your lungs from the concrete mix.
Using serving platters as stepping stone molds
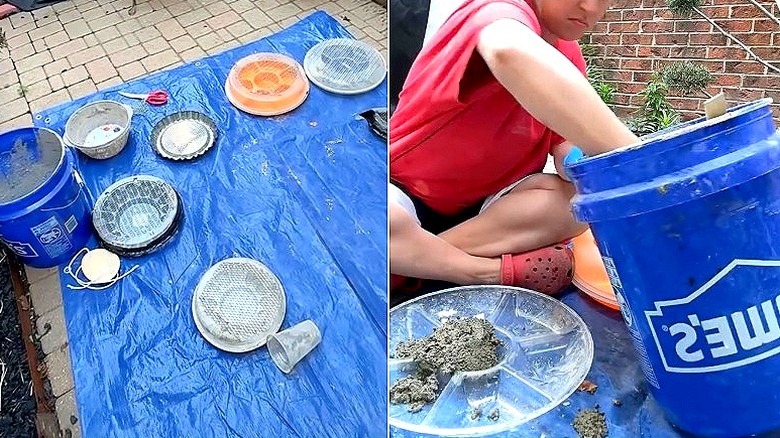
To DIY your own stepping stones from serving trays like Natalie Nuernberger, start by laying out a tarp in your garage or driveway, then set out your materials. Carefully trace the outline of each tray onto the wire mesh grills with permanent marker, then cut them down to size. For this step, you might need heavy-duty scissors like these by Ftecybo (Amazon, $18.99) to get the job done.
After donning a mask, open and scoop the Quikrete mix into a large, clean container, like a plastic storage bin or a bucket. Add water according to the directions on the bag, and then thoroughly mix it. (Keep any unused dry mix in a sealed bucket or container). Spray cooking spray inside each mold to ensure the concrete won't stick to it later. Note that olive oil works well as a mold release agent, especially if you're hoping to save money and use what you already have.
After filling each mold about halfway, Nuernberger presses a cut mesh grill into the wet cement, then tops it off with more Quickrete. This inner mesh will prevent the stepping stone from cracking under pressure. You can also make the step stronger by making it thicker (get creative with using pie pans or lids on the back of each tray). The concrete will need to set for about 24 hours before it's firm enough to remove the mold. Plus, you can use any leftover quick-setting cement for another easy décor project: cement cones!
Releasing and customizing each stone
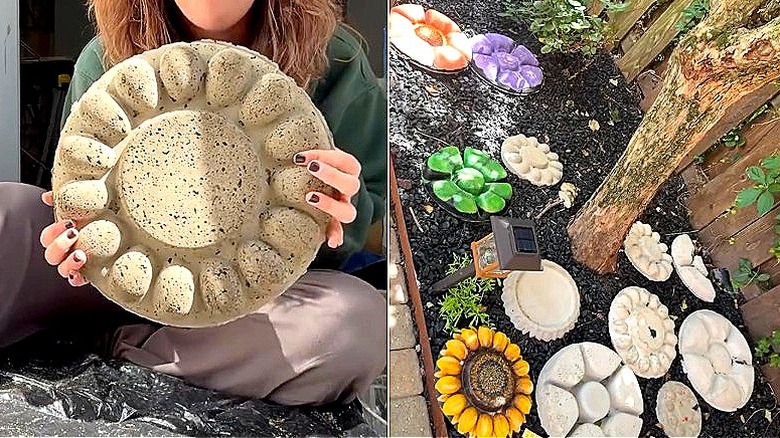
After a long overnight wait, Natalie Nuernberger prepared to pop each petaled stepping stone from its mold. "I couldn't find any examples of stepping stones made from a deviled egg tray, so I have no idea if this is going to work," she explained in her Instagram update. When she did pop the stone out, she seemed just as surprised as her viewers by the adorable results, saying, "It looks like a little flower! Guys, this is so cute! It looks like a little sunshine."
In later videos, Nuernberger explained her process for painting and sealing each stepping stone to give them a unique design, choosing colors and themes inspired by their shape, like a clover for the four-lobed stone. If you plan to paint your own stepping stones, acrylic paint seems to work best, followed by a few layers of Rust-Oleam Painter's Touch 2X Ultracover Matte Clear to protect them against the elements.
Of course, it wouldn't be an honest DIY without some opportunities to experiment, troubleshoot, and improve upon the original design. Some commenters on Nuernberger's page, for example, noted that these stepping stones wouldn't be very comfortable to walk on due to their deep and widely spaced bumps. Others worried that they might even twist an ankle.
One solution could be to partially bury the stepping stones, filling the gaps with soil or sand so that the raised bumps protrude less from the ground. This might also create an intriguing look, where the pathway seems to be made of many small stones arranged in the soil, rather than obvious steps. And, if the divided platters themselves seem too thin or unstable, you could always upcycle the platter lids into concrete stepping stones, too.