

She Covers A Dated Bathtub With Stone To Give It A Modern Upgrade On A Budget
We may receive a commission on purchases made from links.
You've recently purchased an older home and you're in love with it — except for the dated bathtub that makes you grimace every time you look at it. It's no secret that full bathroom renovations can be expensive, but if the room features a decades-old yellow or pink bathtub, you need to at least give that a refresh. Creator and interior design aficionado Krystal Nohai of Our.Nohai.Home has come up with an easy bathtub upgrade you can do on a budget. In her tutorial, she paints the bathtub and the entire shower surround white, and then she adds natural stone tiles to the tub apron (also sometimes called a tub skirt), transforming it from a dated fixture into something decidedly more modern.
This is one of those budget-friendly bathroom upgrades you can complete in a weekend. Plus, it's easy for even novice DIYers, as long as you can get the right supplies from your local hardware store or online. First, you're going to need a Bathworks high-gloss tile refinishing kit from Lowe's. This comes with the primer, paint, and hardener, as well a roller and foam brush. You'll also get instructions on how to use the materials, making repainting your bathtub as easy as possible. You'll be surprised how a simple paint job can make your shower look modern and new — and your bathtub, too. To cover the tub's apron, you'll need a box of AirStone Spring Creek Color Blend Manufactured Stone Tiles, some AirStone Gray Tint Interior Adhesive, and a caulk gun or putty knife to apply the glue. One box of the stone tiles will cover 8 square feet, so this should be enough to finish the front of most bathtubs. However, it's always wise to measure your tub's apron before starting this DIY.
Ready to modernize? How to apply stone tiles to a bathtub apron
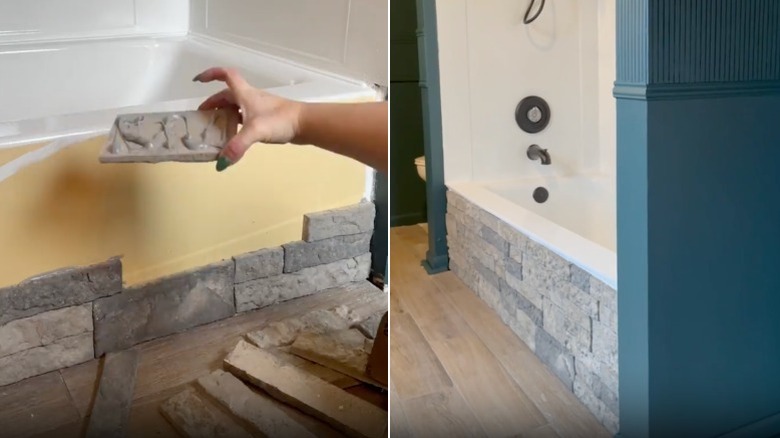
Once you've followed the repainting instructions in the refinishing kit from Lowe's, it's time to add the natural stone tiles to the apron of the tub. First, make sure you bought a box of flat or wall tiles rather than corner tiles. Here's what you need to know about natural stone tile before you buy and apply it: Each tile varies in dimension and color. It's worth taking some time to lay the tiles out on the floor of your bathroom. That way, you can decide on the layout you want before permanently adhering the tiles to the apron of the bathtub. This planning also gives you a chance to determine which stones need to be cut to fit neatly against the wall. Cut the stone tiles using a masonry bit and a hacksaw, a circular saw, or a jigsaw before you start applying them to the tub.
@our.nohai.home This project isn't for everyone and that's okay! Still loving this update in our upstairs bathroom! I know this isn't a permanent fix but it works for now and gets rid of that awful looking yellow tub and shower! Shop link below! https://shoplowes.me/3HYHmYB @Lowe's . #LowesPartner #LowesCreator #LowesFinds #LowesProject #diyhomeprojects
Then it's on to the application process, which is relatively easy. All you have to do is add some adhesive to the back of each stone tile and then press it onto the apron of the tub. Staggering the joints as you place the tiles will make the finish look more natural than if the tiles line up neatly. It's more like finishing a jigsaw puzzle than laying a brick wall. If you make a mistake during application, remove the tile right away, before the adhesive dries, and reposition it. Wait 48 hours for the adhesive to cure, then seal the stone with a high-quality concrete, masonry, or stone sealer, such as Serveon Clear Natural Stone Sealer, to protect the surface from moisture. Test the sealer on a spare tile first to make sure you're happy with the look.