How To Clean Refrigerator Coils For The Best Maintenance
We may receive a commission on purchases made from links.
For homeowners, cleaning is more than just a way to keep the home smelling fresh and hold disease at bay — it may even save you money. Broken down and inefficient appliances are an expensive headache, particularly when you're dealing with a major item like the fridge. According to Angi, the average refrigerator repair cost floats around $200 to $300, a hard cost to swallow that gets even harder when you realize you could simply clean your fridge to make it last longer. Nobody makes a big deal out of it when you buy your fridge, but cleaning your condenser coils twice annually can be a huge help in keeping it running at peak efficiency.
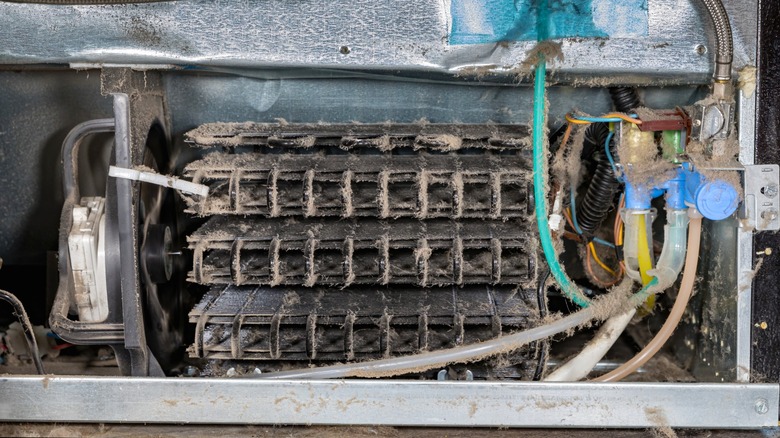
Much like the outdoor unit of your central A/C, condenser coils help the fridge release heat and keep the interior contents cool. When covered with dust, the coils are insulated, subsequently making them get rid of heat much less efficiently. It can get especially dirty if you have pets that shed significantly. The compressor has to work harder to keep the fridge cool, and the unit may not get as cold as it should be. In some cases, it can cause food to freeze in the fridge. Overall, it puts wear on the unit and adds to the energy bill. After doing a deep clean on the inside, a quick refresh of your fridge's coils can go a long way in making your fridge last longer and work better, saving you money now and in the long run.
How to clean your refrigerator coils for optimal performance
Much like the other steps involved in deep cleaning your fridge, having the right tools can make condenser coil cleaning quick, effortless, and effective. At a minimum, you'll need a vacuum. A brush attachment can make it easy to dislodge dust and debris from coils, while a crevice tool will get into hard-to-reach areas. If possible, get a flexible crevice tool to squeeze under the fridge and around components for a complete cleaning. A long brush, such as the Cuitrent Refrigerator Coil Cleaning Brush, will also help clean out dust between coils where other tools can't reach. If needed, you could swipe a paintbrush around to reach between the coils in a pinch. While it isn't 100% necessary, you can also bring compressed air into the mix to help blow dust loose from the coils.
Pull the fridge carefully away from the wall. Unplug it, and locate the coils. Sometimes, they'll be under the refrigerator and accessible from behind a front toe kick. Just pop the front grate off, and use a flashlight to look for the coils under the unit. Alternatively, the coils may be behind an access panel at the back. You can usually take the panel off by removing a few screws. Once you locate them, vacuum the coils, using the brushing and/or air to continually dislodge dust, dirt, and hair. Vacuum around and behind the appliance before putting it back against the wall, and take comfort knowing your fridge isn't wasting an ounce of energy keeping your food fresh.