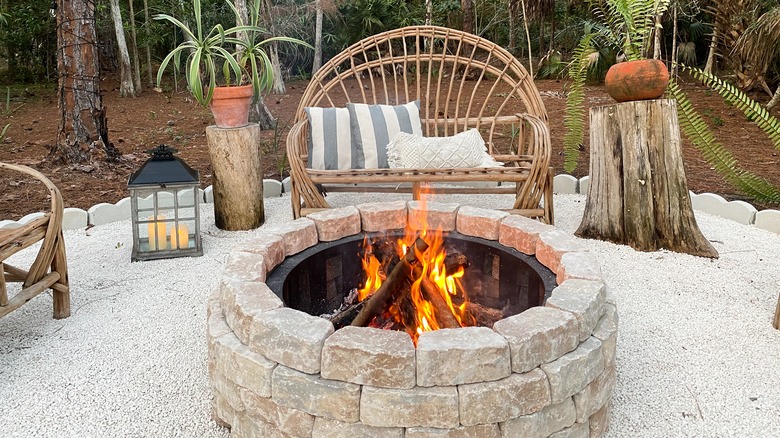
How To Create A DIY Fire Pit In Your Yard
We may receive a commission on purchases made from links.
There's a certain kind of feeling you get when sitting around a fire with your friends or family. That sense of warmth and coziness from the open flames and the soothing sound of crackling wood is enough to put anyone in a relaxed state of mind. Luckily, you can bring home that campy atmosphere that you might think can only be found at cottages or outdoor camping adventures. Building a backyard fire pit can be a simple and cost-effective way of pulling together an entertaining outdoor space. If you are impatient, then this type of do-it-yourself project might be right in your wheelhouse. With proper planning, you can build your very own fire pit in one afternoon.
Before you get too ahead of yourself, there are a few things to consider before getting to work. First and most importantly is making sure that recreational backyard fire pits are approved in your city. Local laws differ from area to area, so be sure to check before you spend energy and money on your project. Next is choosing a location in your backyard. For safety reasons, you want to ensure that your new fire pit is far enough away from your home, your neighbors, and your fence so that there isn't the risk of fire damage. As a rule of thumb, you should keep your fire pit at least 10 feet away from any structure or anything that could catch fire, according to This Old House.
1. Consider the size of your fire pit then gather your materials

Once you have the perfect location picked out, it's time to think about the size and shape you want your fire pit to be. Circle fire pits bring to mind crisp evening campouts that might make your backyard environment feel more cozy and welcoming; however, when it comes to shape, it truly is a matter of personal preference.
The design you choose could also depend on the materials that are available to you. Big box home improvement centers can have a wide range of angled bricks or stones that may inspire the direction you take your project. For the interest of this article, we will be discussing a circular fire pit. A standard backyard fire pit can stretch upwards of 4 feet in width, so you should buy enough bricks, rocks, or stones to accommodate the dimensions you desire, according to Home Depot. For this DIY project, you will need a shovel, level, rubber mallet, steel fire pit ring, stone pack (made of stone dust and small stones), tamper, blocks for the outside of your pit, and concrete adhesive. If you plan to use river rocks or stones you have gathered yourself, you need to ensure that they dry out before stacking them around your fire pit. Sometimes porous stones like pumice, sandstone, and river rocks hold pockets of water which, when heated, might cause the rock to explode, potentially causing harm, as per RST Brands.
2. Outline the area and dig your hole

First, lay out the first layer of stones or blocks in the shape that you want. Once it's in the exact shape you want, simply mark the area that you will be digging by using your shovel to edge out a line along the outside of the blocks. Then you can move the blocks to the side so that they are out of the way. Lay down a tarp beside where you are going to dig. This is going to hold the dirt so that it doesn't ruin the surrounding grass on your lawn, per This Old House.
Next, grab your shovel and make square cuts in the grass below the space you marked out. Place these clumps of grass on the tarp so you can reuse them to fit around your finished fire pit. Once the top grass layer has been removed, you can continue to dig out the dirt, placing it on the tarp next to your square grass clumps. Dig the hole until you have reached about 7 inches under the surface, according to HGTV. Then in the center of your fire pit, you are going to dig a further smaller circular hole another 5 to 7 inches under the surface. This will serve as a well for groundwater to escape to. Once done, you can tamp down the soil until it is level and compact.
3. Prepare the hole with the stone pack for a sturdy foundation
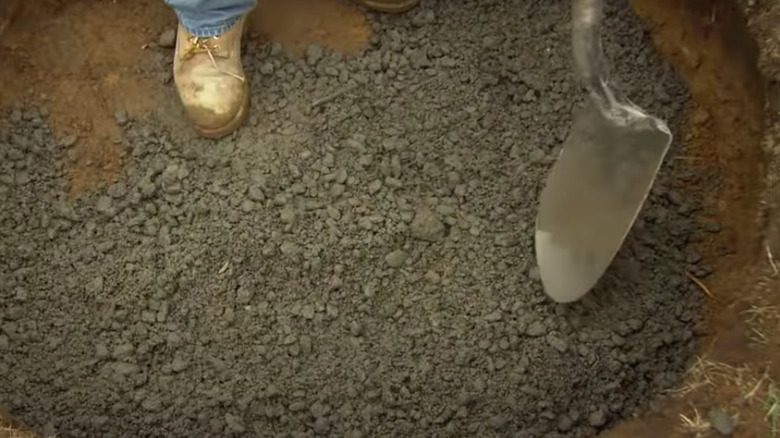
For the smaller hole in the bottom of your fire pit, fill it in with small loose stones. This will provide enough space for water to pass through so that your fire pit will not flood on a rainy day or when you douse the flames after use, per This Old House. Next, start to fill in the rest of the hole with your mixture of the stone pack. The combination of stone dust and small stones with a little bit of water to bind them together provides a nice hard foundation to start laying your first blocks.
Although you might be tempted to pour in a layer of quick-drying concrete, this might not prove best, as the material may crack under high temperatures, according to JS Brick Corporation. If you would rather use cement instead of the stone pack, you should consider purchasing refractory cement, which can withstand the heat. Continue pouring the stone pack into the hole until it is about an inch or two thick, then tap the material down with your hand tamper. Keep pouring and tamping down the stone pack in layers until you are about 4 inches from the top of the hole.
4. Lay down your blocks
With your foundation solid, it's time to start putting down blocks in order to build up your fire pit. First, grab your steel fire pit ring and carefully place it in the middle of your pit. Take one of your angled blocks and place it tight to the side of the ring. With your rubber mallet, smack the top of the block so it sets into the stone pack below. Then take your level and ensure that the block is both side to side and front to back. This will act as your keystone to make sure all the other blocks are perfectly level, as per This Old House. Now you can continue to lay down blocks, tap with your rubber mallet, and level them until you have completed the first layer around the steel fire pit ring.
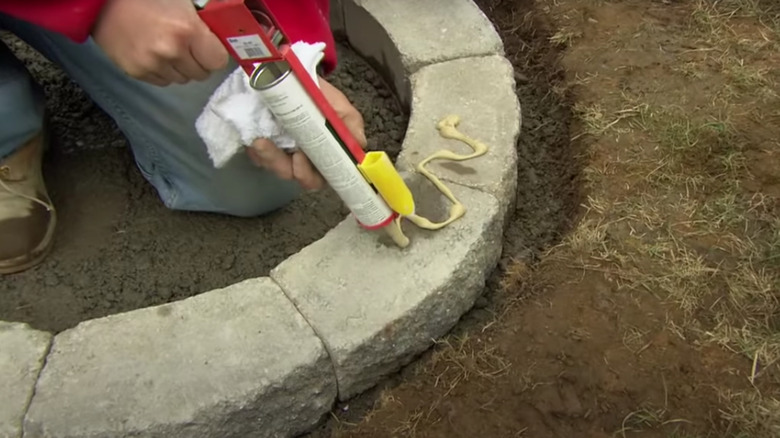
For now, lift the steel ring out of the middle and set it aside. To start constructing the second layer, you will now add some concrete adhesive across the half of two blocks so it spans the joint in between. Then take an angled block and place it on top so that the joint from the bottom two blocks is in line with the middle of the top block. Wiggle the block to spread the adhesive along the bottom and make sure it is aligned. Now you can continue to put down the adhesive and build the blocks until you have reached your desired height.
5. The final steps to your fire pit
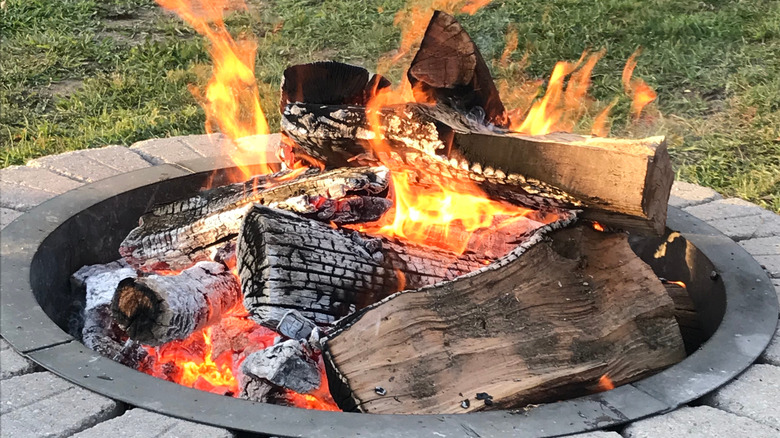
Now that the blocks are built, it is time to perform the final touches to your fire pit. Take your steel fire pit ring and place it back into the middle of your pit. You might notice that the ring doesn't reach all the way to the bottom of your block structure. That is because you still need to fill the middle of the fire pit with small stones until it reaches the bottom of the steel ring. This will help protect the exposed blocks' inside and create a nice layer for the bottom, per This Old House. Because these small stones will be directly exposed to the heat of the fire, you want to choose ones that don't hold a lot of moisture. Water trapped in porous rocks could heat up when the temperature rises and cause the rock to explode, according to DIY Home Guru. Lava rocks or fire pit glass are a good option as they can hold up to hot temperatures and won't absorb water. Carefully spread the rocks evenly, allowing a little divot in the middle.
Finally, you can use the dirt and grass clumps you set aside to repair the outside of the pit so it can encourage the grass to regrow and blend perfectly with the rest of your lawn. Now that your new fire pit is ready to go, you can place some dry firewood in the middle and enjoy.