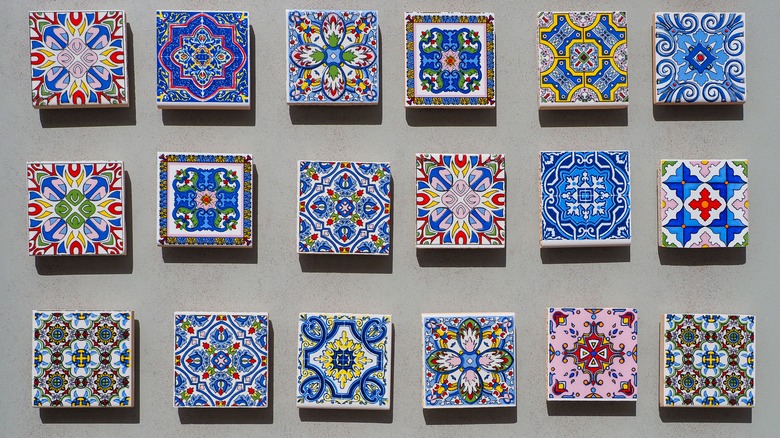
5 Genius Ways To Use Your Leftover Tiles
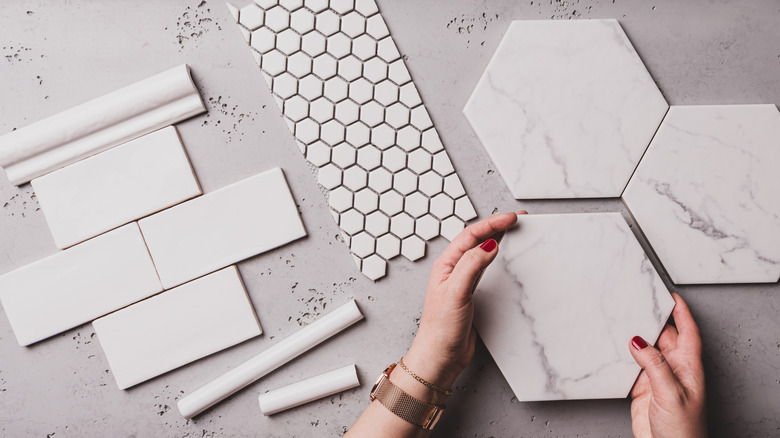
When remodeling or designing a bathroom, kitchen, or any other room with lots of moisture, you'll likely find yourself with a lot of tile on your hands. It's an excellent option for both floors and walls, being highly durable and easy to clean while remaining stylish. As a bonus, it's an eco-friendly material compared to other popular flooring and wall materials, per Florida Tile.
A good rule of thumb when installing anything in your home is to get more than you think you'll need. This includes vinyl flooring, paint, wallpaper, and, of course, tile. Measurements aren't always accurate, and mistakes are bound to happen, making it better to have leftover material than run out. However, you may find yourself with excess spare tile without knowing what to do with it. While you could turn it into a recycling company or sell it, there are also some creative things to do with your leftover tile to incorporate it into your home still.
1. Turn them into coasters
One effortless way to use your leftover tiles is to turn them into coasters. This can be as easy or complicated as you want it to be. If you have a unique tile design, you can just set them out and be done. Since tile is water resistant, it's the perfect material to collect condensation and protect your furniture. If you want to have a bit more fun, you can customize your tile. This works best on plain tile with a simple shape and design, but it's not limited to that style. For this DIY, you'll need your tile, some strong white glue like Mod Podge, an image to put on your tile, scissors, a ruler, foam brush, felt pads, and a waterproof sealant, per DIY Projects with Pete.
Begin by thoroughly cleaning the tile, and then prepare your images. You can use maps, postcards, film photographs, tickets, magazine clippings, printed-out images, book pages, etc. Cut it to the size of the tile, apply a layer of glue, and then your image. You can use a roller, plastic card, or another object to get out air bubbles. Let it dry, and then apply more glue to the top to keep it in place. Next, use your sealant. Once everything is dry and in place, add the small felt pads to the underside of the tile, one in each corner, to keep it from sliding around.
2. Tile tray
While the coaster idea is fun, it only works for smaller tiles. If you have larger pieces of tile, you don't have to miss out on the upcycling fun. Love Chic Living has a super easy but stylish DIY to turn larger tile slabs into trendy, functional trays.
To begin, gather your materials. You'll need your tile some resistant rubber padding to keep the tile from sliding around on or damaging your furniture, felt pads, handles, and a powerful adhesive. Begin by cutting the padding to the size of your tile and securing it with glue. Then, install the felt pads in each corner. Next, mark where you want your handles to go, ensuring they're even on each end. Apply the handles with your adhesive per the package instructions, and let it dry completely before use. This isn't the most functional tray for carrying lots of food and drinks, but it is undoubtedly great for display and decorative purposes.
3. Display them as wall art
If you have unique or beautiful leftover tile and some empty wall space, a super simple way to use it is by hanging and displaying it as wall art. While this is a simple concept, the execution is a little more involved than simply tacking it up on the wall. That being said, it isn't difficult.
Per Upcycle My Stuff, for this tile DIY, you'll need either disc plate hangers or a saw tooth hanger with an adhesive back. The disc plate is ideal since it allows the tile to hang perfectly flat against the wall, but the saw tooth hanger works fine. Begin by cleaning off the back of your tiles to remove debris or dirt. Then, apply some water to the disc, let it sit for five minutes, and firmly apply it to the back of the tile. Let it sit for at least 24 hours before hanging on the wall. For the saw tooth hanger, stick it to the back of the tile.
4. Magnets
If you have multiple, smaller pieces of leftover tile from a mosaic or honeycomb-style project, you can very easily put those pieces to both functional and decorative use by turning them into magnets. This DIY is straightforward, and all you'll need is your tile leftovers, glue, and magnet pieces, per The Merrythought Collective.
Begin by cleaning your tiles and getting them all laid out. Your magnet should be strong enough to support the weight of your tile — larger or heavier tiles will need heavier-duty magnets. Make sure it's large enough to support the weight of the tile but not too big so that you can see it from the front. Then, glue the magnet to the back of the tile using a powerful and heavy-duty adhesive. Let it dry completely (roughly 24 hours) before using them. Stick them on your fridge or other magnetic surfaces for a lovely decorative touch!
5. Tile an old table
This last way to upcycle leftover tiles is a lot more heavy-duty and labor-intensive, but it's also a great way to repurpose an old piece of furniture and use up a lot of excess tiles. Extraordinary Chaos says you can turn a glass top table into a lovely, customized tile top table with some plywood, tile, and a few hours. This is an excellent DIY for outdoor patio tables since tile is water and moisture-resistant and can withstand the elements. To begin, remove the glass top from your table and measure it. Next, get a piece of wood cut to those measurements, and use wood glue or another method to attach it to the table.
Before installing your tiles, lay them on the wood to get an idea of where and how you want them arranged. You should also decide at this point if you want an edge material or if you want to leave the edges raw. Once everything is in place, use grout and tile cement to secure them to the wood. If using an edging material, wait until the tile is completely dry to apply it.