The Best Way To Create A DIY Mantel
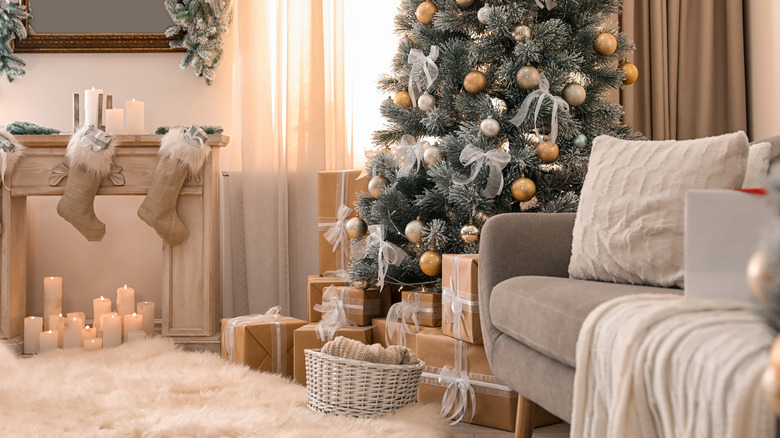
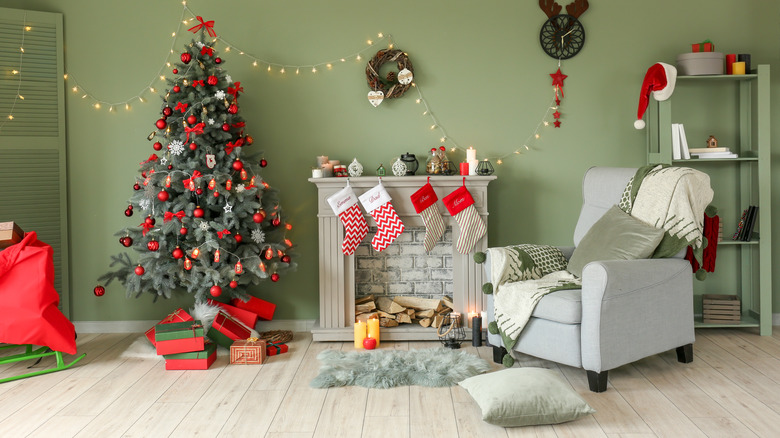
Wondering where to hang the stockings with care when you're without a fireplace for Christmas? We've got your back. You can easily fake your own mantel and fireplace, and you may even love it enough to keep it up year-round. Mantels are a major part of Christmas décor, and provide the backdrop for family moments and celebrations, says Columbia Metropolitan. There are plenty of mantel DIYs that will work beautifully — it's a matter of finding one that fits your budget, skillset, and how much time you can spare. We recommend a hybrid of methods from a few YouTube tutorials for achieving a realistic DIY mantel.
Here's what you'll need for this DIY project: Six cardboard boxes measuring 5½ inches by 12 inches by 19½ inches (buy new at your hardware store, you'll want these boxes to match perfectly), packing tape, peel-and-stick brick or stone contact paper, a black poster board, Command Strips, and hot glue (via YouTube). Optional items are joint compound and a jar of paint — whatever shade you want the fireplace to be! You will not need any special equipment or power tools to complete this mantel DIY, and it can go anywhere in your home where you have some empty wall space. Crafters of all skill levels can do this, but it will take a little patience when it comes to laying the brick out. So let's get these chestnuts roasting and get into it!
Build your mantel structure
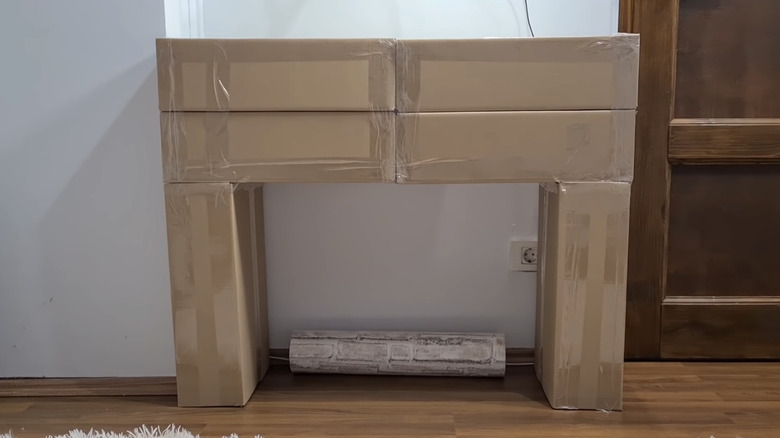
To get started, we'll take a note from the mantel DIY walkthrough by Christmas Loading (via YouTube). This DIY project doesn't require power tools and isn't nearly as messy to work with as foam board. You'll need your boxes and tape for the first step. To start, take two boxes, stack them on top of each other horizontally, and begin taping until they are solidly attached, then repeat with two more boxes. Next, join these stacks to create the top of your mantel with hot glue and tape. Finally, attach the remaining boxes vertically to create the base/legs of the mantel with plenty of hot glue.
If you have little ones or pets and are worried about this structure being knocked over, you can add a book or stack of magazines to the bottom of the boxes before sealing them off to give additional weight. Make sure everything is flush, and use tape and glue as necessary for support.
Pick the right contact paper
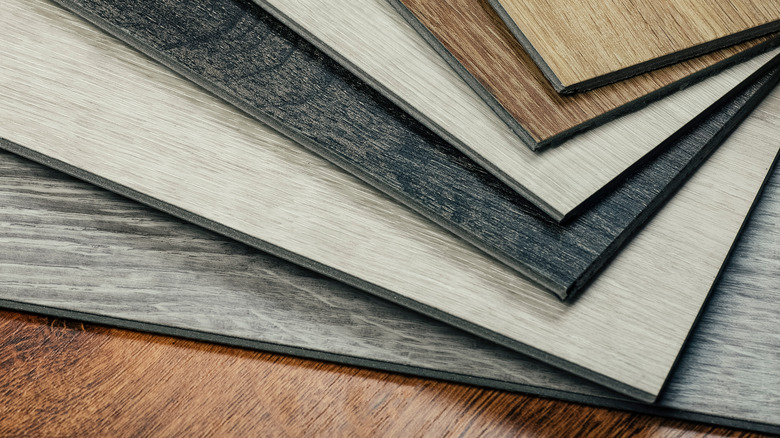
Picking out what to cover your cardboard mantel with can be a challenge; there are plenty of options, and it ultimately depends on your personal style and how much time you want to spend decorating your mantel. Matte marble contact paper, like this one from Amazon, is a great choice if you love the classic and elegant look of lightly streaked stone. It is also much harder to detect unnatural seams, meaning the veining doesn't have to match perfectly. Wood grain contact paper is also a good choice for similar reasons, especially if you have a rustic cabin vibe for the holidays.
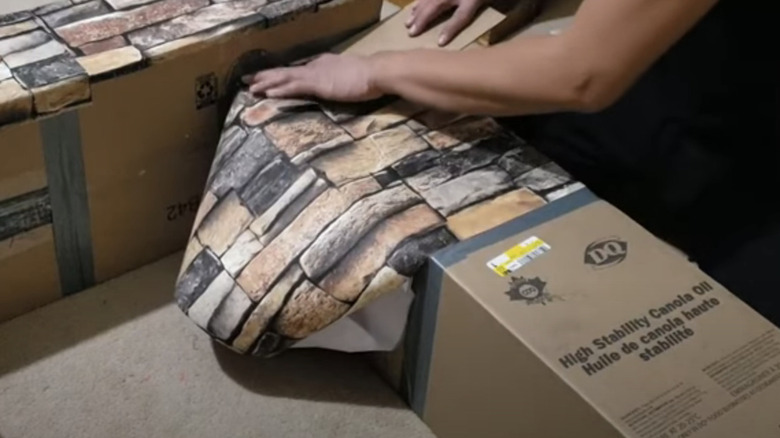
But if you just can't get enough of the '70s stone or all-American brick fireplace, they have contact paper for that, too! However, when it comes to this print, we recommend using textured paper — otherwise, the project can look a bit cheesy. This roll from Home Depot is an excellent choice for lovers of classic red brick, but there are many colors available. This option stands out because of the unique texture on each brick, making the fact that it's a paper print much harder to spot, which is especially important if you plan to leave your fireplace up year-round. But if you go for a more affordable sheet, use joint compound to blur the prints and add a more authentic texture like LaughCryDIY (via YouTube).
Get sticky with it
It's finally time to cover up that cardboard! This is the best step because your project will finally start looking like a proper mantel. It will take a minute to get the layout just right, so here are some tips for this step. First, don't be too quick to peel off the adhesive backing; you want everything to lay flat and evenly, and if your sticky side is already exposed, you may spend time fighting sticky corners and awkward air bubbles. Be sure to measure out the roll before cutting anything as well; if you need to have an exposed scam, try hiding it on the wall-facing side of the mantel. If it can't be avoided on the frontward side, spend some time making sure the actual print lines up as best as possible. This may mean cutting out bricks so you can stagger the print (via YouTube).
Maeng Garzy (via YouTube) provides a thorough walkthrough to help you get the paper to lay nicely and smooth it for super clean lines and corners. If you used a flat texture contact paper like marble, granite, or wood grain, you are ready for the next step. However, if you used a textured print and aren't in love with the color, it's time to paint. Chalk or liquid paint is a great choice for totally matte, stone-like finishes. Finally, attach the black poster board to the back of your faux mantel to cover the wall behind it.
Let's decorate
Once your faux mantel looks finished, it's time to stand it upright and attach it to the wall. Don't skip this step, especially if you have little ones, as the whole structure can come tumbling down. Use Command Strips to attach your DIY mantel to the wall.
Finally, it's time to get onto the fun part — decorating! Because you built your mantel with cardboard, there are many options for hanging decorations up, like staples, tape, or hooks. Hang citrus and pine garlands, add the stockings, and string some lights along the top border. If you're feeling uninspired, check out our list of great ways to decorate the mantel for the holidays.
When it comes to adding the fire element to your fireplace, you also have some room to play. Try mixing timber and string lights like Irene – My DIY Life Diaries (via YouTube) or LED battery-operated pillar candles used by Yellow Girl (via YouTube). You can also stack firewood or even books for a less sparky display. Either way, you now have a perfect faux fireplace that will really make your house feel like Christmas.