These Drywall Repair Hacks Will Save You Time And Money

We may receive a commission on purchases made from links.
Drywall is found throughout most homes, from bedrooms and hallways to ceilings and basements, which means there's a lot of opportunity for damage to occur. Cracks, holes, tears, and other problems are common and can be the result of natural wear and tear, but they can quickly expand into larger repair jobs. You might think a new coat of paint will cover most of these blemishes, but that's a temporary solution that will only put off the inevitable repair project.
Most panels of drywall are made up of only thin paper and gypsum, which is a delicate mineral that can crumble easily and really deteriorate if it gets wet. The corners and edges of furniture and other heavy items can cause a pretty nice-sized hole or ding with only a little force. Cracks can appear when the seasons change or humidity rises and falls. Shifts in the foundation, powerful winds, and buckling floors can also create fractures in weaker parts of your walls. No matter how the damage occurs, leaving it for too long can lead to more costly and bigger repair jobs. Drywall can be hiding complicated electrical work, plumbing, or insulation, and if what's behind is out in the open it could be a dangerous hazard to have in your home.
A drywall repair might seem like a job for professionals, and sometimes it is, but don't be intimidated. If you're handy with a putty knife and can take good measurements, then you could easily make this a do-it-yourself project to save money and time. Here are nine drywall hacks that can make your home project a breeze.
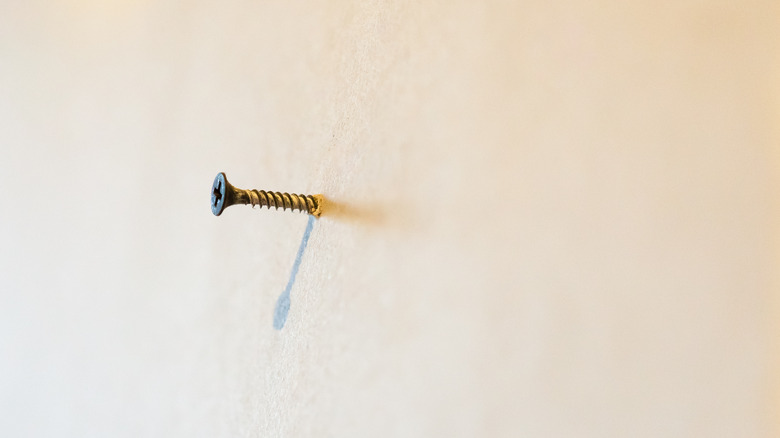
Use a primer-sealer and joint compound on ripped drywall paper
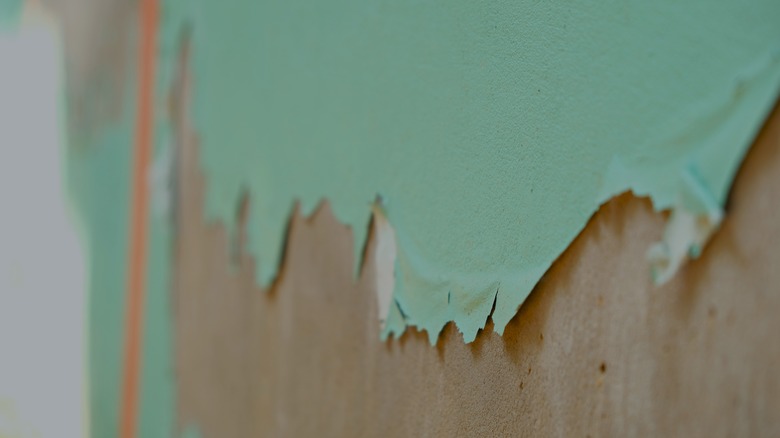
Standard drywall is made of paper and minerals, which looks finished, smooth, and professional when it's in good condition; however, it's rather delicate and can often rip, get dented, dinged, or marked up. The paper or the facing on drywall covers the pressed, powdered mineral known as gypsum inside and gives you that desirable surface that can be primed and painted easily. The facing is a perfect surface for paint and primer to stick to but if it's ripped, the exposed gypsum underneath will soak up paint and primer like a sponge.
The trick to repairing ripped paper, whether it's a small patch or a large chunk, is to use both primer-sealer and joint compound. The combination will breathe new life into your room with a flawless finish. Step one is to cut away the excess ripped paper as much as you can. Any loose ends or scraps will make the job more difficult. Next, apply the primer-sealer. A product like KILZ Interior Drywall Water-based Wall and Ceiling Primer from Lowes will work great because it will reseal the powdery mineral component under the paper. Most types can be applied with a roller, bristle brush, foam brush, or sprayer, for an even layer over the ripped area. Make sure the primer-sealer dries completely before any further steps.
Your final step is to apply the joint compound over the ripped area. You might be tempted to apply this first, but the primer-sealer is what's going to give you a professional finish. Joint compound is a mud or putty that usually dries very quickly and will need to be sanded down. When applying joint compound over the ripped paper, you don't need a thick consistency. Add a little water to the mixture to thin it out and apply only a single layer.
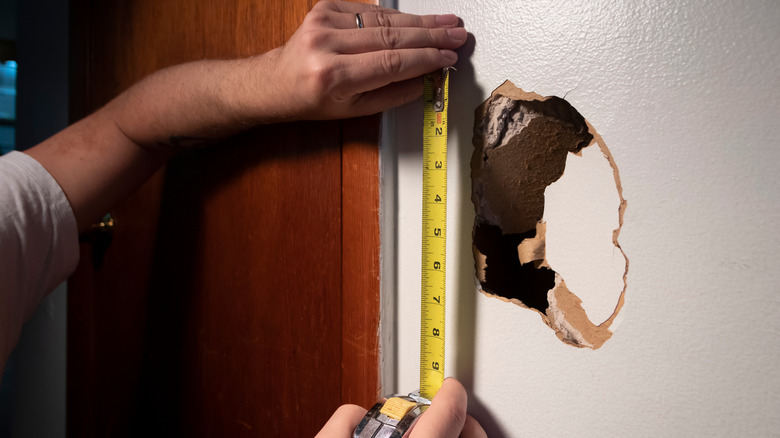
Don't skip the tape when repairing a crack
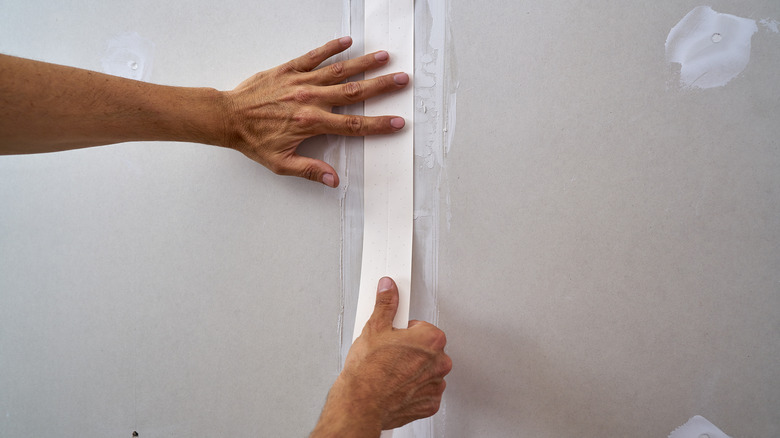
Cracks in drywall are unfortunately very common and frequently occur in corners and around windows and doors where there are weak spots in the walls. At first, they might not seem like a big deal, but over time they can grow and become an unsightly blemish in your otherwise perfect room. One hack to remember is to always repair minor cracks as soon as you notice them with mud or compound but, most importantly, remember to never skip over the tape. This one extra step will save you time and money.
Applying a strip of tape over a filled-in crack will help ensure that it stays closed. It will help reinforce the area and make repainting a lot simpler. The first step is to widen the existing crack just a little to make room for more joint compound or spackle. Clear away any debris/dust and allow the joint compound to fully dry before applying the tape. Most compounds shrink as they dry and you might need to add a little extra layer on top to smooth out the surface, which would be difficult if it's sealed under drywall tape. Various brands of tape will need to be applied over compound or mud to make it stick, or there are self-adhesive options. Be sure to clear away any dust before applying adhesive tape or it may not stick. Use a putty knife to apply even, thin layers of mud onto the drywall under the tape and another layer over the tape. Using the knife, you can gradually even out the edges to minimize sanding, but be sure to use enough or the tape will pop through. You'll be left with a reinforced wall that is easy to paint over.
Use a wet sponge instead of sandpaper for your finishing touches
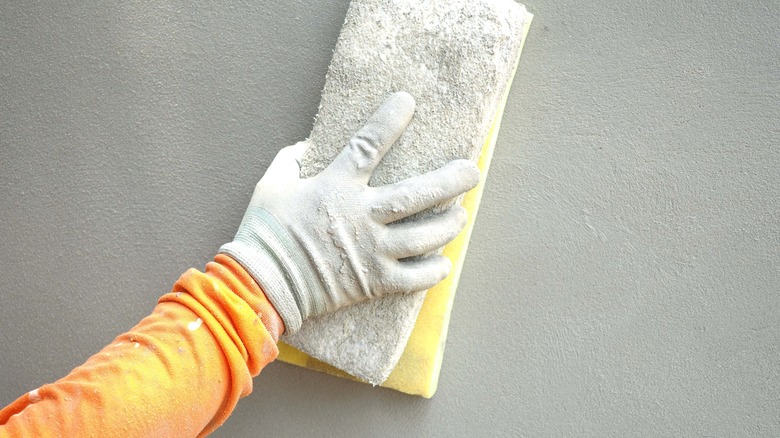
Sanding drywall is a tedious, frustrating step in any repair job. The sandpaper alone comes in too many different options, it's uncomfortable to use, and is overall just a dusty, annoying process. Unfortunately, it's also the step that really finishes the job and gives your room a professional touch. If you're working on a small sanding job when repairing drywall, a tried and true hack is to swap your sandpaper for a damp sponge.
Spackle and mud tend to dry quickly but they are delicate materials that can soften, chip, and break down easily. This is why sandpaper transforms clumps of mud into dust. However, with just a little moisture, the mud can also soften and be smoothed out. Even though this hack will result in less dust, you should still cover your floors and furniture to protect them. Grab a small bucket of water and an extra firm sponge that doesn't have many grooves to it. Dampen the sponge and ring it out meticulously. The trick is to have a damp surface, not a sopping one. Using a light touch, work in circles to slowly wear down the spackle or mud into a smooth surface, just like you would with sandpaper. It's important to keep your touch light. If you dampen the mud too much with too much water or force then it will become too soft and might wash away. Wipe away drips of water/spackle right away and don't spend too much time on one area. Leaving the spot to dry for a short time will go a long way. Also, remember to clean your sponge regularly with fresh water. Excess mud can build up on your sponge and make it hard to get a smooth surface.
Try an Eclipse® Rapid Wall Repair Patch for a stronger patch
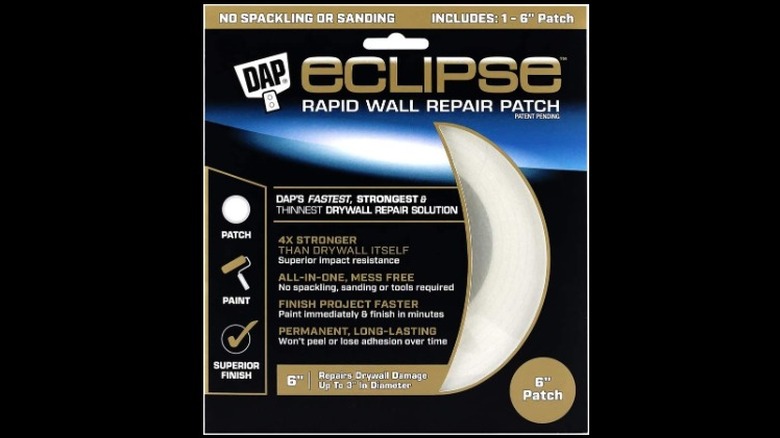
There are endless repair and patch kits on the market that claim to make filling in small holes and divots in drywall a breeze. However, most of those come with more than a few tiresome steps that don't always achieve that super smooth, finished look that some perfectionists might be craving. The Eclipse® Rapid Wall Repair Patch is something any DIYer should always have on hand because it works so well, is easy to use, and is usually priced at less than ten dollars. Repairing even small holes and dents almost always requires drying time and sanding, unless you have this seemingly magical patch.
This brand offers patches in a few sizes from two inches to six inches, which means you can repair everything from a nail hole to a gaping hole in the wall. You simply dust the surface with a dry cloth, remove the adhesive backing, stick, and peel away. You're left with a completely smooth surface that's ready to be painted over. That's not even the best part. The ultimate hack is to use these patches in areas where there's an increased chance for damage, such as where the doorknob might hit the wall, or where a table corner might dig in. The patch is much stronger than typical drywall, which means you can repair a hole and make it even more sturdy or apply them in areas to prevent future damage. At just a few dollars, these patches are a simple and quick way to make a wall look brand new without spackle or mud, and best of all, no sanding. Simply paint right over the patch and you'll never know the difference.
Make a bigger hole to repair large holes to prevent weak spots
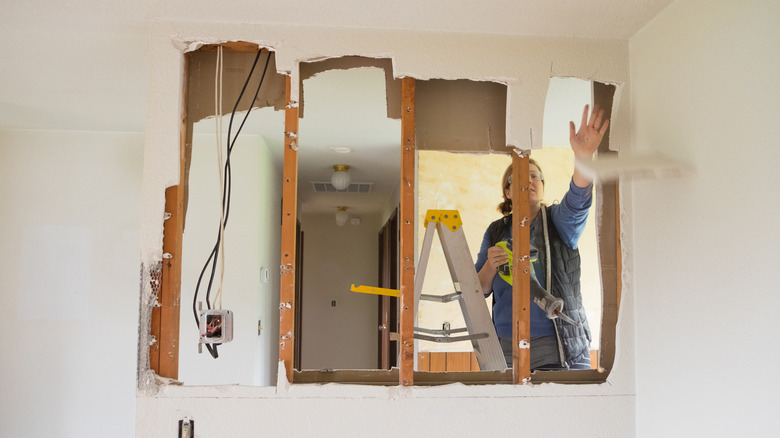
This sounds counterintuitive, there's no doubt. But a larger hole could be a great way to reinforce your wall and prevent weak spots, rather than creating a weak area that just might break again. Another reason to try this hack is when the hole is not a clean break. If the edges of the hole are jagged, cracked, and hanging on by ripped paper, then it's a better tactic to clear away the bad and start with a clean slate.
If you're dealing with a hole that's between two and six inches then you can merely apply a patch. Bigger than six inches is getting into a bigger project. This is when a larger sheet of drywall that can be reattached to studs makes more sense. Using a stud finder or your keen sense of hearing, locate your studs on either side of the hole. This is where you'll want to cut to. Using a drywall jab saw, you can cut a square out of the wall extending to the studs on either side. From here you can use a scrap piece of drywall or cut a new piece to fit the new larger hole. Using drywall screws, attach the drywall to the studs, cover the holes with joint compound, apply tape and mud over the seams, and after sanding you can repaint. This is a much bigger project than applying a patch, but patches are not attached to your studs or reinforced, which means even a small amount of pressure could end up creating new damage. This hack is best for high-traffic areas in your home.
Repair small holes with a homemade cardboard patch
Small holes in our drywall can occur in a myriad of ways and the last thing you want to do is make a quarter-sized hole into a week-long project. Making a homemade patch out of cardboard is a cheap, quick way to fix a small problem and you likely have cardboard lying around somewhere in your home anyway.
The first step is to clear away any cracked drywall or ripped paper from the edges. Once they're smooth, measure the hole and cut a piece of cardboard to be roughly an inch and a half larger all the way around. You don't need extra thick cardboard, in fact, thinner or more flexible cardboard will work best. Once the cardboard is cut to the correct size, cut a hole in the center and knot a string through it. The tricky part will be gently fitting the patch through the hole to the inside of the wall. Use the string to prevent the patch from falling and get your glue ready. Apply some super glue or hot glue around the edges of your patch where it will stick to the inside of the wall. Use the string to pull the patch to be flush with the wall and let the glue set. Once the glue dries you can fill in the hole with mud without worrying that it will fall through to the other side. Apply some tape over the hole to smooth out the surface and sand as necessary.
Use spray foam to patch holes
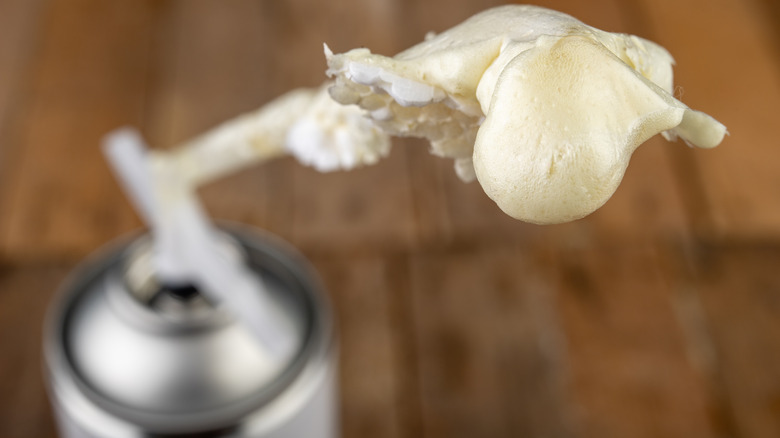
Polyurethane-based spray foams that expand and harden are another excellent option for patching up small holes in damaged drywall. This is often an imprecise method because the foam can change shape once it dries, but it's a simple, inexpensive way to patch minor holes. If sprayed carefully, the foam will stick to the edges of the hole and fill in any gaps, completely eliminating the need for mud or spackle. This airtight method works great for hard-to-reach areas behind appliances or in tight corners. These products are typically very sturdy and cost about fifteen dollars or less. Most products also come with an easy-to-use straw or sprayer for extra reach and control, which makes application simple and fast. Great Stuff 157911 Insulating Foam Sealant on Amazon will dry within fifteen minutes.
Begin this process the same way as patching other holes and clear away any cracked or broken drywall. Once the area is clear, apply the foam to the inside edges of the hole. The foam will expand to fill the area. If you're unfamiliar with expanding foam or are trying a new brand, it's a good idea to do a few test runs on cardboard. Once the foam hardens you can use a razor blade or a saw to gently cut through the excess sticking out; you'll want to be careful not to dislodge the foam while cutting. You may need to apply some mud or sand on the surface to make it flush with the wall depending on the hole. From there you can layer tape over it if necessary. Although this hack might also work for medium holes, it's not appropriate for larger holes unless you provide some kind of backing to prevent the foam from falling behind the drywall.
Save drywall scraps to create patches
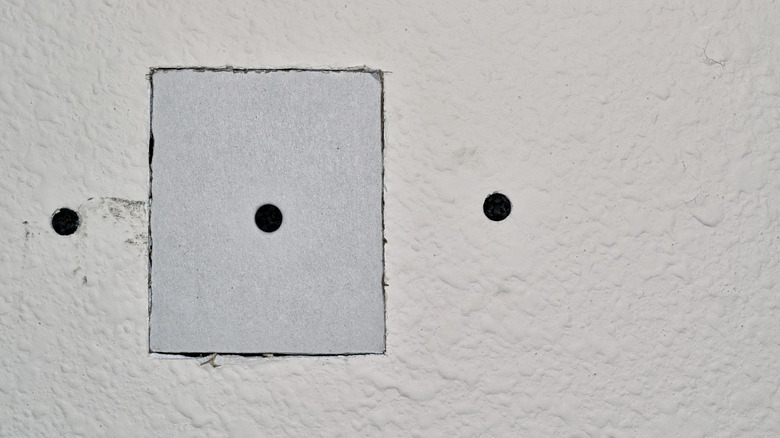
Small and large blemishes are nearly inevitable when it comes to drywall. If you're starting a new drywall project or if you're buying a new sheet to make a repair, hang on to those scraps. Stash the extras somewhere that they can lay flat and won't get wet because they can be used as patches down the line. A sheet of drywall can range from about twelve to thirty dollars at Lowes, and you'll likely only need a small section for repair patches, so keep the scraps on hand.
Applying a patch with drywall will require precise cuts, which means you should measure carefully and trim as you go. The patch will need to fit very snugly into the hole and one stray cut could render your piece useless. Another tip when using a drywall patch is to give yourself something to hold onto. Drilling a screw into the patch or even taping a string to the back of the patch will go a long way when you are positioning it. Because the patch must fit so snugly, you don't want to push too hard and drop it on the other side of the wall. If that happens, you should move on and start hunting for another scrap. Apply joint compound to the edges of the patch. Once it's in place and dry, sand the edges and apply tape to ensure a smooth and sturdy seam.
Use toothpaste and other household items to fix small holes
This might sound like an old renter's trick, but there are a few items around your home that can work great when repairing thumbtack holes and other minor blemishes. If you're a DIY expert that loves to complete projects on a budget, head to your bathroom cabinet. Toothpaste dries in a similar way to spackle, which means a dollop can be applied to a small hole. Smooth out the surface and allow it to dry overnight. This works best on white walls with white toothpaste.
Another trick is to make a paste out of baking soda, a few drops of water, or even a bit of glue for some extra strength. Mix the ingredients until you have a sticky paste-like consistency. Apply the combination to small holes on white walls and give it time to dry. This hack also works great on cracked corners that you want to reinforce. The glue will dry and pull the seams together without undertaking a full repair job. For an extra finished touch, you can use a putty knife for a smooth surface that will look just like a spackle job. Some holes are so small that they're difficult to fill. Consider carefully making the hole larger so it can be filled thoroughly, and you've got an easy fix on a budget.