Don't Throw Out Old Pillowcases: 9 Clever Hacks To Reuse Them
We may receive a commission on purchases made from links.
Pillowcases only last one to two years before becoming too worn and faded for further use. They may not be as vibrant and cozy as they once were, outliving their original purpose. However, old pillowcases aren't always destined for the trash. With some creative upcycling, they can still have value and time on their side.
Below are nine clever hacks that upcycle pillowcases for other household uses. Both worn and like-new pillowcases are useful materials for other ventures. Those with pretty patterns and vibrant colors that hardly look used can be repurposed as home decor. Worn-down pillowcases can also be put to use as cleaning and laundry tools. In short, there's bound to be some way to repurpose an old pillowcase that's far more productive and eco-friendly than throwing it away. If done right, they can boost your interior design, make cleaning easier, and help keep fabric out of landfills. Read on to learn what makes these hacks so clever and how to put them into action.
Sew a themed coaster and bar towel set for a kitchen or home bar
Don't let pillowcases with fun designs and patterns go to waste. Upcycle these colorful fabrics into themed designs for holidays, events, and other special occasions. A single pillowcase has plenty of material for making coasters and bar towels. In fact, TikToker @redeux_style repurposed just one case into six coasters and a bar towel. Some ideas for using this can include cutting up a floral pillowcase for a springtime theme or upcycling a pink and red striped pillowcase for Valentine's Day. Because the goal is to create themed decor, avoid doing this hack with plain white pillowcases. A white coaster and bar towel set will stain easily and won't have the same decorative appeal for kitchens, breakfast nooks, and home bar decor.
This DIY requires sewing, but it's easy enough for beginners. Cut the pillowcase in half, using one side for the coasters and one for the bar towel. Cut the coaster side into 12 even pieces and follow @redeux_style's instructions for sewing them up correctly. It helps to have a nonslip ruler like the Omnigrip by Omnigrid Non-Slip Ruler to ensure you cut and fold even lines throughout the process.
Turn a pillowcase into a decorative woven basket liner
Woven baskets add aesthetic value and storage space to rustic and modern-style homes. Upgrade a woven basket you already own or DIY stylish storage with a clever delivery box hack. Lining the inside with a pillowcase makes the basket more decorative and provides a smooth and soft surface for item storage. This is especially useful in bedrooms where former pillowcases and sheets likely already match the interior design.
Even if you DIY the basket base instead of purchasing one, this project is easy to complete. Choose or craft any size basket you want. Ensure it doesn't have a lid or top if you want the pillowcase and the contents to be visible. You may need more than one pillowcase for larger baskets, which can lead to unsightly seams if you aren't adept at sewing. On the other hand, a small basket will be dwarfed by the pillowcase. It's much easier to fix up a smaller basket and liner by either cutting down the pillow case or folding it over multiple times. When the basket is finished, simply open the pillowcase and tuck it into the basket. Keep the liner in place using a Krightlink Hot Glue Gun Kit and Glue Sticks. When you have finished, you can use this pillowcase for closet organization and storage, as well as for other rooms and purposes.
Reupholster an ottoman with a new pillowcase pattern
If you're growing bored of your old ottoman, consider upgrading it with a pillowcase. Hiring a professional to reupholster an ottoman can range from $300 to $700, but the cost of DIYing your own using a pillowcase is a fraction of that. Depending on how exciting your pillowcases are, you can dress up this furniture with a one-of-a-kind pattern or in a single shade that befits the rest of the living space.
Start by cutting the vertical and horizontal pillowcase seams. Then detach the ottoman cushion and lay it upside down in the center. Tuck the pillowcase sides over the ottoman, using a staple gun like the ThinkWork Light Duty Staple Gun to tightly affix the pillowcase in place. Even if you don't have a staple gun, this project is doable for less than $15, and it has a homemade touch, making the DIY process and results far more valuable than expensive professional upholstery.
Repurpose a pillowcase into one-of-a-kind cushion covers
Make use of cozy pillowcase fabric and turn old cases into slightly smaller cushion covers. These cushions can be thrown among the other pillows on a bed or be used to accent sectionals and sofas in other living spaces. There are methods that use sewing and approaches that use no-sew methods, giving any DIYer the potential to upcycle their pillowcases for decorative cushions. Keep in mind that this hack only works for small accent cushions, not full-size sofa cushions, which would take more than one pillowcase to cover.
The no-sew method is easiest: Tuck the cushion all the way to the bottom of the pillowcase, flatten it, and slowly tuck in the pillowcase fabric until you have a smooth, covered cushion. There's no need to permanently alter the pillowcase if using this method. Because it's not cut or sewn, you can repurpose it into other pillowcase hacks in the future. This trick is also usable beyond turning old pillowcases into cushion covers, and HGTV's Nate Berkus uses a similar hack to form-fit pillowcases to standard pillow inserts.
Sewing takes a bit more time, but sewed cushions hold up better to general wear and tear. Unfortunately, there's no going back after a sewing job — the stitches and cuts are permanent. Make sure the pillowcase is at least 1 inch longer than the cushion on all sides before pinning it in place and sewing it. If you want a more creative cushion cover design, TikToker @melissa_jade_at_no_60 cut off excess strips of fabric and sewed them to the open side of her pillowcase cushions. The result was a decorative tie-close design that also makes it easy to swap out cushion covers when the mood strikes.
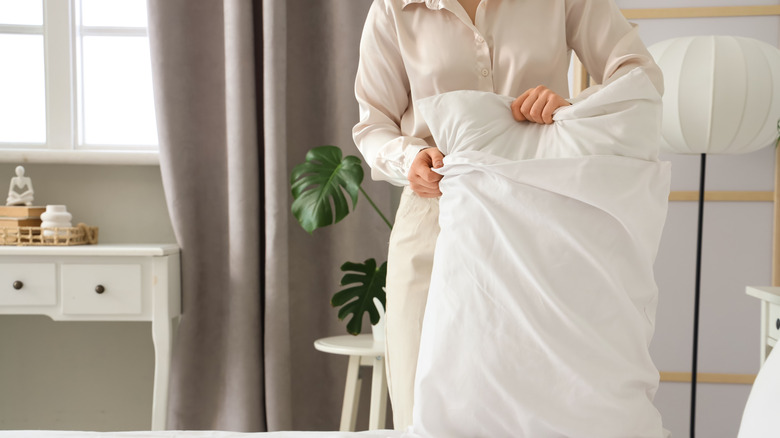
Make a cozy cat bed or small dog bed out of a pillowcase
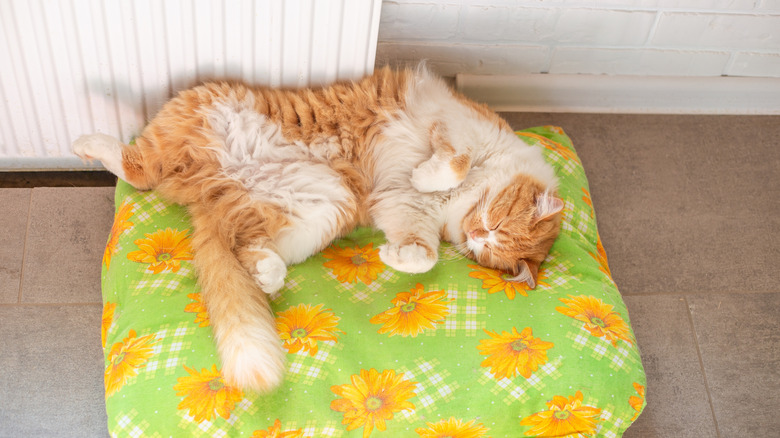
Your pillowcase may have served its time for you, but other members of your family may appreciate the hand-me-down. Turn the pillowcase into a luxurious bed for your beloved dog or cat. Most pillowcases are already sewn closed on three sides and have a rectangular shape similar to buyable cat and tiny dog beds. With the right filler material, they'll turn into a comfy pillow. As an added bonus, the pillow pattern may match your bedroom color scheme.
Animals aren't usually as picky as people when it comes to comfort. Simply take the old pillowcase and stuff it with old clothes, rags, or blankets. You can also use craft material designed as filler for projects like these, such as The Original Poly-fil® Premium Fiber Fill Bag. It should take roughly 16 to 24 ounces of the polyester fiberfill to fill a pillowcase. Put the pet pillow on couches or beds to keep your pet from directly shedding and resting on your furniture. Or place it on the floor in the corner or against a wall, so they have their own space.
Designate an old pillowcase as your delicates laundry bag
Protect your laundry delicates with a simple pillowcase hack. If your pillowcases are worn and thin with time, they're perfect tools to protect delicate materials like silk, wool, and velvet fabrics. The thin material also protects clothing decorated with embroidery and fragile embellishments. When you toss all of your laundry in the wash, delicate garments get snagged on tougher clothing's zippers and buttons or even the washer's agitator. A pillowcase prevents these snags while still being permeable enough for water and soap to wash the garments.
This trick is one of the simplest on this list. All you need is the pillowcase and your delicates. Drop the delicates into the pillowcase, knot it shut, and throw it in the wash. Just be sure to also follow wash and dry instructions for your garments — a pillowcase can't protect it from the extreme heat of a dryer. On another note, attempt this hack only with a very lightweight or worn-down pillowcase. Thick and heavy fabric without much wear and tear might soak up too much water or not let enough through to properly wash your clothes.
Store a pillowcase with your suitcase to use as a travel laundry bag
Pillowcases make excellent laundry bags beyond your home, and you can make good use of them even while abroad. People often forget to account for their laundry when packing for a short or long trip. With only one or two suitcases, it's important to differentiate between dirty and clean clothes throughout your travels. An old pillowcase is easy to stuff among your other belongings and makes a great lightweight carrier for dirty clothes as days go by. You can also use the pillowcase to hold undergarments, socks, and other smaller garments, making them easier to find in a suitcase full of stuff. The pillowcase can also hold shoes so dirty soles don't get on clean-packed clothing.
There aren't any hidden tricks to this pillowcase hack. Keep the opening of the makeshift pillowcase travel bag closed with a hair tie, belt, or other accessory. Another option is to knot the top of the pillowcase into itself to keep its contents secure. Dump the entire pillowcase full of dirty clothes into a washer at the end of your trip to make laundry and unpacking even easier.
Craft vintage cafe curtains from an old pillowcase
Clever DIY café curtains add a quaint charm to kitchens. They filter light and add privacy, making living spaces cozier while adding decorative appeal. These curtains aren't necessarily expensive, but refashioning pillowcases into café curtains is a great way to use something you would otherwise throw away. Especially if your pillowcases have colorful chevron, floral, or striped designs that emulate a vintage era. Pillows with ruffled edges are even better for this mini project because ruffles have more stylish appeal than a straight curtain.
This pillowcase hack requires minimal tools, and sewing is optional. Rip or cut the pillow at the seams, fold down the edges, and hot-glue or sew them down. If your pillows have additional ruffled edging, ensure they're at the intended "top" of your curtain design. Cafe curtains hang mostly untouched, so you don't have to worry about wearing the glue down with excess washing or regular wear and tear for years to come.
Use an old pillowcase to wipe down and catch dust from ceiling blade fans
If you have no desire to use your pillowcase as decor or bring it along on your travels, turn it into a clever pillowcase cleaning hack. When cleaning your home, it's easy to remember the things directly in front of you and beneath your feet. However, many people forget to look up. If your ceiling fan hasn't been cleaned in a while and a thick layer of dust clings to the blades, a pillowcase is a two-in-one solution. The fabric case catches the debris as it's dislodged, keeping piles of dust from fluttering around a room and creating another mess.
Stand on your bed or use a stepladder to put yourself at the proper height to reach the fan. Open the pillowcase and close the opening around the fan blade, pressing it together to trap the debris. Slowly pull the closed pillowcase off the fan blade, keeping the dust contained as you remove it. Repeat with each blade until your fan is almost completely clear before spot-cleaning any missed spots with a paper towel. When finished, dump the pillowcase's contents into the trash, wash it, and reuse it.
Keep in mind that this hack isn't necessarily helpful for less extreme fan cleanings. There isn't always excessive dust to catch. If the buildup on the fan blades isn't too bad, use a simple dusting tool with an extension rod like the Heonay Ceiling Fan Cleaner Duster and save the pillowcase for more severe cases.